Making the Ultimate Retrobrighting Box
In this video I'll explain how top make this box for retrobrighting aka removing yellowing from plastic. More info of the actual retrobrioghting process can be found from this tutorial https://youtu.be/jdWRsjnVD3s
Parts list at the bottom
First you need a box. Make sure it's as big as you will ever need. I recommend buying 2 of them (if it's transparent). This way you have the largest possible container to but your yellowed item in when you stack them inside each other. I always recommend using as small continer as possible, and especially one with the smallest possible surface area, this will minimize evaporation and save you some hydrogen peroxide.
The box is lined with aluminum tape to keep in the heat and light better. Aluminum tape is real metal so it is conductive, I used transparent tape to isolate my UV LED strip from the metal to reduce the risk of shorting. The strips were attached inside the box and the lid of the box with even spacing. Next the strips were soldered together and the strips on the lid were connected to the other strips with a long wire to allow enough movement for the lid.
Next I used W1209 temperature control board. It's a board which can be used to turn on and off heating/cooling devices based on temperature. here's a complete guide for the settings: http://www.kelco.rs/katalog/images/17670.pdf
The important settings are, P0, you need to choose H for heating. (you can use this to control AC or a fan and for cooling, thee you would choose C). For P1 I used the standard 2.0. This determines how much bellow of the target temperature the temperature need to go before the heater turn on. I set my target temperature for 50 degrees Celsius (ALL THE TEMPERATURES DISPLAYED ARE CELSIUS!). So with my settings when the temperature drops bellow 48 C it will start heating again and stop at 50 C.
In this setup I made 3 separate circuits. 1. LED lights, which are controlled by the green switch and the power input is on the left. I use 12V for that because that's what my leds are rated for. 2. Circuit for the heater. It goes from the middle power plug to the heating unit through the relay on the W1209 board (KO and K1 connectors) There is no switch because the relay will turn heating off when the power of the control board is off I use 12V power and 12V heater for this ( but the heater can easily be upgraded to one that uses mains power if needed). 3. Power for the control board. It goes from the rightmost power plug to the positive and negative terminals on the W1209 board. It's very important to only use 12V power on this one, higher voltage will break the board.
As mentioned for the heater I chose 12V submergeable heating unit. I felt this is the safest option as I only need to make sure it will stay in the solution to prevent it from over heating.
The bellow links are affiliate links and I get a small commission if you buy anything from the site after using the links. To support my channel you can do all your online shopping through these links.
Here is the parts list:
Aluminum tape: https://amzn.to/2S3C6s1
UV LED strip: https://amzn.to/3vogftL
Controller board (W1209): https://amzn.to/3aIpoWn
Heating element: https://amzn.to/3aLud0Z
Power source: https://amzn.to/32QMg1h
Power jack: https://amzn.to/3tX4udH
Switch: https://amzn.to/2PvnqRK
Pair Wire: https://amzn.to/3dSXNUi
Tools:
Electric screwdriver: https://amzn.to/2QsZf75
Soldering station: https://amzn.to/3xrpv25
Wire stripping tool: https://amzn.to/3u10E2F
Hydrogen peroxide: https://amzn.to/2K5OmTS
Flux paste: https://amzn.to/2R3Idfw
Hot glue gun: https://amzn.to/32RGlZQ
Видео Making the Ultimate Retrobrighting Box канала Odd Experiments
Показать
Комментарии отсутствуют
Информация о видео
Другие видео канала
 How to Remove Rust with Electricity - Electrolysis Rust Removal - Restoration Tutorial
 Repair & restoration of a scratched PS2 game disc - Howto resurface discs
 Restoring Giant Lego Stormtrooper - A Star Wars Restoration
 How To Restore Headlights PERMANENTLY ( Better Than a BRAND NEW Headlight )
 How to make simple DIY nickel plating set up - Easy Electroplating for Beginners
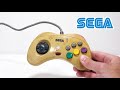 I Restored The Yellowest Sega Saturn Controller
 Restoring RARE Casio Heli-Battle Console - Retro Game Restoration
![[NEW] Simple Electronics Project](https://i.ytimg.com/vi/Q0egyvceEtQ/default.jpg) [NEW] Simple Electronics Project
[NEW] Simple Electronics Project I restored this rusty $1 can opener to find out It’s worth MUCH more…
 Dead Old Battery Restoration
 Adventures in Retrobrite - New techniques for restoring yellowed plastic!
 Nintendo Console Restoration - Yellowed Plastic Retrobright
 Restoring Old Rusty Table Fan with Laser Cleaning
 WWII Flashlight with Rust Holes - Restoration
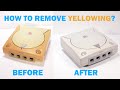 How to remove yellowing from old plastic (retrobright) the BEST method
 Mercedes E300 Full Leather Interior Repair | COLOURLOCK
 Easy DIY - How to make egg hatching incubator
 IS THIS MAGIC? This Fan Has No Blades | Fan Showdown S2E3
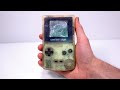 I Restored This 2$ Ebay Junk Game Boy Color - Retro Console Restoration & Repair
 Broken & Yellowed Nintendo GameCube Controller Restoration - Retro Console Repair