Machinists wood tool box restoration.
Restoration of a fantastic little tool chest i found going cheap at a boot sale!
https://youtu.be/-1VL5gDvCX4 you decide my new tool box!
This very well made old tool chest was a great fun restoration. I hope you enjoy this as a good example of the sort of things i source and buy to restore or repurpose for pleasure, mainly to furnish my little "wacky warehouse" workshop/home
Once i have restored them i often can't bring myself to part with them! and so this little box belongs to me for a good few years yet!
I hope you enjoy my latest video too! 😊 https://youtu.be/ImKGzLbf5_w
while your here check out my library of videos, it would help me tremendously
Thank you for watching from where ever you are in this beautiful world!
Got everthing crossed hoping this is going to be my first ever 1 million view video😊
Restoration project of a well used six drawer tool chest, gets restored to it's former glory!
restoring an Engineers/ machinists wooden tool box projest become my favourite restoration so far!. I paid £25.00
Neslein branded oak tool box found at a local car boot sale It was full of vintage tools and drill bits and in a very sorry state perfect so. Time for a restoration and rescue! .
These boxes were produced in the 1940s - 50s era and were popular as apprentice boxes, bought by the engineering company or by the apprentice themselves to store drills guages ,bits and bobs usually associated with the light engineering trade. Made of oak and some teak it has machine made dovetails to the cabinet edges and draw fronts.The box when found was covered in grease , oil and metal filings which were embeded to the original green baize draw linings.
The leather handle was broken and falling to pieces but still salvageable. luckily all the tiny bakelite draw handles and lock hasp are present but unfortunately we have no key!
Removal of the fittings was a simple task and all metal was dropped into a chemical rust remover which also works well in dissolving the oil and grease away ready for a gentle wire wool cleaning , the thin chrome is more or less worn away on the handle caps but these brightened up quite nicely and were deemed presentable enough for re-use.
The Neslein lock was still hanging onto some chrome finish which gave the final piece some charectar as i didnt want it to look brand new!
The smelly and greasy baize was removed completely and will be renewed with some nice sticky back green baize style fablon.all the remnants of varnish are stripped back to the bare wood using a gel paint stripper which is water neutralized.
Once the wood is dry i sanded taking care to follow the grain with a wet and dry p100 grit carbide sandpaper, taking care to keep the original logo intact although these are both worn and chipped they will be kept in place to add some character and orignality, however small they are important and worth saving.
The door of the cabinet was warped and the joints loose and easily came apart i managed to heat up the warped wood with a steam iron and the press it flat between two scraps of wood , after a day of being tightly clamped i used some gorilla glue to re set the joinery after cleaning old residual remnants of glue from the simple slide mortice joints .
Once dusted the wood will be stained to match the darkest part of the box which was one of the small draw fronts possibly teak? and with some vintage rosewood spirit wood stain ,Label reads 34p BY HECK those were the days .When the stain dried i then used 00 guage wire wool to knock back any excess stain from the surface of the wood to reveal the grain. After this another light sand is required with 240 grit paper before using a tac cloth to remove any fine dust residue and I then apply a Liberon pale french polish with a squirrel hair mop, always try to apply the polish liberally and without using any unnecessary back and forth brush strokes.
After 4 hours in a nice warm room the polish is dry and ready to be lighty rubbed down with 240 grit fine sandpaper the dust again removed before i then apply a coat of spirit based clear varnish with a modified pure bristle brush.
This coat was allowed to dry for well over a day before sticking the baize to the draw bottoms and slide out door.
The leather handle was repaired using some scrap red leather which i dyed with a black shoe polish taking care to hide any visible red edges showing on the repair.
After we sprayed the remainders of the original handle with a thin coat of upholstery glue i was able reinforce the original leather and make a good repair the flexible steel insert gives the whole thing its strength back.
Thank you for watching please share and subscribe and maybe take a look at some of my other restoration videos of furniture, mirror frame and travel box etc .
Видео Machinists wood tool box restoration. канала Instone09ine
Показать
Комментарии отсутствуют
Информация о видео
Другие видео канала
 Machinist's Tool Chest Made From Scrap Pallets
 1929 Air Compressor Restoration - Restored to New Condition - I Didn't Think It Would Run
 Extreme restoration of an old (and seemingly fine) chair
 Restoration of Vintage TANK
 "The Disassembly" Restoration of a 1918-1920 UNION TOOL CHEST CO, Inc Machinist Tool Chest Part - 2
 Rusty old toolbox - Perfect custom restoration
 Steampunk Industrial Bookcase. An Unusual Piece of Furniture made of Pallet Wood and Up-Cycled Junk.
 The Nicest Thing I’ve Ever Built | 100 Hour Hand Tool Cabinet Build
 Antique lamp table total restoration
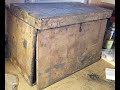 Restoration of a 1918-1920 UNION TOOL CHEST CO, Inc. Machinist Tool Chest Part - 1
 Steampunk Apothecary Chest Coffee Table Made From Pallet Wood and Recycled Copper.
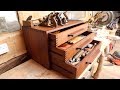 Handmade Box Joint Tool Cabinet From Free Reclaimed Wood
 Gerstner & Sons Tool Chest Restoration
 WWII Flashlight with Rust Holes - Restoration
 I Found A Mid Century Credenza On The Side Of The Road And Restoration Ensued.
 Restoration 80's Sewing Machine Very Old / Classic Style Machine Restoring
 1985 Vintage Scale Restoration - OLD to GOLD
 100 Drawer Workshop Organiser Made From Pallets. Over 1000 Separate Pieces.
 Toolchest build part 1: the carcass
 Water lock valve old giant Restoration | Restore Locking device liquid pressure