Best OBS Settings for Recording 1080p 60FPS Low End PC (NO LAG)
Best OBS Settings for Recording 1080p 60FPS Low End PC (NO LAG). This benchmark tutorial guide covers how to use OBS Studio to record screen along with the best optimization tips and tricks for achieving the best OBS recording settings for quality and performance in OBS Studio on Windows 11/10 PC & Laptops. Multiple stream output resolutions are compared (1080p / 936p / 864p and 720p 60fps) to give you the best OBS Twitch settings for smooth, crisp, stable and high quality CS2, Valorant, Fortnite, Warzone, DOTA 2, Tf2, PUBG, Apex Legends, Overwatch 2, RDR2, FiveM, Rainbow Six Siege and Call of Duty (COD) streams on a variety of hardware encoders, such as NVIDIA NVENC, AMD Advanced Media Framework (AMF), Intel Quick Sync Video (QSV) and Apple VideoToolbox (VT). This tutorial was made for Twitch partners and affiliates in mind. If you've experienced frames missed due to rendering lag or skipped frames due to encoding lag, the information in this #shorts video will help you troubleshoot and eliminate lag, frame drops and stuttering whether you're on a low, mid or high end PC setup for a smoother experience.
Twitch: https://twitch.tv/shogoz
My Discord: https://discord.gg/cdtYsepDbk
To achieve the best OBS settings for recording, it’s important to adjust your configuration based on your system's capabilities. For users with lower-end PCs, the best OBS settings for recording low-end PC involve using hardware encoding options and lowering the bitrate to ensure smoother performance. If you're aiming for best OBS settings for recording 1080p 60fps no lag, you’ll need to fine-tune both your resolution and bitrate settings. The best OBS settings for recording 1080p 60fps provide a clear and smooth output, and ensuring the use of 1080p 60fps ensures high-definition recording. To achieve 1080p 60fps no lag, choose settings that match both your CPU and GPU performance. For best OBS settings, ensure you're using the correct encoding method and adjusting for your system's power. When considering how to set up OBS for recording, simply launch OBS Studio and configure the output settings. OBS Studio for recording screen allows you to capture your entire display or specific windows easily. If you're unsure how to use OBS Studio to record screen, just select the display or application window you want to capture. How to use OBS Studio and how to use OBS effectively requires adjusting video settings and selecting your recording destination. To get started, you’ll want to know how to record with OBS, which involves setting up a scene and choosing the appropriate recording settings. Lastly, for better performance, use nvidia nvenc for hardware encoding to offload work from the CPU.
Common FPS Values options are: 10, 20, 24 NTSC, 25 PAL, 29.97, 30, 48, 50 PAL, 59.94 and 60 fps.
Twitch's Encoding Guide:
Encoding Performance
Encoding can be taxing on your system. x264 will utilize a lot of your CPU, resulting in lower FPS. Alternatively, GPU encoding (e.g. NVIDIA NVENC) utilizes a dedicated encoder in the GPU, allowing you to play and stream without impacting game performance.
Encoding Quality
NVIDIA NVENC hardware encoder offers consistent quality based on the generation of the encoder. The updated NVIDIA Encoder (NVENC) on Turing-based NVIDIA GeForce GPUs (RTX 20-Series and GTX 1660/Ti) will typically produce superior quality than x264 Fast and on par with x264 medium. While the older generation (Pascal, Kepler) are similar with veryfast/faster quality.
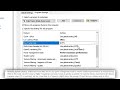
Nvidia's overview of the output settings:
Encoder: software vs hardware encoding options
Rate Control: This determines the rate at which frames are going to be encoded
Bitrate: Depends on your internet connection speed
Keyframe Interval: Most streaming platforms require a setting of 2
Preset P1-P7: Select Quality
Profile: Set to High. Profile determines a group of settings in the H.264 Codec. It doesn’t impact performance and gives access to a set of features that are key to streaming, so this should always be set to High
Look-ahead: This allows the encoder to dynamically select the number of B-Frames, between 0 and the number of B-Frames you specify. B-frames increase image quality, but they consume a lot of your available bitrate, so they reduce quality on high motion content. Look-ahead enables the best of both worlds. This is CUDA accelerated; turn this off if your GPU utilization is high to ensure a smooth stream
Psycho Visual Tuning: This enables the Rate Distortion Optimization in the encoder, which greatly optimizes the way you use bitrate, improving image quality on movement
GPU: 0. If you have 2 GPUs, you can select which one is used to encode.
Max B-Frames: If you uncheck the Look-ahead option, use 2 B-Frames
#obs #obsstudio #twitch #youtube #tips #tipsandtricks #tutorial #guide #shogoz
Видео Best OBS Settings for Recording 1080p 60FPS Low End PC (NO LAG) канала shogoz
Twitch: https://twitch.tv/shogoz
My Discord: https://discord.gg/cdtYsepDbk
To achieve the best OBS settings for recording, it’s important to adjust your configuration based on your system's capabilities. For users with lower-end PCs, the best OBS settings for recording low-end PC involve using hardware encoding options and lowering the bitrate to ensure smoother performance. If you're aiming for best OBS settings for recording 1080p 60fps no lag, you’ll need to fine-tune both your resolution and bitrate settings. The best OBS settings for recording 1080p 60fps provide a clear and smooth output, and ensuring the use of 1080p 60fps ensures high-definition recording. To achieve 1080p 60fps no lag, choose settings that match both your CPU and GPU performance. For best OBS settings, ensure you're using the correct encoding method and adjusting for your system's power. When considering how to set up OBS for recording, simply launch OBS Studio and configure the output settings. OBS Studio for recording screen allows you to capture your entire display or specific windows easily. If you're unsure how to use OBS Studio to record screen, just select the display or application window you want to capture. How to use OBS Studio and how to use OBS effectively requires adjusting video settings and selecting your recording destination. To get started, you’ll want to know how to record with OBS, which involves setting up a scene and choosing the appropriate recording settings. Lastly, for better performance, use nvidia nvenc for hardware encoding to offload work from the CPU.
Common FPS Values options are: 10, 20, 24 NTSC, 25 PAL, 29.97, 30, 48, 50 PAL, 59.94 and 60 fps.
Twitch's Encoding Guide:
Encoding Performance
Encoding can be taxing on your system. x264 will utilize a lot of your CPU, resulting in lower FPS. Alternatively, GPU encoding (e.g. NVIDIA NVENC) utilizes a dedicated encoder in the GPU, allowing you to play and stream without impacting game performance.
Encoding Quality
NVIDIA NVENC hardware encoder offers consistent quality based on the generation of the encoder. The updated NVIDIA Encoder (NVENC) on Turing-based NVIDIA GeForce GPUs (RTX 20-Series and GTX 1660/Ti) will typically produce superior quality than x264 Fast and on par with x264 medium. While the older generation (Pascal, Kepler) are similar with veryfast/faster quality.
Nvidia's overview of the output settings:
Encoder: software vs hardware encoding options
Rate Control: This determines the rate at which frames are going to be encoded
Bitrate: Depends on your internet connection speed
Keyframe Interval: Most streaming platforms require a setting of 2
Preset P1-P7: Select Quality
Profile: Set to High. Profile determines a group of settings in the H.264 Codec. It doesn’t impact performance and gives access to a set of features that are key to streaming, so this should always be set to High
Look-ahead: This allows the encoder to dynamically select the number of B-Frames, between 0 and the number of B-Frames you specify. B-frames increase image quality, but they consume a lot of your available bitrate, so they reduce quality on high motion content. Look-ahead enables the best of both worlds. This is CUDA accelerated; turn this off if your GPU utilization is high to ensure a smooth stream
Psycho Visual Tuning: This enables the Rate Distortion Optimization in the encoder, which greatly optimizes the way you use bitrate, improving image quality on movement
GPU: 0. If you have 2 GPUs, you can select which one is used to encode.
Max B-Frames: If you uncheck the Look-ahead option, use 2 B-Frames
#obs #obsstudio #twitch #youtube #tips #tipsandtricks #tutorial #guide #shogoz
Видео Best OBS Settings for Recording 1080p 60FPS Low End PC (NO LAG) канала shogoz
best obs settings for recording best obs settings for recording low end pc best obs settings for recording 1080p 60fps no lag the best obs settings for recording 1080p 60fps best obs settings for recording 1080p 60fps 1080p 60fps 1080p 60fps no lag best obs settings how to set up obs for recording obs studio for recording screen how to use obs studio to record screen how to use obs studio how to use obs how to record with obs how to set up obs nvidia nvenc shogoz
Комментарии отсутствуют
Информация о видео
23 декабря 2024 г. 5:39:40
00:00:12
Другие видео канала