Retro Funk Canes | Polymer Clay Cane Tutorial for Beginners
Kaleidoscope Polymer Clay Cane Tutorial | Mirror Canes | Polymer Clay Canes for Beginners
In this polymer clay canes for beginners tutorial, I'll be showing y'all how to make 3 different retro funk cane designs using a fun technique by making clay snakes and assembling them.
While these may look complex, they are actually great beginner canes that are fun to make and allow you to experiment in the process even if it gets messy, you'll be able to create unique and interesting designs. The key is to not get too caught up in perfection. This cane tutorial will only require basic tools such as your hands, a roller, and a blade. So let's get started.
STEP 1: Choose 4 Colors, Create & Mold Cane SnakesEach of the 4 colors of clay, should be about 1/4th of a block. I'm doing some retro funk themed colors using Fimo Pro as my clay brand. Roll each color into snakes that are 1/4th of an inch in diameter. Each snake should be about 9-inches or longer. Next, pinch the clay snake between both thumbs and forefingers. This will form the diameter into a smooshed diamond shape. After that, cut each snake into about 1.25-inch lengths so that you get multiple pieces to assemble your cane.
STEP 2: Assemble the CaneTo start off, you can choose a light colored clay. Next, build up a column of 4 pieces of the same colored clay by attaching each piece side by side. The next step is to fill in the front and back sides of the column of clay. You want to choose a contrasting color for this. Fill the 3 gaps on the front and the 3 at the back. After you filled in the sides of the center column with 3 colors, continue to fill in the gaps with the remaining colors altering between using 4 and 3 pieces.
STEP 3: Compression & ReductionCompress the block into a rectangular shape. Apply further compression and reduction techniques to reduce the cane to 7 inches in length. You don't have to do this, but at this stage I've made 2 copies of this cane in order to show you how to make different variations from this point, one will be used for 2 variations of kaleidoscope designs in SEC 4, and the other will be used for 1 mirror cane design in SEC 5.
SEC 4A: Kaleidoscope CanesKaleidoscope Canes are made up of 6 equilateral triangles or 3 diamonds. Take the cane you've just created and trim off the distorted ends. Cut the cane into 4 equal sections and stack one over the other. You do not need to match the patterns. In fact, the less perfect the assembly, the more interesting the finished pattern will be. Then compress the cane into a square and reduce it to 7-inches long again. You should have reduced it to 7-inches for your cane.
SEC 4B: Kaleidoscope Cane Design #1:For the first variation, take the square loaf from the starting point from SEC 4A, and pinch the cane into a triangle shape. Depending on where you pinch it, will affect the look. For this variation, i'm pinching in front of the column. After that, cut the cane into 3 equal lengths and assemble the pieces into a fanlike semicircle. Then, cut that cane in half. Take the two halves and piece them together to form a completed hexagon or circle shape. Now you have your completed kaleidoscope cane design.
SEC 4C: Kaleidoscope Cane Design #2:For the second variation, instead of pinching in front of the column, i'll be pinching parallel to the column as opposed to perpendicular. Go through the same process as previously.
SEC 5: Mirror CanesMirror canes, are made up of 4 mirrored sections that mirror along 4 sides. So i'll be creating a mirror cane, and using the slices to assemble a mirror pattern. To make a mirror cane, i'm grabbing the extra duplicate cane I created in STEP 3. Cut off the distorted ends, then cut it into 4 equal lengths, stack them on top of one another. Then compress the cane into a square. After it is a square, reduce it to 7-inches long again. Then pinch parallel to the core center column across the length of the cane to turn it into a triangular shape. Cut it into 2 pieces, then mirror the 2 halves so that it now has a diamond shape.Next, compress the points of the diamond inward to form a square shape. Now you have your mirror cane. In order create the mirror effect, cut out 4 slices, and arrange them, rotate or flip them, so that the pieces mirror each other and you can play around with making your own patterns as your desire.
Contents of this video
0:00 - Introduction to Kaleidoscope Cane Tutorial
0:32 - 1: Choose 4 Colors, Create & Mold Cane Snakes
2:09 - 2: Assemble the Cane
3:44 - 3: Compression & Reduction
4:29 - 4A: Kaleidoscope Canes
5:53 - 4B: Kaleidoscope Cane Design #1:
7:04 - 4C: Kaleidoscope Cane Design #2:
7:55 - 5: Polymer Clay Mirror Canes
Music:
Music: [swingin ballad] by Alexander Nakarada (www.serpentsoundstudios.com)
Licensed under Creative Commons BY Attribution 4.0 License
https://creativecommons.org/licenses/by/4.0/
#polymerclay #polymerclaytutorials #ovenbakeclay
Видео Retro Funk Canes | Polymer Clay Cane Tutorial for Beginners канала Jennifoo
Показать
Комментарии отсутствуют
Информация о видео
Другие видео канала
 Easy Polymer Clay Tribal Pendant Tutorial
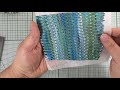 Scrapscape Polymer Clay Tutorial
 Leaf Canes | Polymer Clay Cane Tutorial for Beginners
 How to Reduce Freeform Canes | Polymer Clay Cane Packing
 Spliced Paradox Polymer Clay Cane Tutorial
 Polymer Clay Scrap Technique: Stroppel Cane
 Rainbow Burst Polymer Clay Cane Tutorial
 32 Most Adorable Polymer Clay Hacks
 Introduction to Millefiori Cane | Polymer Clay Cane
 Polymer Clay Tutorials - How to make a flower cane
 Clay Pasta Machine | Pasta Machine For Clay | Tips & Tricks
 Can You Make A Polymer Clay Retro Cane Without An Extruder?
 Polymer Clay Canes for Beginners | Gradient Canes
 Getting Started with Polymer Clay: Striped Border Cane Tutorial
 Polymer clay tutorial murrina petalo Arancio / millefiori cane Arancio
 Polymer Clay Zipper Cane Mini Tutorial
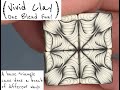 One Blend Fun! Polymer Clay Cane
 Bargello technique +bonus - polymer clay tutorial 003
 Polymer Clay Simple Flower Petal Cane Tutorial
 🎄 Making Polymer Clay Christmas Canes: Peppermint Candy, Star Canes.