etrailer | Atwood Gas and Electric RV Water Heater Installation - 2010 Coachmen Concord Motorhome
Click for more info and reviews of this Atwood Water Heaters:
https://www.etrailer.com/Water-Heaters/Atwood/at96161su.html
Check out some similar Water Heaters options:
https://www.etrailer.com/dept-pg-Water_Heaters-pt-Gas_and_Electric.aspx
Search for other popular Coachmen Concord Motorhome parts and accessories:
https://www.etrailer.com/vehicle/2010/Coachmen/Concord+Motorhome
https://www.etrailer.com
Don’t forget to subscribe!
https://www.youtube.com/user/etrailertv
Full transcript: https://www.etrailer.com/tv-install-atwood-rv-water-heater-2010-coachmen-concord-at96161su.aspx
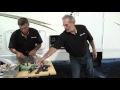
Today on this 2010 Coachmen Concord we're going to review and install a Dometic RV water heater, part number AT96161SU. This is what our water heater looks like when it's installed. Let's go ahead and take a look under the cover here. Couple things to know about our water heater that this is a gas powered water heater. It has a automatic pilot light. This also has an electric water heater element on the other side of the gas tank, which you can't see from the outside.
Depending on what kind of hookup you have at your campsite, you can use gas or electrical. Now this unit is designed to put out 18 gallons of hot water per hour. This unit has an automatic pilot gas burner that heats water once the destination is reached and this will automatically relight as needed to keep the temperature of the water. When this unit is running in gas mode, this unit has an 80% efficiency rating. Now what you can't see on the inside of the tank is that it has an aluminum clad tank, which will help prevent corrosion over long term on the inside from calcium buildup. Now this unit is thermostatically controlled to prevent overheating.
On the inside here is a high temperature switch that automatically turns it off if a too high of a temperature is reached for added safety. One last little detail is that this does come with a pressure relief valve as well. First part of our install is to get access to our water heater, so we need to open up the panel to get to it and then we need to disconnect our electrical and our water lines. Before we do any work, you want to make sure all the gas is turned off and the electrical turned off and all the plumbing is drained. First off we need to remove our fasteners for plumbing. Now there's probably different versions for different RVs, but I started this one off with channel locks and just kind of broke it loose a little bit and you're able to unthread it.
Be careful when you remove it so you can reuse it again for your reinstall on the new water heater. Top one's done, let's do the bottom one. Get that guy loose, now our electrical, typically it's in a junction box so we'll go ahead and pull that loose and get access to the wiring nuts. This part you want to double check to see what colors going to what, so we've got our ground, our bare wire ground, going to green. Looks like white to white and black to black, so it's pretty easy to disconnect and reconnect. Make sure all our wires are freed up.
Next up we've got to remove our conduit here from this junction box. Now yours may have this or it may not. We'll loosen this nut up here, remove the conduit, and then go ahead and pull out our wires. At this point, our old water heater should be freed on the inside. Let's go do everything on the outside next. Outside the RV let's go ahead and open up the access panel here. We need to save this panel so let's go ahead and remove it. They have these little spring clips right here. If you push this in, then you pop it off the back side. Free it from these two clips and you can slide it off. This other side will slide right off the hinge. Let's just gently work them out. Let's go ahead and disconnect our gas connection here, break it loose with a wrench and back off our flare fitting here. Next up is the ring of fasteners going all the way around the edge of our water heater here. Now our fasteners are kind of common here. You can use two different bits on them. You can use a #2 Phillips bit or a #2 Roberts bit, or also known as a square drive. I'm going to go ahead and take them all out. Now I'm taking a little pry bar here and just popping it loose all the way around. This can be a screwdriver, nothing fancy. Should be able to work it out. Getting there. Now these wires we didn't really have access to the inside so we had to pull out the water heater just enough so we could get access to these guys. This is going to be an optional step. I'm going to take this conduit end and transfer this from our old unit over to the new unit. There's just a little ring, you just kind of loosen up with a screwdriver, and we'll get this ready and take it to the other side. Our new one, we'll pop off the lid. There's a slot right here for a screwdriver, just kind of pops up. Again this is optional. This is a clamp right here for the wires. If you want to use it great, if not it's optional. I'm just going to make it
Видео etrailer | Atwood Gas and Electric RV Water Heater Installation - 2010 Coachmen Concord Motorhome канала etrailer.com
https://www.etrailer.com/Water-Heaters/Atwood/at96161su.html
Check out some similar Water Heaters options:
https://www.etrailer.com/dept-pg-Water_Heaters-pt-Gas_and_Electric.aspx
Search for other popular Coachmen Concord Motorhome parts and accessories:
https://www.etrailer.com/vehicle/2010/Coachmen/Concord+Motorhome
https://www.etrailer.com
Don’t forget to subscribe!
https://www.youtube.com/user/etrailertv
Full transcript: https://www.etrailer.com/tv-install-atwood-rv-water-heater-2010-coachmen-concord-at96161su.aspx
Today on this 2010 Coachmen Concord we're going to review and install a Dometic RV water heater, part number AT96161SU. This is what our water heater looks like when it's installed. Let's go ahead and take a look under the cover here. Couple things to know about our water heater that this is a gas powered water heater. It has a automatic pilot light. This also has an electric water heater element on the other side of the gas tank, which you can't see from the outside.
Depending on what kind of hookup you have at your campsite, you can use gas or electrical. Now this unit is designed to put out 18 gallons of hot water per hour. This unit has an automatic pilot gas burner that heats water once the destination is reached and this will automatically relight as needed to keep the temperature of the water. When this unit is running in gas mode, this unit has an 80% efficiency rating. Now what you can't see on the inside of the tank is that it has an aluminum clad tank, which will help prevent corrosion over long term on the inside from calcium buildup. Now this unit is thermostatically controlled to prevent overheating.
On the inside here is a high temperature switch that automatically turns it off if a too high of a temperature is reached for added safety. One last little detail is that this does come with a pressure relief valve as well. First part of our install is to get access to our water heater, so we need to open up the panel to get to it and then we need to disconnect our electrical and our water lines. Before we do any work, you want to make sure all the gas is turned off and the electrical turned off and all the plumbing is drained. First off we need to remove our fasteners for plumbing. Now there's probably different versions for different RVs, but I started this one off with channel locks and just kind of broke it loose a little bit and you're able to unthread it.
Be careful when you remove it so you can reuse it again for your reinstall on the new water heater. Top one's done, let's do the bottom one. Get that guy loose, now our electrical, typically it's in a junction box so we'll go ahead and pull that loose and get access to the wiring nuts. This part you want to double check to see what colors going to what, so we've got our ground, our bare wire ground, going to green. Looks like white to white and black to black, so it's pretty easy to disconnect and reconnect. Make sure all our wires are freed up.
Next up we've got to remove our conduit here from this junction box. Now yours may have this or it may not. We'll loosen this nut up here, remove the conduit, and then go ahead and pull out our wires. At this point, our old water heater should be freed on the inside. Let's go do everything on the outside next. Outside the RV let's go ahead and open up the access panel here. We need to save this panel so let's go ahead and remove it. They have these little spring clips right here. If you push this in, then you pop it off the back side. Free it from these two clips and you can slide it off. This other side will slide right off the hinge. Let's just gently work them out. Let's go ahead and disconnect our gas connection here, break it loose with a wrench and back off our flare fitting here. Next up is the ring of fasteners going all the way around the edge of our water heater here. Now our fasteners are kind of common here. You can use two different bits on them. You can use a #2 Phillips bit or a #2 Roberts bit, or also known as a square drive. I'm going to go ahead and take them all out. Now I'm taking a little pry bar here and just popping it loose all the way around. This can be a screwdriver, nothing fancy. Should be able to work it out. Getting there. Now these wires we didn't really have access to the inside so we had to pull out the water heater just enough so we could get access to these guys. This is going to be an optional step. I'm going to take this conduit end and transfer this from our old unit over to the new unit. There's just a little ring, you just kind of loosen up with a screwdriver, and we'll get this ready and take it to the other side. Our new one, we'll pop off the lid. There's a slot right here for a screwdriver, just kind of pops up. Again this is optional. This is a clamp right here for the wires. If you want to use it great, if not it's optional. I'm just going to make it
Видео etrailer | Atwood Gas and Electric RV Water Heater Installation - 2010 Coachmen Concord Motorhome канала etrailer.com
Показать
Комментарии отсутствуют
Информация о видео
Другие видео канала
 DIY RV Water Heater Inner Tank Replacement
 Installing a New Girard Tankless Instant RV Hot Water Heater
 Older Atwood RV Water Heater Gets An Overhaul
 Cleaning a RV Atwood Water Heater the right way. PM item
 Atwood Electric Heating Element
 Dometic Atwood GC6AA-10E Troubleshooting NO SPARK | RV Water Heater 91365 Circuit Board Replacement
 How To Replace Your RV Electric Water Heater Element - Suburban Electric Element Replacement
 RV Water Heater Not Igniting Or Staying Lit - Troubleshoot - RV Maintenance And Cleaning
 Dometic/Atwood RV Water Heater Overview, Burp, And Backflush
 Travel Trailer Gas Electric Water Heater Explained 2020
 Step by step how to Replace RV water heater
 Atwood RV water heater circuit board troubleshooting and replacement
 Atwood RV Water Heater Thermostat Troubleshooting & Repair Tips
 Atwood water heater not heating, won't light with wiring and diagnostics - Donald McAdams
 RV Water Heaters - Learn about your RV water heater
 Part 1How to wire the low voltage on a atwood hot water heater
 Removal and Installation of RV Water Heater GC6AA-10E
 RV Water Heater Fail! Don't Make This Newbie Mistake! || DIY RV & RV Newbies
 RV Tankless Water Heater Easy Install and Review!
 The Problem With RV Tankless Water Heaters.