Outdoor Wood Burning Garage Heater Upgrade
Finally had some time to repair/upgrade the garage heater; this things is working much better now! Last year when I designed this outdoor wood burning system I was hoping it would provide enough heat to warm up the garage fairly quickly throughout the winter. It worked great in the fall and spring but could not keep up in the dead of winter. I have made some improvements to the system and it seems to be working a whole lot better than it ever did last year.
I started with a small upgrade to the copper tubing at the wood stove which I detailed in another video earlier this fall. Now I have a totally of 40 feet of copper, 20 on the inside and 20 on the outside of the barrel. This will allow the antifreeze to circulate twice as long in contact with the heat and should improve the efficiency quite a bit.
The next improvement was the hardest part. I had to dig up the pex tubing running from the barrel stove to the garage and cover it with some 1/2" foam tubing insulation. I should have done this last year! Of course, during the dig I nicked the pex tubing and had to run to the store for a repair coupling. Once the tubing was repaired and all wrapped in a cozy winter blanky I buried it back underground about 12" deep.
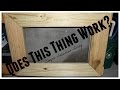
The car radiator is mounted underneath my upper shelf on my workbench and although it does look intriguing I decided to give it a bit of polish and create a neat little frame around it. This covers up the edges and makes it look a bit more refined ( can a car radiator on your workbench look refined?) I used a few scrap deck boards and a few deck screws to get the job done.
All that was left was to fill the system with the recovered antifreeze from last year and get a fire started. I let the system cycle for about ten minutes and made a few last minute checks for leaks, none found! Next I started a healthy but smaller fire in the barrel stove and then hooked up the thermometer measure the inside heat coming out of the radiator. Temps started at about 100 and just kept climbing, higher, higher, and finally it was approaching 160 degrees and I was starting to get nervous. Some of the PVC fittings are only rated to 175 and I wasn't sure if they would hold up to sustained temps that high. I ran out and closed the air vents on the wood stove to kill off the fire a bit. This thing is working great now! The insulation made all the difference, last year's hottest temps were about 95-100 I believe.
The real test will be in the dead of winter when the temps get down below 20. I am going to work on insulating the garage door later this year also which should help a bit. I am excited to use this system throughout the winter this year and will keep you updated on how well it is working.
Soldering equipment -
Spark start torch head - http://amzn.to/1BMl54f
Mapp Gas cylinder - http://amzn.to/14G5DdF
1/2"-3/4" pipe and fitting cleaner combo tool - http://amzn.to/1BSy2ao
Tight spaces pipe cutter - http://amzn.to/1y0INKD
Pipe cutter - http://amzn.to/1xP2qDj
Lead free solder - http://amzn.to/1wGPqvL
Flux - http://amzn.to/1yPxXqA
The Vogelzang single barrel kit can be purchased here - http://tinyurl.com/onurub9
Fiskars X27 splitting axe - http://amzn.to/1QEOfrG
All of these products and more recommended items from the SSL Family are available at the Simple Suburban Living General Store - - http://astore.amazon.com/simpsubulivi-20
Please check us out at www.simplesuburbanliving.com
and follow us on....
http://www.pinterest.com/simplesuburban/
http://www.facebook.com/simplesuburbanliving
http://www.twitter.com/simplesuburban5
http://www.instagram.com/simplesuburbanliving
Видео Outdoor Wood Burning Garage Heater Upgrade канала SSLFamilyDad
I started with a small upgrade to the copper tubing at the wood stove which I detailed in another video earlier this fall. Now I have a totally of 40 feet of copper, 20 on the inside and 20 on the outside of the barrel. This will allow the antifreeze to circulate twice as long in contact with the heat and should improve the efficiency quite a bit.
The next improvement was the hardest part. I had to dig up the pex tubing running from the barrel stove to the garage and cover it with some 1/2" foam tubing insulation. I should have done this last year! Of course, during the dig I nicked the pex tubing and had to run to the store for a repair coupling. Once the tubing was repaired and all wrapped in a cozy winter blanky I buried it back underground about 12" deep.
The car radiator is mounted underneath my upper shelf on my workbench and although it does look intriguing I decided to give it a bit of polish and create a neat little frame around it. This covers up the edges and makes it look a bit more refined ( can a car radiator on your workbench look refined?) I used a few scrap deck boards and a few deck screws to get the job done.
All that was left was to fill the system with the recovered antifreeze from last year and get a fire started. I let the system cycle for about ten minutes and made a few last minute checks for leaks, none found! Next I started a healthy but smaller fire in the barrel stove and then hooked up the thermometer measure the inside heat coming out of the radiator. Temps started at about 100 and just kept climbing, higher, higher, and finally it was approaching 160 degrees and I was starting to get nervous. Some of the PVC fittings are only rated to 175 and I wasn't sure if they would hold up to sustained temps that high. I ran out and closed the air vents on the wood stove to kill off the fire a bit. This thing is working great now! The insulation made all the difference, last year's hottest temps were about 95-100 I believe.
The real test will be in the dead of winter when the temps get down below 20. I am going to work on insulating the garage door later this year also which should help a bit. I am excited to use this system throughout the winter this year and will keep you updated on how well it is working.
Soldering equipment -
Spark start torch head - http://amzn.to/1BMl54f
Mapp Gas cylinder - http://amzn.to/14G5DdF
1/2"-3/4" pipe and fitting cleaner combo tool - http://amzn.to/1BSy2ao
Tight spaces pipe cutter - http://amzn.to/1y0INKD
Pipe cutter - http://amzn.to/1xP2qDj
Lead free solder - http://amzn.to/1wGPqvL
Flux - http://amzn.to/1yPxXqA
The Vogelzang single barrel kit can be purchased here - http://tinyurl.com/onurub9
Fiskars X27 splitting axe - http://amzn.to/1QEOfrG
All of these products and more recommended items from the SSL Family are available at the Simple Suburban Living General Store - - http://astore.amazon.com/simpsubulivi-20
Please check us out at www.simplesuburbanliving.com
and follow us on....
http://www.pinterest.com/simplesuburban/
http://www.facebook.com/simplesuburbanliving
http://www.twitter.com/simplesuburban5
http://www.instagram.com/simplesuburbanliving
Видео Outdoor Wood Burning Garage Heater Upgrade канала SSLFamilyDad
Показать
Комментарии отсутствуют
Информация о видео
Другие видео канала
 Outdoor Woodburning Garage Heater - How well does it work?
 Wood Burning Pool Heater - Upgrade and Update
 #456 - I Built The ULTIMATE Wood Burning Stove...
 The Cost Of Operating An Illegal Wood Stove
 barrel stove part 3
 How I Built My Outdoor Furnace Heat Exchanger
 Wood fire hot water heater.
 How to Install a ADD ON WOOD FURNACE. The do's and Don'ts on installation.
 How To Heat Your Garage Workshop 1 | THE HANDYMAN |
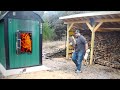 Outdoor Wood Burner. Is it WORTH IT? (4 Years later)
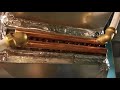 Outdoor Wood Furnace: How I Installed Radiators and Plumbed My House
 Liberator Rocket Stove -- Hyper Efficient, USA Made Wood Burning Stove / Mass Heater
 Installation of a wood-burning stove at the off the grid cabin. #woodburningstove #karlsoffthegrid
 Wood furnace
 Building a Wood Furnace from a Hot Water Heater
 20 Homemade Outdoor Wood Boiler SECRETS Revealed
 Wood burning pool heater UPDATE!
 DIY Outside wood burning forced air furnace FREE HEAT in the winter
 Outdoor Wood Burning Garage Heater - Heat Your Garage For Free Using a Car Radiator!