Uploading Website Files to CPanel
How to upload website files to CPanel:
Step1. Log in to your CPanel using the credentials given by your Hosting Provider
Step 2. Navigate to the "File Manager" of the CPanel that controls all the files in your hosting account.
Step3. Navigate to your Public_Html folder denoted by the globe icon. This folder is the one that all your website files and folders are stored so as to load from your domain automatically.
Step4. Zip all the contents of the public_html folder and delete the original files while retaining the zip backup file.
Step5. Zip your website files on your local machine into zip format since you cant upload folders into CPanel.
Step6. Click upload located at the top bar of your screen to open a new tab on your browser
Step7. Click the blue button at the center and select the zip file that contains your website files. Wait for the progress bar to turn green before closing the tab
8. Return to the File manager tab on your CPanel and refresh the public_html folder to reveal the zip you have just uploaded.
9. Extract the zip file to allow the files to be read. If your homepage is not already named index.html or index.php, rename it appropriately for it to be read as the main page of the website.
If you have any other questions, Kindly post it in the comment section below.
Step 8.
Видео Uploading Website Files to CPanel канала deepAfrica Limited
Показать
Комментарии отсутствуют
Информация о видео
Другие видео канала
 How to Upload Your Website to cPanel File Manager Step By Step (2018/2019)
 cPanel beginner tutorial 3 - managing files in the file manager
 How to Upload PHP Website On Server with Database
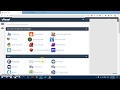 How to Upload Website on cPanel
 How To Install WordPress Themes | The link you followed has expired
 How to Host a Scama and create cpanel email to receive Results.... EDUCATIONAL PURPOSES ONLY!
 29: How to Easily Upload a Website | Learn HTML & CSS | HTML Tutorial | Upload a Website Tutorial
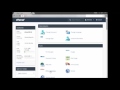 How to upload your websites to Cpanel account (2021 updated)
 How to Edit .HTML Webpages on cPanel with No Skills - Swap Texts, Images & Links
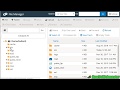 CPanel Tutorial : How to Use File Manager to Upload Website Files
 Learn How to Backup and Restore Wordpress Website from Cpanel
 How To Upload PLR Products And Start Selling
 How to upload your website to live server - Cpanel
 How To Restore / Recover / Import a WordPress Website from a tar.gz backup - Not for Multisites
 Best Way To Change WordPress Themes Without Losing Content or Breaking Website with Laragon 2021
 How to Upload Your Website To The Internet
 The Link you followed has expired wordpress
 Quick Namecheap Tutorial and Website Builder Tutorial
 Chapter -1 What is Cpanel and why we need it ?
 cPanel beginner tutorial 4 - uploading files with ftp