Ollama & PrivateGPT on Windows 10 & Run Ollama powered PrivateGPT on Windows10 in 2025
In This Screencast you will learn how to setup and run PrivateGPT powered with Ollama Large Language Models runner on Windows 10.
Kindly note that you need to have Ollama installed on your Windows before setting up Ollama for PrivateGPT.
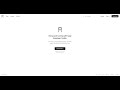
PrivateGPT
Interact with your documents using the power of GPT, 100% privately, no data leaks.
https://github.com/zylon-ai/private-gpt
https://privategpt.dev/
Ollama: Large Language Models Runner
https://github.com/ollama/ollama
https://ollama.com/
https://hub.docker.com/r/ollama/ollama
https://github.com/ollama/ollama-python
https://github.com/ollama/ollama-js
Here are commands used in this video.
git clone https://github.com/zylon-ai/private-gpt
cd private-gpt
git clone https://github.com/pyenv-win/pyenv-win.git "%USERPROFILE%\.pyenv”
Add System Settings
It's a easy way to use PowerShell here
Adding PYENV, PYENV_HOME and PYENV_ROOT to your Environment Variables
[System.Environment]::SetEnvironmentVariable('PYENV',$env:USERPROFILE + "\.pyenv\pyenv-win\",”User”)
[System.Environment]::SetEnvironmentVariable('PYENV_ROOT',$env:USERPROFILE + "\.pyenv\pyenv-win\",”User”)
[System.Environment]::SetEnvironmentVariable('PYENV_HOME',$env:USERPROFILE + "\.pyenv\pyenv-win\",”User”)
Now adding the following paths to your USER PATH variable in order to access the pyenv command
[System.Environment]::SetEnvironmentVariable('path', $env:USERPROFILE + "\.pyenv\pyenv-win\bin;" + $env:USERPROFILE + "\.pyenv\pyenv-win\shims;" + [System.Environment]::GetEnvironmentVariable('path', "User"),”User”)
If for some reason you cannot execute PowerShell command , then type "environment variables for you account" in Windows search bar and open Environment Variables dialog. You will need create those 3 new variables in System Variables section (bottom half). Let's assume username is my_pc.
Variable Value
PYENV C:\Users\my_pc\.pyenv\pyenv-win\
PYENV_HOME C:\Users\my_pc\.pyenv\pyenv-win\
PYENV_ROOT C:\Users\my_pc\.pyenv\pyenv-win\
And add two more lines to user variable Path.
C:\Users\my_pc\.pyenv\pyenv-win\bin
C:\Users\my_pc\.pyenv\pyenv-win\shims
pyenv install 3.11
pyenv local 3.11
pip install pipx
pipx install poetry --include-deps
poetry install --extras "ui llms-ollama embeddings-ollama vector-stores-qdrant”
Set-ExecutionPolicy Bypass -Scope Process -Force; [System.Net.ServicePointManager]::SecurityProtocol = [System.Net.SecurityProtocolType]::Tls12; iex ((New-Object System.Net.WebClient).DownloadString('https://chocolatey.org/install.ps1’))
choco install make
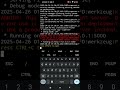
ollama serve
ollama pull llama3.1
ollama pull nomic-embed-text
# CMD
set PGPT_PROFILES=ollama
make run
Видео Ollama & PrivateGPT on Windows 10 & Run Ollama powered PrivateGPT on Windows10 in 2025 канала CA Amit Singh
Kindly note that you need to have Ollama installed on your Windows before setting up Ollama for PrivateGPT.
PrivateGPT
Interact with your documents using the power of GPT, 100% privately, no data leaks.
https://github.com/zylon-ai/private-gpt
https://privategpt.dev/
Ollama: Large Language Models Runner
https://github.com/ollama/ollama
https://ollama.com/
https://hub.docker.com/r/ollama/ollama
https://github.com/ollama/ollama-python
https://github.com/ollama/ollama-js
Here are commands used in this video.
git clone https://github.com/zylon-ai/private-gpt
cd private-gpt
git clone https://github.com/pyenv-win/pyenv-win.git "%USERPROFILE%\.pyenv”
Add System Settings
It's a easy way to use PowerShell here
Adding PYENV, PYENV_HOME and PYENV_ROOT to your Environment Variables
[System.Environment]::SetEnvironmentVariable('PYENV',$env:USERPROFILE + "\.pyenv\pyenv-win\",”User”)
[System.Environment]::SetEnvironmentVariable('PYENV_ROOT',$env:USERPROFILE + "\.pyenv\pyenv-win\",”User”)
[System.Environment]::SetEnvironmentVariable('PYENV_HOME',$env:USERPROFILE + "\.pyenv\pyenv-win\",”User”)
Now adding the following paths to your USER PATH variable in order to access the pyenv command
[System.Environment]::SetEnvironmentVariable('path', $env:USERPROFILE + "\.pyenv\pyenv-win\bin;" + $env:USERPROFILE + "\.pyenv\pyenv-win\shims;" + [System.Environment]::GetEnvironmentVariable('path', "User"),”User”)
If for some reason you cannot execute PowerShell command , then type "environment variables for you account" in Windows search bar and open Environment Variables dialog. You will need create those 3 new variables in System Variables section (bottom half). Let's assume username is my_pc.
Variable Value
PYENV C:\Users\my_pc\.pyenv\pyenv-win\
PYENV_HOME C:\Users\my_pc\.pyenv\pyenv-win\
PYENV_ROOT C:\Users\my_pc\.pyenv\pyenv-win\
And add two more lines to user variable Path.
C:\Users\my_pc\.pyenv\pyenv-win\bin
C:\Users\my_pc\.pyenv\pyenv-win\shims
pyenv install 3.11
pyenv local 3.11
pip install pipx
pipx install poetry --include-deps
poetry install --extras "ui llms-ollama embeddings-ollama vector-stores-qdrant”
Set-ExecutionPolicy Bypass -Scope Process -Force; [System.Net.ServicePointManager]::SecurityProtocol = [System.Net.SecurityProtocolType]::Tls12; iex ((New-Object System.Net.WebClient).DownloadString('https://chocolatey.org/install.ps1’))
choco install make
ollama serve
ollama pull llama3.1
ollama pull nomic-embed-text
# CMD
set PGPT_PROFILES=ollama
make run
Видео Ollama & PrivateGPT on Windows 10 & Run Ollama powered PrivateGPT on Windows10 in 2025 канала CA Amit Singh
Комментарии отсутствуют
Информация о видео
10 апреля 2025 г. 12:12:17
00:02:43
Другие видео канала