03-05 R6 06-09 R6s Clutch How-To (diy)
DIY: How to replace the Clutch on a R6
03 - 05 R6
06 - 09 R6s
Done with OEM Parts (same procedure with aftermarket parts)
- (6) Friction Plates: 4FN-16321-00-00 (red color reference tab)
- (2) Friction Plates: 5SL-16321-00-00 (purple color reference tab)
- (7) Pressure Plates: 3J2-16324-00-00
- (1) Pressure Plate: 168-16324-00-00 (thicker than the other 6)
- (6) Clutch Springs: 90501-237L0-00
- Clutch Cover Gasket: 5SL-15461-01-00
Torque reference:
-Pressure Plate Bolts 10mm: 5.8 ft.lbs (8 Nm)
-Clutch Cover Bolts & Cable Bracket Bolts 5mm Hex: 8.7 ft.lbs (12 Nm)
****Important notes****
-Soak the Friction Plates in Fresh Oil for at least a half hour before installing them.
-Do not remove the coolant hose unless you plan on draining the coolant prior.
-Clean off old gasket material (use a razor blade if needed)
-Line the Dot on the pressure plate up with the small Dot on the Clutch Basket
-Arrow on the Clutch Cover (above the shaft arm) should line up with the marking on the arm when the arm is pushed forward by hand (until it stops).
-Some people say you need to drain the oil. Oil was not drained before this install, if the bike has been sitting for a day or 2 it should not make a mess of oil.
Video does not include how to remove/install the Lower Left Faring (if you can't manage that on your own you shouldn't attempt to do the clutch)
Disclaimer: I assume no responsibility for you performing this work on your motorcycle.
Видео 03-05 R6 06-09 R6s Clutch How-To (diy) канала ju190
Показать
Комментарии отсутствуют
Информация о видео
Другие видео канала
 YAMAHA R1 CLUTCH REPLACEMENT (step by step detailed)
 Production of the G&G GP exhaust for the Yamaha R6
 2009-2014 Yamaha R1 Clutch Mod Walkthrough (1080p)
 Stunter Sessions- How to Wheelie part 1
 Tech Talk: Motorcycle Clutch Maintenance and Performance Tuning
 Race Motor Rebuild
 Yamaha R6 pt.3 CAMSHAFT CRANKSHAFT TIMING
 How To Change/Replace Your Motorcycle Chain
 How To Tell If Your Motorcycle's Clutch Is Going Bad
 R6 Spark Plug Replacement 1
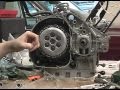 13 Clutch Removal yzf600 1996
 CBR 600RR Slipper Clutch Install Part 2 of 2
 Performance Upgrades: Project R6
 change coolant on 03-09 R6s
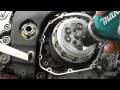 CLUTCH CHANGE SUZUKI GSXR 1000K5 ( PART 1)
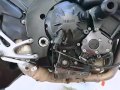 R1 clutch cable adjustment after new clutch ages are I stalled
 Change your own bike clutch - Save money
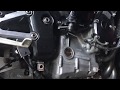 R1 2003 5pw clutch removal
 ('06-'16) Yamaha YZF-R6 First Oil Change: DIY Maintenance