Paper Star Lanterns with Cut-Outs and Snowflakes!
See how to make paper star lanterns with intricate cut-outs that cast a magical glow! Get the free pattern (Design #168) at https://jennifermaker.com/make-paper-star-lanterns
I love making paper lanterns! So much so, in fact, that a couple of years ago, I made a paper lantern or luminary for every month of the year. And this is the perfect season for paper lanterns -- they cheerfully light up our homes on those long, dark winter nights.
I appreciate every subscriber. It's free and easy to subscribe -- just click here: http://bit.ly/sub2jennifer
MATERIALS LIST (contains my affiliate links):
* 8.5" x 11" 100-110 lb. cardstock (I used seafoam blue https://amzn.to/35PVEBQ and ice silver white - https://amzn.to/33JRzh0 ) or poster board (I used Cricut foil holographic posterboard - https://amzn.to/2OIxHXt )
* (Optional) 8.5" x 11" vellum - https://amzn.to/2P3Zhxi
* (Optional) Hanging lantern cord for pendant lighting - https://amzn.to/2qcHRpN
* (Optional) 40-Watt LED Light Bulbs
* A way to glue your paper star lantern, such as hot glue, tacky glue, or spray adhesive (useful if you use the vellum layer) - https://amzn.to/33LuHhg
* A way to cut the project (I used the amazing Cricut -- see http://shrsl.com/1dq4w )
* My free SVG cut file (Design #168) (available in my free resource library at https://jennifermaker.com/library )
Step 1: Get my free paper star lantern file and pattern.
Step 2: Cut your paper star lantern pieces.
First, upload the paper star lantern SVG file to Cricut Design Space and place it on your canvas.
Decide if you want to cut the vellum layer out. The vellum will diffuse the light which gives your paper star lantern a nice glow and disguises the light fixture inside, but the lighting effect of stars and snowflakes cast on walls won't be as pronounced with the vellum included. You decide which one you like best -- the vellum layer is optional for both paper star lanterns. If you decide not to use vellum, hide or delete that layer (the white triangles).
This hanging paper star lantern needs to be sturdy enough to support itself, and this material works the best. For material settings, use the "glitter cardstock" setting as that will give you two passes and cuts cleanly.
Step 3: Assemble your paper star lantern.
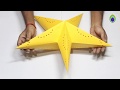
A. Prefold each of the five paper star lantern pieces along the dashed cut edges, including the long side tab.
B. Prefold the bottom of the two tabs in the opposite direction from how you folded it in step A. Be sure to fold all five pieces in the same manner.
C. If you are including the vellum layer, spray the inside of each of the five paper star lantern pieces with permanent spray adhesive. Then place the vellum on the top of the sections of each star lantern piece. Let dry completely before continuing.
D. Identify the star point piece with a crescent missing at its point and set it aside for now.
E. With the other four pieces, place glue along the long side tab, glue the tab to the inside of the other side to form a point. Be sure that the pieces align flush. Repeat for all four pieces. This will give you four star points.
F. Place glue on one side of the bottom tab of one star point and glue another star point to other side of the light fixture tab, working your way around until the four assembled star points are glued together.
G. Pick up the piece you set aside earlier and glue the shorter tabs to the main star assembly — you'll need to reach inside to press the layers together as the glue sets.
H. If you want to light up your paper star lantern, place the light fixture inside now with the cord sticking out the end of the unglued point. Carefully glue the long tab in place to close up your paper star lantern.
#cricut #cricutmade #designspace
============
Follow me at:
Blog: https://jennifermaker.com
Facebook Page: https://www.facebook.com/jennifermakercrafts
Facebook Group: https://www.facebook.com/groups/cricutcraftersandmakers/
Instagram: https://www.instagram.com/jennifer.maker
Pinterest: https://www.pinterest.com/jenuinemom
Please subscribe to my channel at https://www.youtube.com/c/jennifermaker for more video tutorials to craft a life you love!
Credits:
Introduction: PixelBytes (my child!)
Music: Cute by Bensound (licensed, royalty and copyright free)
Videography: Jennifer Marx on a Panasonic Lumix FZ-1000 DSLR 4K camera
Design: A Jennifer Maker original!
Видео Paper Star Lanterns with Cut-Outs and Snowflakes! канала Jennifer Maker
I love making paper lanterns! So much so, in fact, that a couple of years ago, I made a paper lantern or luminary for every month of the year. And this is the perfect season for paper lanterns -- they cheerfully light up our homes on those long, dark winter nights.
I appreciate every subscriber. It's free and easy to subscribe -- just click here: http://bit.ly/sub2jennifer
MATERIALS LIST (contains my affiliate links):
* 8.5" x 11" 100-110 lb. cardstock (I used seafoam blue https://amzn.to/35PVEBQ and ice silver white - https://amzn.to/33JRzh0 ) or poster board (I used Cricut foil holographic posterboard - https://amzn.to/2OIxHXt )
* (Optional) 8.5" x 11" vellum - https://amzn.to/2P3Zhxi
* (Optional) Hanging lantern cord for pendant lighting - https://amzn.to/2qcHRpN
* (Optional) 40-Watt LED Light Bulbs
* A way to glue your paper star lantern, such as hot glue, tacky glue, or spray adhesive (useful if you use the vellum layer) - https://amzn.to/33LuHhg
* A way to cut the project (I used the amazing Cricut -- see http://shrsl.com/1dq4w )
* My free SVG cut file (Design #168) (available in my free resource library at https://jennifermaker.com/library )
Step 1: Get my free paper star lantern file and pattern.
Step 2: Cut your paper star lantern pieces.
First, upload the paper star lantern SVG file to Cricut Design Space and place it on your canvas.
Decide if you want to cut the vellum layer out. The vellum will diffuse the light which gives your paper star lantern a nice glow and disguises the light fixture inside, but the lighting effect of stars and snowflakes cast on walls won't be as pronounced with the vellum included. You decide which one you like best -- the vellum layer is optional for both paper star lanterns. If you decide not to use vellum, hide or delete that layer (the white triangles).
This hanging paper star lantern needs to be sturdy enough to support itself, and this material works the best. For material settings, use the "glitter cardstock" setting as that will give you two passes and cuts cleanly.
Step 3: Assemble your paper star lantern.
A. Prefold each of the five paper star lantern pieces along the dashed cut edges, including the long side tab.
B. Prefold the bottom of the two tabs in the opposite direction from how you folded it in step A. Be sure to fold all five pieces in the same manner.
C. If you are including the vellum layer, spray the inside of each of the five paper star lantern pieces with permanent spray adhesive. Then place the vellum on the top of the sections of each star lantern piece. Let dry completely before continuing.
D. Identify the star point piece with a crescent missing at its point and set it aside for now.
E. With the other four pieces, place glue along the long side tab, glue the tab to the inside of the other side to form a point. Be sure that the pieces align flush. Repeat for all four pieces. This will give you four star points.
F. Place glue on one side of the bottom tab of one star point and glue another star point to other side of the light fixture tab, working your way around until the four assembled star points are glued together.
G. Pick up the piece you set aside earlier and glue the shorter tabs to the main star assembly — you'll need to reach inside to press the layers together as the glue sets.
H. If you want to light up your paper star lantern, place the light fixture inside now with the cord sticking out the end of the unglued point. Carefully glue the long tab in place to close up your paper star lantern.
#cricut #cricutmade #designspace
============
Follow me at:
Blog: https://jennifermaker.com
Facebook Page: https://www.facebook.com/jennifermakercrafts
Facebook Group: https://www.facebook.com/groups/cricutcraftersandmakers/
Instagram: https://www.instagram.com/jennifer.maker
Pinterest: https://www.pinterest.com/jenuinemom
Please subscribe to my channel at https://www.youtube.com/c/jennifermaker for more video tutorials to craft a life you love!
Credits:
Introduction: PixelBytes (my child!)
Music: Cute by Bensound (licensed, royalty and copyright free)
Videography: Jennifer Marx on a Panasonic Lumix FZ-1000 DSLR 4K camera
Design: A Jennifer Maker original!
Видео Paper Star Lanterns with Cut-Outs and Snowflakes! канала Jennifer Maker
Показать
Комментарии отсутствуют
Информация о видео
Другие видео канала
 How to Make Paper Flowers in Cricut Design Space -- All 10 Flowers!!
 DIY One Minute Paper Star Christmas Ornaments
 DIY Paper Hanging Lamp Made from Cardstock!
 DIY Custom Shadow Boxes: How to Design Your Own!
 DIY How to make Star Lantern Kandil For Diwali & Christmas Decoration
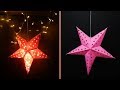 DIY- Star Lantern | How to Make Paper Star Lantern Kandil for Christmas Decor/ New Year / Diwali
 Cut Wood Letters on a Cricut -- Including Name Puzzles!
 DIY Paper Butterfly Heart Canvas & Wall Art Tutorial - Made with a Cricut!
 DIY Gift Boxes Made on a Cricut!
 3D Paper Star - DIY Christmas led star for Scandinavian decor
 Make Amazing Waterslide Decals for Tumblers, Mugs, and Glasses!
 Easy Giant Paper Snowflakes Pattern + Start-to-Finish Tutorial
 Cricut Tool Bench: A Craft Tool Holder & Organizer Made on the Cricut Explore or Maker!!
 Cricut DIY Paper Star Demo
 How to make Paper hanging stars
 Easy Paper Star Lantern Tutorial / Christmas & New Year Decorations DIY /14 Days of Christmas DIY
 Cricut Pens: Writing and Envelope Addressing Tutorial
 Make Print Then Cut T-Shirts with Your Cricut the RIGHT Way!
 DIY Wedding Invitations on a Cricut (Free Templates!)