Pull Out Pantry Shelves
Check us out:
http://www.broke-dad.com/
https://www.instagram.com/broke.dad.diy/
https://twitter.com/BrokeDadDiy
https://www.facebook.com/brokedaddiy/?ref=aymt_homepage_panel
Disclaimer:
Broke-Dad LLC and its’ agents are not responsible for actions taken by individuals nor entities. Safety and operation of tools, products, and techniques are not the responsibility of Broke-Dad LLC and its’ agents. Broke-Dad LLC does not receive compensation from products used in this video and is in no way bound to said companies.
Transcription:
Hey guys, Broke-Dad here, and today we are going to go over how to convert MDF pantry shelves into custom roll-out shelves. Stay tuned.
The first step is to take measurements of the area the shelf sits in. To convert the stationary shelf into a roll out you will need to trim it down and add a guide bar on the inside of the pantry. You can purchase several types of mount drawer slides from a hardware store. Take the size of the chosen drawer slide into account in your measurements. Cut the guide rails out of wood the necessary width to allow the altered shelves to slide in and out.
Now remove the shelves from the cabinet. Take your measurements and mark on the shelve where you want to cut. Using a straight edged object to mark your cut line is always advised. You can cut the shelve with a circular saw but I chose a table saw because the fence helped me to cut a straight line. The boards used for pantry shelves are usually MDF, which stands for Medium-Density Fiberboard. The mechanics behind MDF are not important but the saw dust it creates is not healthy to breath. Wear a properly rated respirator when cutting.
Once you have cut your shelves you can measure them and cut your sides. I chose to use select pine because it is cheaper, light weight and has a nice simple look to it. I used the same wood to make the guide rails that we will install inside the pantry later.
The easiest method is to hold the board you are going to cut up to the shelf and mark your cuts. Use the method of your choice you make these quick cuts. Placing the sides onto the shelving I drilled pilot holes down into the siding and into the MDF before screwing them into place. The length of the screw will be determined by the size of the board you choose for the sides. Using wood screws is recommended. If you wish to you could also use wood glue and wood screws to secure the sides.
I drilled the screws into the sides separately, leaving a small amount of the screw out. This allowed me to line the screw up with the pilot holes in the MDF and prevent slipping.
You can do the same for the front panels or you can screw them into the already set side panels. Both methods work just fine.
To make a stop for the back of the shelve I cut down some of the extra MDF and attached it. Feel free to get creative with your shelves!
Once the shelves are complete take the drawer slides and attach the correct side to the shelf. Take your time here and be sure that you are mounting the right slides to the correct location.
Now you need to mount the guide rails inside the pantry. Remove the clips that where holding the MDF up. In order to mark these locations and help me with mounting the guide rails I took some small wooden dowels that I previously cut into one inch pieces and placed them into the holes inside the pantry.
To make life easier you can preset your screws into your custom guide rails. Place the guide rails unto the wooden dowels in the locations you wish to place the new shelves and drill them into place. Try to counter sink the screws, meaning drill the screw deep enough into the wood so that it is at least flush with the wood. This way the guide rail screws will not interfere with attaching the drawer slides.
Since you are working in a cramped space it may be difficult to have someone hold the drawer slides for you. To solve this, you can use painters tape to help hold the slide onto the guide rail. Be aware that the tape will not hold the slide in the exact spot you may want, so make sure you are satisfied with your placement before drilling.
Repeat these steps for each shelf you wish to convert. Be sure to check the maximum weight limit for the drawer slides you purchase and do not exceed them.
If the shelves are the incorrect size you can either purchase new MDF from a hardware store and recut the correct dimensions. If the shelves are off by a small amount you can add washers on between the drawer slides and the guide rails to make a snugger fit.
Now you simply slide your new custom-made shelves into place and organize your pantry.
Thanks for watching Broke-Dad. Please be sure to like and subscribe to our page and check out our other videos.
Видео Pull Out Pantry Shelves канала Broke-Dad
Показать
Комментарии отсутствуют
Информация о видео
Другие видео канала
 Rollout Shelf For Pantry
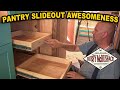 Slide-out Pantry Shelves and Kitchen Cabinet Handles
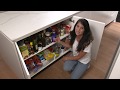 Cupboard Pantry Makeover with Tansel Premium Pull-Out Storage
 Building A Hidden Pull Out Spice Rack To Organize A Cabinet
 DIY RV Storage Drawer
 DIY Under Stairs Pull Out Storage Drawers - Extra Storage For Small Spaces.
 The BEST Drawer Slide Method! Ana White's Secret Trick!
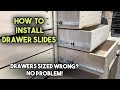 How to Install Drawer Slides
 DIY Pantry Makeover | Home With Stefani
 How to Install 3 Types of Drawer Slides in Cabinets - WOOD magazine
 Making DIY Budget Cabinets - Office Remodel part 2
 Installing the LAVIDO Pantry Pull-Out
 How to install vertical drawer slides "on the money"
 Rolling Planter Box
 Gel Stain Kitchen Cabinets
 Wall Cabinet Mounting Techniques
 More RV Pantry storage
 Building Pull Out Cabinet Shelves
 Building a Desk Using Dowels for Drawer Slides // Woodworking // Instagram Builders Challenge
 Building a Freestanding Pantry with Pull Out Drawers