- Популярные видео
- Авто
- Видео-блоги
- ДТП, аварии
- Для маленьких
- Еда, напитки
- Животные
- Закон и право
- Знаменитости
- Игры
- Искусство
- Комедии
- Красота, мода
- Кулинария, рецепты
- Люди
- Мото
- Музыка
- Мультфильмы
- Наука, технологии
- Новости
- Образование
- Политика
- Праздники
- Приколы
- Природа
- Происшествия
- Путешествия
- Развлечения
- Ржач
- Семья
- Сериалы
- Спорт
- Стиль жизни
- ТВ передачи
- Танцы
- Технологии
- Товары
- Ужасы
- Фильмы
- Шоу-бизнес
- Юмор
HP DeskJet 2700 and DeskJet Plus 4100 Printer Series: Unpacking and Setup
HP Printer setup support presents Unpacking the HP DeskJet 2700 and DeskJet Plus 4100 Printer Series _ HP Printers _ HP_1
To set up a printer for the first time, remove the printer from the box, connect the power cord, add printer to HP Smart, load paper, install the ink cartridges, and complete setup.
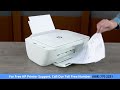
Remove the printer from the box
Remove the printer from the box, and then remove all tape, stickers, and packing materials.
CAUTION: To avoid setup problems and potential printer damage, make sure all internal packaging material is removed, all doors are closed and trays reinserted before turning on the printer.
● Remove the printer from the box.
● Remove all tape and packaging materials from the outside of the printer.
● Lower the output tray, reach inside the printer, and then grasp the handle and lower the ink cartridge access door to open it.
● Remove all tape, packaging materials, and cardboard from inside the printer.
● Close the ink cartridge access door.
● Remove all hardware and materials from the box.
● Recycle the box and packaging materials.
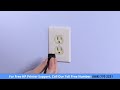
Connect the power cord
Plug the printer into an electrical outlet and turn on the printer.
NOTE: Do not connect a USB cable at this time. The connection to the computer is established during the software installation.
● Connect the power cord to the back of the printer and into an electrical outlet.
● Press the Power button.
● Wait until the printer is idle and silent.
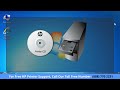
Add the printer to HP Smart
The HP Smart app is required and helps connect your device to your printer. It also guides you through the rest of the setup process.
● Go to 123.hp.com to download and install the software.
● Open the app, and then touch Add a New printer or touch the plus sign to find your printer.
● Follow the prompts in HP Smart to connect the printer to your network and device.
● Sign up for HP+ or Instant Ink.
NOTE: This is optional and depends on country/region.
● Follow the animation in the HP Smart app to load paper and install setup cartridges.
The steps that follow on this page can be used with the instructions in HP Smart to complete printer setup.
Load plain paper
Load plain paper in the input tray.
● Raise the input tray.
● Slide the paper width guide all the way to the left.
● Load a stack of plain white paper into the input tray.
● Slide the paper width guide to the right until it rests at the edge of the paper.
● Lower the output tray, and then pull out the tray extender.
Before you print, make sure to select the correct paper size or media type in the print job settings.
Install the ink cartridges and complete setup
Install the HP ink cartridges that came with your printer.
● Lower the output tray, reach inside the printer, and then grasp the handle and lower the ink cartridge access door to open it.
● Remove the cartridge from the package. Be careful to only hold it by the black plastic sides.
● Remove the tape from the cartridge.
CAUTION: Do not touch the copper-colored contacts or the ink nozzles, or reapply the protective tape. Touching these areas can result in an ink system failure.
● Slide the cartridge into its color-coded slot at a slight upward angle, and then push up on the cartridge until it snaps into place.
● Close the ink cartridge access door.
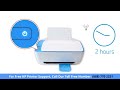
● For print quality purposes, an alignment page prints after three pages are printed. Follow the instructions on the page to complete the cartridge alignment.
Thanks For Watching.
Видео HP DeskJet 2700 and DeskJet Plus 4100 Printer Series: Unpacking and Setup канала Wifi Printer Problems Solutions
To set up a printer for the first time, remove the printer from the box, connect the power cord, add printer to HP Smart, load paper, install the ink cartridges, and complete setup.
Remove the printer from the box
Remove the printer from the box, and then remove all tape, stickers, and packing materials.
CAUTION: To avoid setup problems and potential printer damage, make sure all internal packaging material is removed, all doors are closed and trays reinserted before turning on the printer.
● Remove the printer from the box.
● Remove all tape and packaging materials from the outside of the printer.
● Lower the output tray, reach inside the printer, and then grasp the handle and lower the ink cartridge access door to open it.
● Remove all tape, packaging materials, and cardboard from inside the printer.
● Close the ink cartridge access door.
● Remove all hardware and materials from the box.
● Recycle the box and packaging materials.
Connect the power cord
Plug the printer into an electrical outlet and turn on the printer.
NOTE: Do not connect a USB cable at this time. The connection to the computer is established during the software installation.
● Connect the power cord to the back of the printer and into an electrical outlet.
● Press the Power button.
● Wait until the printer is idle and silent.
Add the printer to HP Smart
The HP Smart app is required and helps connect your device to your printer. It also guides you through the rest of the setup process.
● Go to 123.hp.com to download and install the software.
● Open the app, and then touch Add a New printer or touch the plus sign to find your printer.
● Follow the prompts in HP Smart to connect the printer to your network and device.
● Sign up for HP+ or Instant Ink.
NOTE: This is optional and depends on country/region.
● Follow the animation in the HP Smart app to load paper and install setup cartridges.
The steps that follow on this page can be used with the instructions in HP Smart to complete printer setup.
Load plain paper
Load plain paper in the input tray.
● Raise the input tray.
● Slide the paper width guide all the way to the left.
● Load a stack of plain white paper into the input tray.
● Slide the paper width guide to the right until it rests at the edge of the paper.
● Lower the output tray, and then pull out the tray extender.
Before you print, make sure to select the correct paper size or media type in the print job settings.
Install the ink cartridges and complete setup
Install the HP ink cartridges that came with your printer.
● Lower the output tray, reach inside the printer, and then grasp the handle and lower the ink cartridge access door to open it.
● Remove the cartridge from the package. Be careful to only hold it by the black plastic sides.
● Remove the tape from the cartridge.
CAUTION: Do not touch the copper-colored contacts or the ink nozzles, or reapply the protective tape. Touching these areas can result in an ink system failure.
● Slide the cartridge into its color-coded slot at a slight upward angle, and then push up on the cartridge until it snaps into place.
● Close the ink cartridge access door.
● For print quality purposes, an alignment page prints after three pages are printed. Follow the instructions on the page to complete the cartridge alignment.
Thanks For Watching.
Видео HP DeskJet 2700 and DeskJet Plus 4100 Printer Series: Unpacking and Setup канала Wifi Printer Problems Solutions
hp printer drivers printer setup HP HP DeskJet 2700 and DeskJet Plus 4100 Printer Series Hewlett Packard Unpacking the HP DeskJet 2700 & DeskJet Plus 4100 Printer how to connect hp wireless printer install hp wireless printer printer how to install hp printer tutorial howto diy electronics printer how to support help learn reset HP printer hp printer support install printer set up printer hp printer setup hp wireless printer setup
Комментарии отсутствуют
Информация о видео
25 октября 2025 г. 9:24:33
00:01:35
Другие видео канала