ATtiny85 and MPU-6050 6-axis Accelerometer and Gyro Arduino IDE
#MPU6050, #ATtiny85, #Arduino
I'll show you how to get the ATtiny85 reading the sensors on the Invensense MPU-6050 MEMS 6-axis DOF Gyroscope and Accelerometer.
NOTE! Change Quotes to "Less-than" and "Greater than" symbols in library 'includes' where appropriate. Change LT and GT to maths symbols.
// Connect SDA and SDC (ATTINY85 physical pins 5 & 7) to the MPU6050 and the SSD1306 OLED Display
// Connect Vcc/Gnd to MPU6050 and SSD1306 OLED Display (if you are using the 128x64 display, comment out "setdisplay()"
// If you only want to use Serial Monitor OR OLED display, comment out calls to libraries, functions and routines which you don't require
//
// Tom Donnelly 2018
#include "TinyWireM.h"
#include "TinyOzOLED.h"
#include "SoftwareSerial.h"
// #define DEBUG 1 // - uncomment this line to display accel/gyro values
#ifdef DEBUG
#endif
int accelX, accelY, accelZ;
int gyroX, gyroY, gyroZ;
int gyroXold, gyroYold, gyroZold;
char mpu = 0x68; // I2C address of MPU. Connect 5V to pin ADO to use 0x69 address instead
SoftwareSerial Monitor(-1, 4); // We will only use Tx on PortB 4
void setup() {
Monitor.begin(9600);
TinyWireM.begin();
OzOled.init();
setDisplay(); // set display to 128x32px. Comment out of you're using 128x64 display
OzOled.printString("Bond Gyro");
delay(1000); // Display title
OzOled.clearDisplay();
// We need to do three things. 1. Disable sleep mode on the MPU (it activates on powerup). 2. Set the scale of the Gyro. 3. Set the scale of the accelerometer
// We do this by sending 2 bytes for each: Register Address & Value
TinyWireM.beginTransmission(mpu);
TinyWireM.write(0x6B); // Power setting address
TinyWireM.write(0b00000000); // Disable sleep mode (just in case)
TinyWireM.endTransmission();
TinyWireM.beginTransmission(mpu);
TinyWireM.write(0x1B); // Config register for Gyro
TinyWireM.write(0x00000000); // 250° per second range (default)
TinyWireM.endTransmission();
TinyWireM.beginTransmission(mpu); //I2C address of the MPU
TinyWireM.write(0x1C); // Accelerometer config register
TinyWireM.write(0b00000000); // 2g range +/- (default)
TinyWireM.endTransmission();
}
void loop() {
getAccel();
getGyro();
if (shaken()) {
Monitor.print((long)millis());
Monitor.println(" Shaken..");
OzOled.printNumber((long)millis(), 0, 1);
OzOled.printString("Shaken..", 0, 2);
#ifdef DEBUG
Monitor.println((long)accelX);
Monitor.println(accelY);
Monitor.println(accelZ);
OzOled.printNumber((long)accelX, 0, 0);
OzOled.printNumber(accelY, 0, 1);
OzOled.printNumber(accelZ, 0, 2);
OzOled.printNumber((long)millis(), 0, 3);
#endif
}
if (stirred()) {
Monitor.print((long)millis());
Monitor.println(" Stirred..");
#ifdef DEBUG
Monitor.println(gyroX);
Monitor.println(gyroY);
Monitor.println(gyroZ);
OzOled.printNumber((long)gyroX, 0, 0);
OzOled.printNumber(gyroY, 0, 1);
OzOled.printNumber(gyroZ, 0, 2);
OzOled.printNumber((long)millis(), 0, 3);
#endif
}
// delay(100);
}
void getAccel() {
TinyWireM.beginTransmission(mpu); //I2C address of the MPU
TinyWireM.write(0x3B); // Acceleration data register
TinyWireM.endTransmission();
TinyWireM.requestFrom(mpu, 6); // Get 6 bytes, 2 for each DoF
accelX = TinyWireM.read() LTLT 8; // Get X upper byte first
accelX |= TinyWireM.read(); // lower
accelY = TinyWireM.read() LTLT 8; // Get Y upper byte first
accelY |= TinyWireM.read(); // lower
accelZ = TinyWireM.read() LTLT 8; // Get Z upper byte first
accelZ |= TinyWireM.read(); // lower
}
void getGyro() {
TinyWireM.beginTransmission(mpu); //I2C address of the MPU
TinyWireM.write(0x43); // Gyro data register
TinyWireM.endTransmission();
TinyWireM.requestFrom(mpu, 6); // Get 6 bytes, 2 for each DoF
while (TinyWireM.available() LT 6);
gyroX = TinyWireM.read() LTLT 8; // Get X upper byte first
gyroX |= TinyWireM.read(); // lower
gyroY = TinyWireM.read() LTLT 8; // Get Y upper byte first
gyroY |= TinyWireM.read(); // lower
gyroZ = TinyWireM.read() LTLT 8; // Get Z upper byte first
gyroZ |= TinyWireM.read(); // lower
}
bool shaken() {
if ((abs(accelX) GT 20000) || (abs(accelY) GT 20000) || (abs(accelZ) GT 32760)) {
return true;
}
else return false;
}
bool stirred() {
gyroXold = gyroX; // Save current Gyro settings...
gyroYold = gyroY;
gyroZold = gyroZ;
getGyro(); // get a second reading to compare with the last to see if we're moving
// 300 is just a number to filter noise-level fluxuations .. DYOR
if (((gyroX - gyroXold) GT 300) || ((gyroY - gyroYold) GT 300) || ((gyroZ - gyroZold) GT 300)) {
return true;
}
else return false;
}
void setDisplay () { // 128x32px OLED settings
OzOled.sendCommand(0xA8); // Multiplexer
OzOled.sendCommand(0x1F);
OzOled.sendCommand(0xDA); // Com Pins
OzOled.sendCommand(0x02);
}
Видео ATtiny85 and MPU-6050 6-axis Accelerometer and Gyro Arduino IDE канала Tom Donnelly
Показать
Комментарии отсутствуют
Информация о видео
Другие видео канала
 e-bike PAS Sensor fail. 3D printed replacement. Pendleton
 Suzuki GSXR125 Dealer Mode How to. F1 FI Code Diagnostic Mode
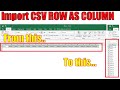 Import CSV row as COLUMN in Excel. e.g. eBay BLOCKED BUYERS
 Baiway Configurable Multi-chemistry Battery Meter. 3.2-70V
 Samebike Battery Capacity Test. 500W 10Ah LO26
 Seized VAX Brush Bar Fix U85 U89 U90 &tc.
 Samsung CLP Laser Printer Imaging Unit Drum Reset
 NCR18650B Panasonic. Simple FAKE vs Genuine test
 12V WS2812B 3-wire LED Strip with Arduino Uno
 Removing Blu-Ray DVD Security TAG lock
 HM-10 BLE Android App using HM10 & AI2 only. NO ARDUINO
 Simple 36V 250W front wheel e-bike build and buying tips
 $10 DIY QC Quick Charge 3.0 2.0 Phone Charger Powerbank
 Making a Simple Triac Dawn-Dusk Switch
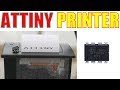 ATtiny-85 Printer - Thermal Printing
 Is the BPW34 any good for Energy Harvesting? Volts? Amps?
 Arduino POWER 200 nano Amps current SLEEP - 2000 Year Battery Life!
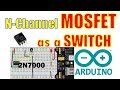 N-channel MOSFET Switch. 2N7000 - Arduino Power Saving
 P-channel MOSFET Switch. ZVP3306 BS250 - Arduino Power Saving
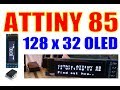 ATTINY85 driving I2C Oled 128 x 32 Display