How to sew elastic (2 techniques) | Sewing Tutorial with Angela Wolf
Elastic waistbands are a quick and easy option for many garments. Learn how to sew elastic two ways, from a versatile casing to a no-budge sew-in option. Read more about types of elastic for sewing — http://craftsy.me/2ah9QdY
Stock up on elastic here — http://craftsy.me/29ZYHvW
Shop elastic threaders — http://craftsy.me/29UXc0p
Master sewing elastic with your serger —http://craftsy.me/2akcWwd
Like and share this video if it was helpful - let's inspire more sewists! Got comments, questions or ideas for future videos? Leave them below!
Follow Craftsy
---------------------------------
http://www.facebook.com/sewingclub
http://pinterest.com/craftsy/sewing
http://www.twitter.com/becraftsy
https://www.instagram.com/becraftsy/
About Craftsy
-------------------------------------------------
Unleash the maker in you! Join more than 10 million passionate makers on Craftsy, where you can access expert instruction, supplies, patterns, and endless inspiration to help you make more of what you love.
In this video
------------------------------
Sewing elastic into a waistband or cuff is fast and easy. I'll show you how simple it is in this quick video.
Hi, I’m Angela Wolf! I'm going to show you two ways to sew elastic into a garment.
One technique uses an elastic casing
and in the other you sew the elastic directly to the fabric.
This is a skirt with a waistband casing; it has a a folded edge stitched in place with an opening where the elastic will be inserted.
First you’ll need to mark your elasticfor your waistline. I’ve already done that . Once I finish inserting the elastic these two markings must meet.
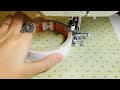
An easy way to insert the elastic is with a large safety pin since we all have one of those laying around the house!
Insert the safety pin into the 2 inch slot, and glide the pin as far as you can into the casing.
With the pin right here with my left hand I'm going to ease out the fabric. Slide the safety pin and a little bit further, and keep easing out the fabric. I’m going to do this all the way around the skirt. The only thing you need to be careful of is that you don’t lose the other side of the elastic within the casing or you have to start all over!
Continue to slide the safety pin past the seams - and stretch the fabric back out, you just don't want too much fabric gathering or the elastic can twist
Once I get to the back to the 2 inch opening, pull the elastic out enough that you’ll be able to run this to the sewing machine.
Match up the fitting marks and pin
Double check the casing on the skirt, that the elastic is not twisted.
To secure the elastic, use a zigzag stitch and stitch back and forth a couple of times. Trim the excess elastic away.
Even out the elastic within the casing, and the final step is to stitch the opening closed: start with a back stitch, stitch closed, and back stitch
And your elastic casing waistband is complete!
"Another way to apply elastic is by attaching it right to the fabric for a flatter look. If you have a serger this is a really fast technique - but I'll show you on a sewing machine - this time on a pair of pants.
On your measured and zigzagged elastic mark the half points and quarter points..
Line the elastic up along the wrong side of the fabric, matching up the center front seam with the center front marking on the elastic and the center back marking with the center back of the pants.
Stretch the elastic and add a few pins - this will help to ease the elastic in evenly all the way around the waist
Stitch the elastic to the fabric with a zigzag stitch of 1.4 length and 3.5 wide. As you do this, make sure to stretch the elastic to match the length of the fabric.
Finish your edge and then turn under the elastic toward the wrong side of the fabric. Pin at the center back seam and the center front - and lets just add one pin to each of the side seams
Line up the edge of the presser foot with the edge of the elastic and topstitch the bottom edge of the elastic to the fabric with a slightly bigger zigzag of 1.8 long and 4.5 wide. Make sure the elasitc butts up to the fold and stretch the elastic to match the length of the fabric.
Stitch over the first stitch just a little and backstitch - and the waist is finished.
Now you know two techniques to sew elastic into a waistband! The same techniques work for cuffs too!
Видео How to sew elastic (2 techniques) | Sewing Tutorial with Angela Wolf канала Craftsy
Stock up on elastic here — http://craftsy.me/29ZYHvW
Shop elastic threaders — http://craftsy.me/29UXc0p
Master sewing elastic with your serger —http://craftsy.me/2akcWwd
Like and share this video if it was helpful - let's inspire more sewists! Got comments, questions or ideas for future videos? Leave them below!
Follow Craftsy
---------------------------------
http://www.facebook.com/sewingclub
http://pinterest.com/craftsy/sewing
http://www.twitter.com/becraftsy
https://www.instagram.com/becraftsy/
About Craftsy
-------------------------------------------------
Unleash the maker in you! Join more than 10 million passionate makers on Craftsy, where you can access expert instruction, supplies, patterns, and endless inspiration to help you make more of what you love.
In this video
------------------------------
Sewing elastic into a waistband or cuff is fast and easy. I'll show you how simple it is in this quick video.
Hi, I’m Angela Wolf! I'm going to show you two ways to sew elastic into a garment.
One technique uses an elastic casing
and in the other you sew the elastic directly to the fabric.
This is a skirt with a waistband casing; it has a a folded edge stitched in place with an opening where the elastic will be inserted.
First you’ll need to mark your elasticfor your waistline. I’ve already done that . Once I finish inserting the elastic these two markings must meet.
An easy way to insert the elastic is with a large safety pin since we all have one of those laying around the house!
Insert the safety pin into the 2 inch slot, and glide the pin as far as you can into the casing.
With the pin right here with my left hand I'm going to ease out the fabric. Slide the safety pin and a little bit further, and keep easing out the fabric. I’m going to do this all the way around the skirt. The only thing you need to be careful of is that you don’t lose the other side of the elastic within the casing or you have to start all over!
Continue to slide the safety pin past the seams - and stretch the fabric back out, you just don't want too much fabric gathering or the elastic can twist
Once I get to the back to the 2 inch opening, pull the elastic out enough that you’ll be able to run this to the sewing machine.
Match up the fitting marks and pin
Double check the casing on the skirt, that the elastic is not twisted.
To secure the elastic, use a zigzag stitch and stitch back and forth a couple of times. Trim the excess elastic away.
Even out the elastic within the casing, and the final step is to stitch the opening closed: start with a back stitch, stitch closed, and back stitch
And your elastic casing waistband is complete!
"Another way to apply elastic is by attaching it right to the fabric for a flatter look. If you have a serger this is a really fast technique - but I'll show you on a sewing machine - this time on a pair of pants.
On your measured and zigzagged elastic mark the half points and quarter points..
Line the elastic up along the wrong side of the fabric, matching up the center front seam with the center front marking on the elastic and the center back marking with the center back of the pants.
Stretch the elastic and add a few pins - this will help to ease the elastic in evenly all the way around the waist
Stitch the elastic to the fabric with a zigzag stitch of 1.4 length and 3.5 wide. As you do this, make sure to stretch the elastic to match the length of the fabric.
Finish your edge and then turn under the elastic toward the wrong side of the fabric. Pin at the center back seam and the center front - and lets just add one pin to each of the side seams
Line up the edge of the presser foot with the edge of the elastic and topstitch the bottom edge of the elastic to the fabric with a slightly bigger zigzag of 1.8 long and 4.5 wide. Make sure the elasitc butts up to the fold and stretch the elastic to match the length of the fabric.
Stitch over the first stitch just a little and backstitch - and the waist is finished.
Now you know two techniques to sew elastic into a waistband! The same techniques work for cuffs too!
Видео How to sew elastic (2 techniques) | Sewing Tutorial with Angela Wolf канала Craftsy
Показать
Комментарии отсутствуют
Информация о видео
Другие видео канала
 How to Serge Elastic to a Waistband by Sew Sew Live
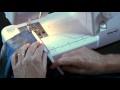 Sew an Elastic Waistband Without Casing
 HOW TO TAKE IN THE WAIST OF YOUR JEANS | NO-SEW EASY + QUICK
 ⭐️ 12 amazing sewing tips and tricks for beginners | Sewing techniques no overlock machine no serger
 The easiest way to measure elastic!
 All About Elastic - How to pick the right elastic for your sewing project
 DIY: TURN SWEATPANTS INTO JOGGER STYLE CUFFED SWEATPANTS
 5 Ways to Attach / Use Elastic | Basics of Sewing #1
 Learn how to make leggings on It’s Sew Easy with Angela Wolf (1308-1)
 How To Shirr Fabric | Shirring Tutorial
 DIY Circle Skirt with enclosed elastic waistband. Any age + Any size. Easy!
 KEEP YOUR PANTS UP! - Hidden Stretch Belt
 Learn to Sew a Drawstring Waistband - Jogger Pants Waistband Tutorial
 Easy way to sew and attach an Elastic
 Beginner's Guide To Sewing (Episode 7): Elastic
 How to Sew & Join Elastic for Pull on Pants - a Sewing Tutorial
 Sewing Basics #2: 7 Ways to Attach/Use Elastic
 How To Encase Elastic With A Serger
 Sewing 101: Elastic Waistbands