Google Pixel Battery Repair Guide - Fixez.com
https://www.fixez.com presents the official Google Pixel Battery Repair and Replacement Guide. Following the step-by-step, detailed instructions we have provided will help you safely replace a Google Pixel battery that is damaged or not holding a charge. Visit Fixez.com for all of the DIY Google Pixel replacement screens, parts and tools you need to fix your cell phone quickly, and affordably.
https://www.fixez.com/store/google/google-pixel
https://www.fixez.com/categories/repair-tools
If you need your Google Pixel repaired ASAP instead- we have you covered there too. Contact one of our skilled technicians at 866-233-6460 or support@fixez.com and they will fix your device for you. They are available Monday to Friday, 9am to 5pm PST.
Subscribe to our YouTube Channel for additional DIY smartphone and tablet teardown and repair videos! https://www.youtube.com/channel/UCDJrZCUtdJQaJq0akRCt3Ng
Like us on Facebook: https://www.facebook.com/fixez.com
Follow us on Twitter: https://twitter.com/fixezdotcom
Google Pixel Battery Repair Guide Steps:
Step 1
Power down your Google Pixel smartphone.
Step 2
Eject the Nano-SIM Card Tray.
Step 3 (Google Pixel Display Assembly)
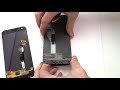
The 5-inch Google Pixel AMOLED display assembly is glued on solidly and is a tight fit within the frame. Apply heat to soften the adhesive.
Use the precision knife to create enough space to insert a playing card.
With the playing card slice through the sticky adhesive and carefully decouple the Google Pixel screen from the phone.
The display assembly is still connected to the Google phone, so don’t try to remove it entirely just yet.
Remove the following 2 T5 Torx screws securing the bracket that covers the display cable.
With the bracket out of the way detach the cable from motherboard and free the Google Pixel display assembly.
Step 4 (Google Pixel Midframe)
Remove the following 9 T5 Torx screws.
The thin midframe is secured by snug, press-fit notches. Use the precision knife to release the clips and separate it from the rear case… but don’t remove it entirely just yet.
Lift up the Google Pixel midframe and detach the ribbon connector from the motherboard, then separate it from the phone.
Step 5 (Google Pixel Battery)
Spudge up the Google Pixel battery cable from the motherboard.
Detach and extract the interconnect cable.
Google teases us with what looks like a pull to remove battery tab, we pull it only to find out it is perforated on the bottom.
The HTC-made, 2,770 milliampere-hour, Google Pixel battery is adhered to the phone with two strips of adhesive, but with a little spudgering it is readily removed.
* To reassemble your device, follow the steps in reverse order.
Видео Google Pixel Battery Repair Guide - Fixez.com канала Fixez.com
https://www.fixez.com/store/google/google-pixel
https://www.fixez.com/categories/repair-tools
If you need your Google Pixel repaired ASAP instead- we have you covered there too. Contact one of our skilled technicians at 866-233-6460 or support@fixez.com and they will fix your device for you. They are available Monday to Friday, 9am to 5pm PST.
Subscribe to our YouTube Channel for additional DIY smartphone and tablet teardown and repair videos! https://www.youtube.com/channel/UCDJrZCUtdJQaJq0akRCt3Ng
Like us on Facebook: https://www.facebook.com/fixez.com
Follow us on Twitter: https://twitter.com/fixezdotcom
Google Pixel Battery Repair Guide Steps:
Step 1
Power down your Google Pixel smartphone.
Step 2
Eject the Nano-SIM Card Tray.
Step 3 (Google Pixel Display Assembly)
The 5-inch Google Pixel AMOLED display assembly is glued on solidly and is a tight fit within the frame. Apply heat to soften the adhesive.
Use the precision knife to create enough space to insert a playing card.
With the playing card slice through the sticky adhesive and carefully decouple the Google Pixel screen from the phone.
The display assembly is still connected to the Google phone, so don’t try to remove it entirely just yet.
Remove the following 2 T5 Torx screws securing the bracket that covers the display cable.
With the bracket out of the way detach the cable from motherboard and free the Google Pixel display assembly.
Step 4 (Google Pixel Midframe)
Remove the following 9 T5 Torx screws.
The thin midframe is secured by snug, press-fit notches. Use the precision knife to release the clips and separate it from the rear case… but don’t remove it entirely just yet.
Lift up the Google Pixel midframe and detach the ribbon connector from the motherboard, then separate it from the phone.
Step 5 (Google Pixel Battery)
Spudge up the Google Pixel battery cable from the motherboard.
Detach and extract the interconnect cable.
Google teases us with what looks like a pull to remove battery tab, we pull it only to find out it is perforated on the bottom.
The HTC-made, 2,770 milliampere-hour, Google Pixel battery is adhered to the phone with two strips of adhesive, but with a little spudgering it is readily removed.
* To reassemble your device, follow the steps in reverse order.
Видео Google Pixel Battery Repair Guide - Fixez.com канала Fixez.com
Показать
Комментарии отсутствуют
Информация о видео
Другие видео канала
 How to Replace Your Google Pixel Battery
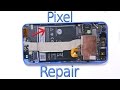 Google Pixel Teardown - Screen Repair Battery Replacement Fix
 Huawei Nexus 6P Battery Replacement Guide - RepairsUniverse
 Google Pixel Back Camera Lens Replacement - CLEAR Back Camera Mod!
 Google Pixel 1 LCD Screen and battery replacement
 Google Pixel LCD / Screen Replacement-Repair Tutorial
 DOUBLE Your Android Battery Life for FREE!
 iPhone X Teardown! - Screen and Battery Replacement shown in 5 minutes
 Why I Don't Use the Pixel!
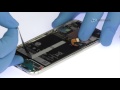 Google Pixel XL Battery Repair & Replacement Guide - RepairsUniverse
 Top 8 Google Pixel Tips and Tricks
 Google Pixel 2 USB-C charging port replacement
 Google Pixel Teardown and Reassemble Guide - Fixez.com
 How to Replace Your Google Pixel 2 Battery
 Google Pixel & Pixel XL Review: One Month Later
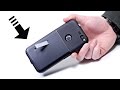 What's Hiding Inside This Google Pixel Case?
 Google Pixel: Battery Recalibration
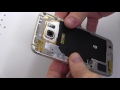 How to Replace Your Samsung Galaxy S6 Battery
 25 Reasons Why Google Pixel 2 XL Is Better Than iPhone X
 Google Pixel XL Pake Battery Xiaomi? Bisaa!