Car-O-Liner Vision X3 Measuring – How to Center A Vehicle
This video explains how to perform center a vehicle using the Vision X3 electronic measuring system from Car-O-Liner.
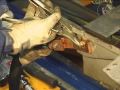
In this video you’ll learn how to center a vehicle using the Car-O- Tronic system by Car-O- Liner. Turn on the computer and double-click the car liner icon on the screen to open the program want in the software picked a letter N to create a new work order. In the new work order enter the repair order or RO number to advance click on the check mark; next select the make and model of the vehicle and double-click on the vehicle to view the property data sheet once the data sheet is displayed print the sheet; click on the check mark to advance; next select engine in or engine out a vehicle then refer to the data sheet for clamping locations and clamp the vehicle as directed on the datasheet. Place the measuring slide on the measuring bridge and press the bull’s eye button on the end of the slide to turn the slide on. Once the program and slider communicating move the arm through a range of motion to wake up the sensors. Locate the zero point on the screen to identify this as the starting point it is recommended to start out at the left rear 0 then selected to and the proper attachment using the upper left side of the screen take the first measurement by pressing the bulls eye button on the end of the measuring slide remember the first point is left rear 0 go to the right side of the vehicle and measure the exact same point as you did on the left side staying on the right side move as far forward to the front of the vehicle as you can and take a third measurement note that they're different adapters for different data sheets. Now go to the left side of the vehicle and take the same point that was taken on the right side now that four points have been taken better directly across from each other take a fifth measurement this measurement should be between the front 0 and rear 0 using the automatic search point or ASP you will hear the software cheer I'm you've successfully centered the vehicle.
Видео Car-O-Liner Vision X3 Measuring – How to Center A Vehicle канала Car-O-Liner
Показать
Комментарии отсутствуют
Информация о видео
Другие видео канала
 Car-O-Liner MB repair
 Car-o-Liner EVO
 GM Approved Car-O-Liner EVO For Structural Repairs Of The Cadillac CT6
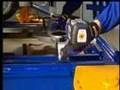 Car-O-Tronic Vision Measuring System
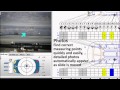 Car-O-Liner Measuring: Vision2 Software
 Audi Repair by Amato's Autobody on Celette car bench or frame machine, collision repair
 Car-O-Liner Vision2 Electronic Measuring
 How To Use a Laser to Measure Auto Body Car Frame Damage Collision Repair Equipment Universal DIY
 Part 5 of S60 car repair | Repair
 Blackhawk PL10 chassis machine
 Car-O-Liner’s PNP90 and PNP90 XT2 Riveting Tools System
 Car-O-Liner CTR12000 Multi Function Kit
 Car-O-Tronic Vision X3 - Electronic Measuring System
 Celette frame machine and MZ jigs tutorial, universal jig, measuring system, collision repair.
 Car-O-Liner - Easy, Accurate Measuring - Randy's Body Shop
 Measurements from engine bay mounting NO SETUP3
 The Value of Adding an OEM Certified Collision Repair Center
 Car-O-Liner Benchrack Structural Frame Alignment Machine-Milled Surface
 Home Made car body frame machine, Frame rack, Collision Repair Equipment, Universal DIY Jig
 Car-O-Liner Quick42 Alignment Bench