Skin Retouching with Vivid Light – Photoshop Quick Tip #adobe
Skin Retouching with Vivid Light – Photoshop Quick Tip | Professional Retouching in Minutes!
Welcome to this quick and powerful Photoshop tutorial! In this video, we dive into a professional skin retouching technique using the Vivid Light blending mode. Whether you're a beginner or an advanced user, this method is a game-changer for achieving smooth, clean, and natural-looking skin without losing texture or detail.
📌 What You’ll Learn:
How to use Vivid Light blending mode effectively
Frequency Separation basics
Dodging & Burning tips for depth
Plugin alternatives to speed up your workflow
Non-destructive editing workflow
Pro tips for realistic retouching
🔧 Tools & Plugins Mentioned:
✅ Photoshop (Any recent version)
✅ Retouch4me Plugin Suite (Optional, Paid)
✅ Portraiture by Imagenomic (Optional, Paid)
✅ TK Luminosity Masks Panel (Optional, Advanced Control)
✅Beauty Retouch Panel (by Retouching Academy)
Tip: Even if you don’t use plugins, this manual method gives you full creative control.
Why Use the Vivid Light Technique?
The Vivid Light technique works by combining blurring and high-pass filtering to separate tones from textures. It gives you:
High precision in skin retouching
Controlled smoothing without plastic skin effect
No need for external plugins (though they can help)
Perfect results for portraits, beauty, fashion, and commercial work
Step-by-Step Breakdown:
Duplicate the Layer
Always work non-destructively. Name your layer "Retouch Base."
Apply Gaussian Blur
Use a moderate blur (4–10px) to remove fine skin texture.
Create a New Layer → Apply Image
Set blend mode to Subtract or Add depending on method. This gives you a texture-only layer.
Set Blend Mode to Vivid Light
Here’s the magic! This will reintroduce skin texture over the smooth base.
Mask and Paint Carefully
Use soft brushes and low flow (10–20%) to blend only problem areas.
Dodge & Burn
Add light and shadow depth using 50% gray layers or curves adjustment layers.
Pro Tips:
Use low opacity brush strokes for smoother results.
Zoom out often – don’t overwork the details.
Avoid over-smoothing; skin should look natural.
Use Luminosity Masks for advanced selections.
Toggle the "Before/After" often to stay on track.
Plugin Workflow (Optional):
If you're working on multiple images and need speed:
Use Retouch4me Clean Skin for quick smoothing.
Use Portraiture Plugin for fast auto-retouching.
Use Beauty Retouch Panel for one-click actions (healing, D&B, texture fixes).
These plugins are helpful but manual control is key for professional quality.
Recommended Resources:
[Download Free Skin Texture Samples]
[Get Retouching Academy Panel]
[Photoshop Actions Pack – Frequency Separation + D&B]
[Professional Portrait Retouch LUTs]
[Brush Pack for Skin Retouching]
Keywords & Tags (for SEO):
skin retouching photoshop, vivid light skin retouch, photoshop beauty retouch, smooth skin in photoshop, photoshop frequency separation, dodge and burn photoshop, photoshop portrait editing, photoshop skin smoothing, retouch4me photoshop, photoshop plugins, photoshop skin editing tutorial
🙌 Support the Channel
👍 Like this video if you found it helpful
💬 Comment your thoughts or questions
🔔 Subscribe for more Photoshop quick tips
📸 Follow us on Instagram: @yourhandle
💻 Visit our website: www.yoursite.com for courses, freebies, and more
This Vivid Light technique is one of the most underrated but powerful tools in Photoshop. Mastering it will take your retouching skills to the next level – all while keeping the skin looking realistic and beautiful.
Видео Skin Retouching with Vivid Light – Photoshop Quick Tip #adobe канала Pix&Perfect
photoshop high pass filter beauty retouching photoshop tamil tutorial photoshop for beginners photoshop skin retouching tutorial photoshop vivid light retouch photoshop frequency separation trick how to retouch skin in photoshop photoshop portrait editing photoshop skin texture photoshop smooth skin high pass filter skin retouching photoshop quick tips 2025 beauty retouching photoshop photoshop workflow skin photoshop tips and tricks photoshop vivid light effect
Комментарии отсутствуют
Информация о видео
24 апреля 2025 г. 14:30:07
00:00:56
Другие видео канала
 Add Design or Pattern on Fabric in Photoshop 2025
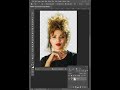 One Click Background Removal in Photoshop!
 Sharpening an Image - Image Enhancement
 Easy Background Removal in Photoshop!
 How to Change Product Color in Photoshop 2025
 How to Use Perspective Warp in Photoshop
 How to Change Product Color in Photoshop 2025
 How to Auto Crop & Straighten Images Like a Pro - "படங்களை தானாகவே நேராக்கும் எளிய வழி!"
 Add Design or Pattern on Fabric in Photoshop 2025
 HOW TO REMOVE OR ADD OBJECTS IN PHOTOSHOP
 Remove Extra Person from Photo in Photoshop - 2025 - Easy Tutorial
 How to recolor image in Photoshop
 Remove Wrinkles & Fine Lines from Faces Easily
 Unbelievable! Photoshop 2025 AI Colorizes Black & White Photos in 1 Click!
 "Photoshop 2025 Magic! Creating Own Images with Generative Workspace"
 Cloud-Based Background Removal Features in Photoshop 2025: Revolutionizing Image Editing
 How to Change Sunglasses in Photoshop 2025 – Easy & Quick Tutorial
 ADDING BACKGROUND TO TEXT
 Image Enhancement in Photoshop – Next Level Editing!
 How to Replace Sky in Photoshop – Easy & Stunning Results