- Популярные видео
- Авто
- Видео-блоги
- ДТП, аварии
- Для маленьких
- Еда, напитки
- Животные
- Закон и право
- Знаменитости
- Игры
- Искусство
- Комедии
- Красота, мода
- Кулинария, рецепты
- Люди
- Мото
- Музыка
- Мультфильмы
- Наука, технологии
- Новости
- Образование
- Политика
- Праздники
- Приколы
- Природа
- Происшествия
- Путешествия
- Развлечения
- Ржач
- Семья
- Сериалы
- Спорт
- Стиль жизни
- ТВ передачи
- Танцы
- Технологии
- Товары
- Ужасы
- Фильмы
- Шоу-бизнес
- Юмор
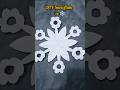
❄️Easy snowflake tutorial #diy #snowflakes #shorts
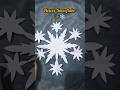
❄️ Easy Snowflake Tutorial | DIY Paper Craft for Beginners ❄️
Welcome to this simple and creative DIY snowflake tutorial that will help you transform an ordinary piece of paper into a beautiful winter decoration. Whether you're preparing for a festive celebration, decorating your room, or just looking for a relaxing craft activity, this easy snowflake design is perfect for all ages. With minimal materials and a few simple steps, you can create stunning paper snowflakes that look delicate and intricate.
Paper snowflakes are one of the most popular and timeless DIY crafts, especially during winter and holiday seasons. They symbolize uniqueness and beauty, as no two snowflakes are ever the same. This tutorial is designed to guide beginners step-by-step while also inspiring creativity for those who want to experiment with their own designs.
To get started, all you need is a square piece of paper, a pair of scissors, and a bit of patience. You can use plain white paper for a classic snowflake look, or try colored or patterned paper to add a unique twist. Begin by folding the paper diagonally to form a triangle. Then, fold it again into a smaller triangle. Depending on the complexity you want, you can continue folding to create more layers. The more folds you make, the more detailed your snowflake will appear.
Once your paper is folded, it’s time for the fun part—cutting! Use scissors to cut small shapes along the edges of the folded triangle. You can create triangles, curves, zig-zags, or even tiny circles. Be careful not to cut all the way through the paper, as this will cause your snowflake to fall apart. The key is to experiment with different patterns and see what beautiful designs you can create.
After you finish cutting, gently unfold the paper to reveal your snowflake. This is always the most exciting part because each design is unique and often surprising. You’ll notice symmetrical patterns forming a delicate and artistic snowflake shape. If the paper is slightly wrinkled from folding, you can place it under a book for a few minutes to flatten it out.
This easy snowflake tutorial is perfect for kids, beginners, and even adults who enjoy relaxing crafts. It helps improve fine motor skills, creativity, and concentration. You can also turn this activity into a fun group project with family and friends. Try making multiple snowflakes and experimenting with different sizes and designs to create a full winter-themed decoration set.
There are many ways to use your finished snowflakes. You can hang them on windows using tape or string to create a snowy effect. They also look beautiful when used as wall decorations, greeting card elements, or even as part of gift wrapping. If you’re celebrating holidays like Christmas or winter festivals, these DIY snowflakes can add a charming handmade touch to your decorations.
To make your snowflakes even more special, consider decorating them further. You can add glitter for a sparkling effect, use markers to draw patterns, or even apply a bit of glue and sprinkle some shimmer powder. This adds depth and makes your snowflakes stand out even more.
If you’re creating content for social media or YouTube Shorts, this tutorial is perfect for quick and engaging videos. The step-by-step process is visually satisfying, and the final reveal always grabs attention. Make sure to use good lighting and clear camera angles to capture each step. Adding background music or voiceover instructions can make your video even more appealing.
Consistency is key if you're building a DIY content channel. Try uploading regularly and experimenting with different craft ideas like 3D snowflakes, colored snowflakes, or themed designs. Engaging with your audience through comments and asking them to share their creations can help grow your community.
In conclusion, this easy snowflake tutorial is a fun, creative, and relaxing activity that anyone can enjoy. It requires very few materials but delivers beautiful results every time. Whether you’re decorating your space, creating content, or simply passing time creatively, paper snowflakes are a wonderful choice. So grab your paper and scissors, and start crafting your own unique snowflake designs today!
Don’t forget to like, share, and subscribe for more easy DIY craft ideas. Happy crafting! ❄️✨
Видео ❄️Easy snowflake tutorial #diy #snowflakes #shorts канала 2 minutes craft 😇
christmas decor christmas decorations craft tutorial crafts diy room decor diy snowflake easy craft easy crafts easy origami easy paper snowflakes easy snowflake handmade snowflakes how to make paper snowflakes miniature origami paper snowflake paper snowflake craft paper snowflakes papercraft quick crafts snowflake snowflake song snowflake tutorial what is snowflake winter crafts
Комментарии отсутствуют
Информация о видео
18 ч. 13 мин. назад
00:00:19
Другие видео канала