Make bioplastic by yourself!
Subtitles available in English, German and French.
What ingredients and material do you need?
👉water, corn starch, vinegar, glycerin (you can get it in a pharmacy), cooking pot, hotplate, whisk, wooden spoon & baking tray
How can you DIY?
👉Add 1 tablespoon of starch and 1 teaspoon of vinegar to 4 tablespoons of water in a cooking pot. Add also 1 teaspoon of glycerin. You can get the glycerine in a pharmacy. If you want to make more bioplastics, you can double, triple, etc. the quantities.
👉Stir the mixture thoroughly with a whisk and heat over medium heat. Always keep stirring.
After a few minutes, the mixture becomes thicker, you have to then replace the whisk with a wooden spoon to continue stiring.
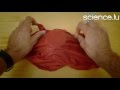
👉After more or less 10 minutes you have a sticky and glassy substance in your cooking pot. You can then spread this substance on a baking tray or another suitable surface.
👉Wait at least 24 hours for the bioplastic to dry. Then you can pull it off the baking tray.
ℹ️ You can even make objects (e.g. a bowl) with the bioplastic. Find out how to make a bioplastic bowl in this video: https://youtu.be/8nxuO3SjMQM
What’s the duration⏱️ of this DIY?
👉45 minutes of production – finished bioplastic earliest after 24 hours
What’s the scientific explanation?
👉The starch that serves as a raw material in this experiment consists of very long molecular chains, many of which are branched. In order to produce bioplastic from it, the starch must be boiled with vinegar. A chemical reaction takes place in which the side branches of the molecular chains making up the starch, are "cut off". The results are long starch molecule chains (which can be compared to cooked spaghetti). The effect of the third ingredient, the glycerin, can be explained well with the "spaghetti model": long, damp spaghetti stick together and get stuck. Transferred to the bioplastic, it would be rigid after drying and therefore easily fragile. The oily glycerin serves as a "lubricant", the spaghetti or the long starch molecules can glide past each other. The bioplastic softens and stays flexible even when it has dried. You can control whether your bioplastic is getting harder or softer by adding more or less glycerin.
Some additional tips:
👉You can also use cooking oil, instead of glycerin, but it doesn’t work as well.
👉The more glycerin you take, the softer your bioplastics becomes. If you take less glycerin, the bioplastic will become harder but also more fragile.
👉If you want to make colored bioplastic, you can add color to the substance. Food coloring works well, but don’t hesitate to try out other dyes!
👉If you want to convert the quantities into milliliters, one tablespoon corresponds to 15 ml and 1 teaspoon to 5 ml.
👉You can also sew purses, make hats or other items for Carnival out of the bioplastic fabric! Just one thing: please note that the bioplastic fabric is not waterproof!
Hazard note⚠️
👉The hot bioplastic is sticky. Make sure to not burn yourself with it and please only try it in the presence of an adult!
.......................................................
Scientific explication in German: https://bit.ly/2H1fFvJ
Scientific explication in French: https://bit.ly/2Yid7DP
More experiments: https://www.science.lu/de/experimentieren!
🔔Subscribe to our channel: http://bit.ly/2HWo6sz
📹Video: Ingo Knopf/scienceRELATIONS & FNR
Видео Make bioplastic by yourself! канала ScienceLuxembourg
What ingredients and material do you need?
👉water, corn starch, vinegar, glycerin (you can get it in a pharmacy), cooking pot, hotplate, whisk, wooden spoon & baking tray
How can you DIY?
👉Add 1 tablespoon of starch and 1 teaspoon of vinegar to 4 tablespoons of water in a cooking pot. Add also 1 teaspoon of glycerin. You can get the glycerine in a pharmacy. If you want to make more bioplastics, you can double, triple, etc. the quantities.
👉Stir the mixture thoroughly with a whisk and heat over medium heat. Always keep stirring.
After a few minutes, the mixture becomes thicker, you have to then replace the whisk with a wooden spoon to continue stiring.
👉After more or less 10 minutes you have a sticky and glassy substance in your cooking pot. You can then spread this substance on a baking tray or another suitable surface.
👉Wait at least 24 hours for the bioplastic to dry. Then you can pull it off the baking tray.
ℹ️ You can even make objects (e.g. a bowl) with the bioplastic. Find out how to make a bioplastic bowl in this video: https://youtu.be/8nxuO3SjMQM
What’s the duration⏱️ of this DIY?
👉45 minutes of production – finished bioplastic earliest after 24 hours
What’s the scientific explanation?
👉The starch that serves as a raw material in this experiment consists of very long molecular chains, many of which are branched. In order to produce bioplastic from it, the starch must be boiled with vinegar. A chemical reaction takes place in which the side branches of the molecular chains making up the starch, are "cut off". The results are long starch molecule chains (which can be compared to cooked spaghetti). The effect of the third ingredient, the glycerin, can be explained well with the "spaghetti model": long, damp spaghetti stick together and get stuck. Transferred to the bioplastic, it would be rigid after drying and therefore easily fragile. The oily glycerin serves as a "lubricant", the spaghetti or the long starch molecules can glide past each other. The bioplastic softens and stays flexible even when it has dried. You can control whether your bioplastic is getting harder or softer by adding more or less glycerin.
Some additional tips:
👉You can also use cooking oil, instead of glycerin, but it doesn’t work as well.
👉The more glycerin you take, the softer your bioplastics becomes. If you take less glycerin, the bioplastic will become harder but also more fragile.
👉If you want to make colored bioplastic, you can add color to the substance. Food coloring works well, but don’t hesitate to try out other dyes!
👉If you want to convert the quantities into milliliters, one tablespoon corresponds to 15 ml and 1 teaspoon to 5 ml.
👉You can also sew purses, make hats or other items for Carnival out of the bioplastic fabric! Just one thing: please note that the bioplastic fabric is not waterproof!
Hazard note⚠️
👉The hot bioplastic is sticky. Make sure to not burn yourself with it and please only try it in the presence of an adult!
.......................................................
Scientific explication in German: https://bit.ly/2H1fFvJ
Scientific explication in French: https://bit.ly/2Yid7DP
More experiments: https://www.science.lu/de/experimentieren!
🔔Subscribe to our channel: http://bit.ly/2HWo6sz
📹Video: Ingo Knopf/scienceRELATIONS & FNR
Видео Make bioplastic by yourself! канала ScienceLuxembourg
Показать
Комментарии отсутствуют
Информация о видео
Другие видео канала
 Make your very own bioplastic bowl!
 Plastics Made from Milk, Potatoes and Sugar? | HTME
 ALP project - Bio-plastic from banana peels
 Experiment: Biodegradable Plastic
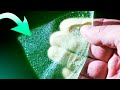 Making An EDIBLE PLASTIC WRAP!
 How To Make A Seaweed Bioplastic - The Basics
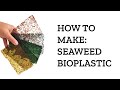 How to make Algae Seaweed Bioplastic - BEST tips and tricks!
 Bioplastics
 ALP project - Bio-plastic from corn starch and vinegar
 How to make an EDIBLE PLASTIC WRAP (crazy molecular recipes)
 MAKE BIOPLASTIC FROM TAPIOCA STARCH - MARINE ENVIRONMENT BIOTECHNOLOGY (BIOPLASTIC MINI PROJECT)
 Is bioplastic the „better“ plastic?
 Turning paper into plastic
 Precious Plastic - Make an edible bowl (part 8.2)
 A Hemp And Seaweed Bioplastic - How To Make It
 Designing Plastic for the Future: How To Make a BioPlastic Bag
 Make Bio-Plastic From Milk
 BIOPLASTIC DIY : gauze on cassava bioplastic
 Bioplastic from starch - home made
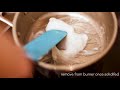 How to Make Tapioca Bioplastic. Makemoret Collective