How to Remove Acne in Photoshop
I Guarantee I Can Teach You to Master Photoshop. Learn How: https://phlearn.com/aaronwillteachyou
How to Remove Acne in Photoshop
Anyone who has gone through puberty knows that acne can stand out in a photo. Don't let those spots get you down! In this episode we show you how to get rid of acne and pock marks in Photoshop.
The key to removing acne is to divide the process into two steps; The first step is to get rid of redness and the second step is to remove the blemishes.
How to Remove Redness
Half of the battle is removing the redness around acne and it can be difficult if you don't use the right tools. In this episode we show you how to use Hue/Saturation to target specific areas of red and alter them so they look like normal skin tone.
Removing Acne Blemishes
After removing the color it is time to remove the blemishes. Adobe has done a great job with the spot healing brush in recent versions of Photoshop (CS6, CC, CC2014). It makes removing zits and blemishes very easy as long as you check a few settings. Be sure to select "content aware" and "sample all layers" so you can use this tool on a new layer and not destroy your original layer.
Simply paint over the blemishes to remove them. We suggest removing small spots first and then moving to the larger areas. To finish off the job, zoom out and paint larger areas. This will help to even out uneven skin tones.
Adding Red Back to Skin
In the first step we removed all the red from the skin. This is a necessary step when getting rid of acne but you will want to add a bit of red back to the skin to make it look more realistic. The difference is that the original red was blotchy and very saturated. This red will be softer and more subtle.
Choose the red color from the lips and paint over the subject's face, then change the layer blend mode to Soft Light and reduce the opacity to 20%-50% or until the skin looks natural.
VISIT PHLEARN.COM FOR MORE FREE TUTORIALS
https://phlearn.com
SUBSCRIBE TO OUR CHANNEL FOR MORE FREE TIPS AND TRICKS
http://www.youtube.com/subscription_center?add_user=phlearnllc
GET FREE TUTORIALS IN YOUR EMAIL + DISCOUNTS ON OUR PRO TUTORIALS!
https://phlearn.com/mail
BUY THE TABLET AARON USES! https://phlearn.com/tablet
LET'S BE FRIENDS!
Instagram ► https://www.instagram.com/phlearn/
Facebook ► https://facebook.com/phlearn
Twitter ► https://twitter.com/phlearn
Google+ ► https://plus.google.com/116791098059215639405
Phlearn ► https://phlearn.com
Видео How to Remove Acne in Photoshop канала PHLEARN
Показать
Комментарии отсутствуют
Информация о видео
Другие видео канала
 How to Whiten Teeth in Photoshop
 Complete Guide to Removing Blemishes in Photoshop
![Easily Smooth and Soften Skin In Photoshop | High-End Retouching Techniques [FREE Action Included]](https://i.ytimg.com/vi/ry9FFnE8s1g/default.jpg) Easily Smooth and Soften Skin In Photoshop | High-End Retouching Techniques [FREE Action Included]
Easily Smooth and Soften Skin In Photoshop | High-End Retouching Techniques [FREE Action Included]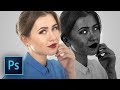 Leave No Blemish Unhealed with This Beauty Retouching Tip in Photoshop
 How To Remove ANYTHING From a Photo In Photoshop
 How to Remove Eye Bags in Photoshop
 LIGHTROOM Mobile Tutorial - How to remove pimples/acne | Clear face by LIGHTROOM Mobile
 Photoshop for Beginners | FREE COURSE
 How to Remove Reds from Skin in Photoshop
 Face Smooth In Photoshop | Easy Frequency Separation Tutorial
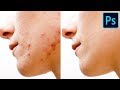 5 Ways to Remove Pimples FAST
 How to Change Eye Color in Photoshop
 I Paid Photoshop ‘Experts’ to edit this photo better than me
 The BEST Way to Whiten Teeth in Photoshop
 Photoshop Tutorial : How To Smooth Skin and Remove Pimples and Blemishes (Easy)
 How to Create Facial Hair in Photoshop
 Equalize Skin Tones in Photoshop
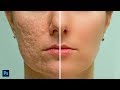 High-End Skin Softening in Photoshop - Remove Blemishes, Wrinkles, Acne Easily and Quickly
 How to Remove Anything from a Photo in Photoshop
 High-End Skin Softening in 1 Minute or Less in Photoshop