- Популярные видео
- Авто
- Видео-блоги
- ДТП, аварии
- Для маленьких
- Еда, напитки
- Животные
- Закон и право
- Знаменитости
- Игры
- Искусство
- Комедии
- Красота, мода
- Кулинария, рецепты
- Люди
- Мото
- Музыка
- Мультфильмы
- Наука, технологии
- Новости
- Образование
- Политика
- Праздники
- Приколы
- Природа
- Происшествия
- Путешествия
- Развлечения
- Ржач
- Семья
- Сериалы
- Спорт
- Стиль жизни
- ТВ передачи
- Танцы
- Технологии
- Товары
- Ужасы
- Фильмы
- Шоу-бизнес
- Юмор
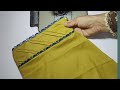
Beautiful neck and trousar bottom design for girls #fashiondesign #dressdesingn
Neck design descriptions + cutting & stitching details
Nice — I made a set of 8 clear neck-design options with short cutting & stitching instructions you can use for garments (kameez, tops, dresses). Each includes shape, cutting pattern pieces, recommended seam allowances, and stitching/finishing tips.
1) Classic V-Neck (moderate depth)
Look: Timeless, elongates the neck.
Cutting: Front: mark center front, draw V with desired depth (e.g., 6–9 cm). Cut on single layer. Back: shallow round or straight. Add 1–1.5 cm seam allowance around neck and CF.
Stitching & finish: Interface a narrow facing (2–3 cm wide) or use bias tape. Stay-stitch around V before turning. Clip (small triangles) into the V point, understitch facing, press flat. Topstitch 2 mm from edge for a crisp finish.
2) Overlap / Fakable Crossover Neck
Look: Overlapping front panels with a slight wrap. Feminine and forgiving.
Cutting: Front consists of two overlapping pattern pieces (left & right). Add 1.5–2 cm seam allowance along overlap edges. Cut on single layer. Back: normal.
Stitching & finish: Stay-stitch overlap edge. Sew shoulder seams, then stitch side seams leaving overlap free. Finish neckline with narrow facing or clean bound with bias strip — stitch binding to wrong side, turn, and understitch. Topstitch along overlap if desired.
3) Square Neck
Look: Structured, modern. Works well with medium-to-stiff fabrics.
Cutting: Front: square cutout; cut on single layer. Reinforce corners with small diagonal clips (notches) in seam allowance only. Back: higher straight back. Add 1–1.5 cm SA.
Stitching & finish: Use interfaced facing for stability. Attach facing, understitch, clip/grade corners carefully, turn and press. Optional topstitch 3 mm from edge.
4) Boat / Sabrina Neck
Look: Wide, shallow horizontal neckline; elegant and modest.
Cutting: Front and back both follow wide curve to shoulder points. Add 1–1.5 cm SA. Cut facing piece following neckline curve, 4–6 cm wide.
Stitching & finish: Stay-stitch neckline to prevent stretching. Sew facing to neckline, trim seam allowance, understitch facing, and press toward inside. For stretch fabrics use clear elastic along seam before attaching facing.
5) Mandarin / Band Collar
Look: Short upright collar, neat collarless look with a band.
Cutting: Cut collar band strip (double layer): length = neck circumference + 1–2 cm for overlap/button; height = desired band height + seam allowances. Back band may be slightly curved.
Stitching & finish: Interface outer band. Sew short ends to make loop, attach to neckline with right sides together, understitch and topstitch at top of band for clean look. Add button/loop or hook if closure required.
6) Keyhole Neck (button closure)
Look: Small teardrop or round opening at center front with button at top — delicate detail.
Cutting: Front: mark keyhole (round or teardrop). Cut main fabric normally and prepare facing that mirrors keyhole shape (facing with slit). Add 1–1.5 cm SA.
Stitching & finish: Sew neckline facing leaving the keyhole area open; turn facing through the slit, press carefully, then stitch down or add hand-stitched button loop and button. Topstitch around keyhole if fabric is stable.
7) Scoop Neck (deep or shallow)
Look: Soft, rounded neckline that’s flattering and casual.
Cutting: Front: curved scoop with 1–1.5 cm SA. Cut facing 4–6 cm wide matching curve. Back: shallower scoop.
Stitching & finish: Stay-stitch curved edge, attach facing, grade seam allowances, understitch, and press. For knit fabrics use stretch stitch or serger and finish with narrow binding.
8) Sweetheart Neck
Look: Romantic heart-shaped bustline. Requires precision.
Cutting: Front drafted with central dip and two curved cups; cut on single layer with 1–1.5 cm SA. Consider a shaped interfaced facing or sewn-in lining for stability.
Stitching & finish: Interface facing heavily at points. Sew darts/curves first for shape, then attach facing and understitch. Clip curves carefully and press. Hand-finish center point for smoothness.
Quick general tips (apply to all designs)
Seam allowance: 1–1.5 cm is standard for necklines; facings often 2–3 cm wide.
Stay-stitching: Always stay-stitch around necklines on single-layer curved edges to prevent distortion.
Interfacing: Lightweight fusible interfacing for woven fabrics; knit stay tape or clear elastic for stretch fabrics.
Clipping & notching: Clip into concave curves, notch convex curves — but never clip beyond stitching line.
Understitching: Understitch facings to hold them inward — gives a crisp edge.
Topstitching: Use topstitching for strength and decorative definition where appropriate.
Testing: Try on a muslin or test fabric to check depth and shape before cutting final fabric.
Видео Beautiful neck and trousar bottom design for girls #fashiondesign #dressdesingn канала W Sewing
Комментарии отсутствуют
Информация о видео
15 сентября 2025 г. 21:21:43
00:00:55
Другие видео канала