Solidoodle Workbench - Z Axis AUTOLEVEL in Repetier
It seems that SOME versions a Repetier may already be setup for this:
For the Z Axis Autolevel (or Autotramming) calibration setup, to use the built in leveling feature on the Workbench (with Repetier - since Soliprint 1.1.0 will not recognize the printer) try this:
1. Lower the table & Make sure the leveling switch by the extruder is ALL THE WAY DOWN
2. Prep & position your stl file in Repetier & run Slic3r
3. Manually turn on the extruder heat and/or heat bed in Repetier (you can also add a code line for this, but I like to do it manually)
4. Paste the following code in the GCode, after the command: M107
G28 X0 Y0 ;home X and Y
G29 ;probe bed
G90; set absolute coordinates
G92 E0; reset extruder distance
G1 Z5 F300 ;move platform down 5mm
G1 X145 Y145 F3000 ; move to back right corner
5. Click Run
The sensor should autolevel. I think the G90 line is the key code. It seems that Marlin is ready to go for this on the Workbench.
This works well for me! Hope this helps you!
________________________________________________________________________________________________________
Originally, I found this info from: http://www.soliforum.com/topic/4714/automatic-bed-leveling-and-z-offset-howto-level-23/
You can download/print a backup Z-Probe extruder mount for Solidoodle here: http://www.thingiverse.com/thing:193786
THANKS TO: Rincewind for the post on 2013-12-01 07:26:39!!
Видео Solidoodle Workbench - Z Axis AUTOLEVEL in Repetier канала zn design tools & techniques
Показать
Комментарии отсутствуют
Информация о видео
6 февраля 2015 г. 11:00:34
00:07:01
Другие видео канала
 How to Setup an Inexpensive Modular Photo & Video Studio
 Promotional Package for Industrial Crossarm Product
 FIX: Rear Seat Back Jammed/Stuck/ Won't Fold Down on a 2012 Honda CRV
 Adobe Illustrator CC 6 - Using the Type Tool & Advanced Text Settings
 Adobe Illustrator CC 5 - Using the Brush Tool and Basic Brush Panel Options
 Adobe Illustrator CC 4 - Save an Illustrator file as an Illustrator Editable PDF
 Adobe Illustrator CC 1 - Starting An Illustration from scratch with the Pen tool
 Adobe Illustrator CC 3 - Pencil and Smooth Tools to create illustrations
 Adobe Illustrator CC 2 - Anchor Point and Direct Selection Tools: Adjust Paths with Precision
 Fixing a 2008 MacBook Pro keyboard if keys pop off
 Dreamweaver 101 - Formatting HTML5 Code - Part 2/3
 Dreamweaver 101 - Formatting HTML5 Code - Part 3/3
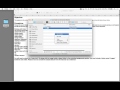 Dreamweaver 101 - Setting Up Dreamweaver & Folders
 Solidoodle Workbench Prints Birdfeeder Perch 4.0 (using Cura)
 Solidoodle Workbench - YAxis setup to move Extruder forward & back
 Solidoodle Workbench - Gnomes Birdhouse at 0.2mm
 HIDE / TURN OFF the ANNOYING Welcome Screen - Adobe Illustrator CC 2014
 Solidoodle Workbench Repetier Presets (so far)
 Solidoodle Workbench - Printing a Birdhouse at 0.4mm resolution
 Solidoodle Workbench 3D Printer - Out of the Box Before Printing