Faux Broken China Polymer Clay Tutorial
Hello dear polymer clay enthusiasts!
Here's an easy, colorful and perfect for a summer project. And taking into account the large array of napkins that are available out there, you truly have endless possibilities to make wonderful decoupaged polymer clay pieces.
In order to spice up the design I added an embossed golden pattern made using embossing powder, a stamp, an ink pad and a heat gun using a technique that is very used in card making.
Well, if you don't have embossing powder and a heat gun or if this technique does not appeal to you, you can still complement the Faux China look using stencils or silkscreen and gold metallic acrylic paint.
I decided to put the pieces together using seedbeads and a very easy bead stitch and I hope that you'll give it a try and thus make bead chains to attach your beautiful polymer clay pieces.
As always, I started by properly conditioning the polymer clay. I'm working with white Cernit 100% opacity polymer clay.
I used a larger angular cutter to cut the shape of the bead and a smaller round cutter to make a hole in the middle of the bead.
Then I applied a thin layer of Fimo liquid (like would act like a glue and would allow me to attach the napkin to the polymer clay base) and on top of it I put a design cut out from a napkin (after removing the inside white layer like I would do for any decoupage project).
I applied another layer of Fimo Liquid (on top of the napkin) and then I baked the pieces for 30 minutes at the temperature recommended by the polymer clay manufacturer.
Then I did the same thing for the back. I decoupaged the back in the same manner. I put the pieces into the oven again, but this time for 20 minutes only .
I used a stamp, an ink pad, gold embossing powder and a heat gun to heatset a golden pattern that I thought would enhance the faux China look.
After the second baking, the pieces are well protected (the napkin used to decorate the pieces is well protected underneath the baked Fimo liquid) so if you'd prefer a matt finish for your pieces, you can use them as they are. I wanted a glossy look on the pieces so I decided to apply a layer of Triple Thick Gloss Glaze and I thought this would add the final touch to the Faux Broken China effect.
I hope you'll like this tutorial and I hope that you'll take this inspiration and use it in your work with polymer clay!
My best to you!
Mihaela
Music from http://www.accelerated-ideas.com/freemusictracks
-~-~~-~~~-~~-~-
Please watch: "(36) Faux Enamel - playing with polymer clay, silver foil and alcohol inks "
https://www.youtube.com/watch?v=oIZpBAA35ho. Get inspired to create beautiful and colorful faux enamel clay pieces!
-~-~~-~~~-~~-~-
Видео Faux Broken China Polymer Clay Tutorial канала Mihaela Georgescu
Показать
Комментарии отсутствуют
Информация о видео
Другие видео канала
![Faux Modern Enamel [Polymer Clay Video Tutorial] using chalk pastels and stencils](https://i.ytimg.com/vi/zFbT2PY8hdA/default.jpg) Faux Modern Enamel [Polymer Clay Video Tutorial] using chalk pastels and stencils
Faux Modern Enamel [Polymer Clay Video Tutorial] using chalk pastels and stencils Updated Broken China Necklace Tutorial using Dremel Tool
 Hollow Chips Beads polymer clay FIMO tutorial бусины в технике чипсы полимерная глина FIMO Perlen
 Easy crackle effect on polymer clay
 Luxurious Polymer Clay Earrings. 4 Styles of Faux Enamel Jewelry.
 new easy galactic bracelet polymer clay tutorial FIMO & low temperature enamel DIY Armband
 Polymer Clay Faux Simbircite Technique/Pendants
 클레이로 원석 만들기/ Imitation Stone Making Polymer Clay Tutorial
 How to transfer an image from an inkjet printer to resin using 2 methods|| Resin ideas
 How to Glaze Ceramics with Paint-on Glazes // Glazing at Home!
 Polymer Clay Scrap Technique: Make Your Own Pebble Texture Stamp
 Faux Cinnabar Polymer Clay Tutorial
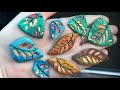 Faux Carved Stone look on Polymer clay . Jewelry Tutorial.
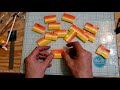 Polymer Clay Flower Cane
 BO Céramique - CERAMIC EARRINGS with MAGIC MIX or CERNIT GLUE- POLYMER CLAY TUTORIAL
 Create Colorful Alcohol Ink & Silkscreened Polymer Clay Components
 Easy Wire Clay and Resin Jewelry
 Simple Crackle/Cracked Effect Polymer Clay
 Polymer Clay Gold Leaf Marble Earring Tutorial | Polymer Clay Marble Beginner Technique
 Polymer Clay Faux Batik Technique/Pendants