How to Install a Midmark M9®/M11® Steam Sterilizer
Video training guide—how to install a Midmark steam sterilizer.
Learn more at http://midmark.com.
Video Transcript:
This video is an overview of its installation; however, always refer to the appropriate technical documentation for the complete list of instructions, safety alerts, and sequence of procedures before conducting any service or maintenance operation.
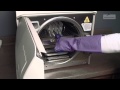
Inside the autoclave you will find the M911 installation and operation manual, a laminated quick reference guide for cleaning and operation, one bottle of speed clean, four trays and a power cord.
This illustration can be found in the installation and operation manual. It provides critical information for installing the autoclave, including types of support surface, recommended location and minimum clearances around the unit. These recommendations must be followed to ensure optimum performance of your autoclave.
Be sure your unit has the following clearances around it for proper air circulation. Place the unit of a moisture resistant surface such as laminate or stainless steel. The support surface must be level to ensure proper water level in the chamber during operation. Position the unit close to the front edge of the support surface so that the drain tube is easily accessible. If installing the unit beneath a cabinet, shelf or overhang a minimum clearance of 5 inches must be maintained above the unit to allow the operator to change the paper roll if the optional printer is installed.
If there is less than 5 inches of clearance above unit the overhang must not project further than 15 inches from the rear of the M9 or 18 inches from the rear of the M11.
The M9/M11 autoclave operates best in environments where the room temperature is between 68 degrees F and 104 degrees F with less than 80% relative humidity.
M9 and M11 autoclaves are available in either 115 volt or 230 volt AC. It is critical that the voltage delivered to the units be maintained between 104 & 127 volts AC for 115-volt models and between 207 & 253 volts AC for the 230-volts models.
In all cases, it is necessary to use a 3-prong grounded circuit in either voltage configuration. The maximum power consumption is approximately 1500 watts. The autoclave requires a dedicated electrical circuit and should NOT be connected to an electrical circuit with other appliances. After ensuring proper electrical requirements, attach the electrical cord to the back of the autoclave and then into the wall space socket. Now you will want to fill the reservoir with clean distilled water. It is very important that only distilled water be used. Since the autoclave operates with high water temperatures any minerals dissolved in the water will leak out and form mineral deposits. This can prevent valves from opening or closing properly and can also lead to corrosion in the chamber and tubing. The use of distilled water will minimize or eliminate these problems.
After your sterilizer is installed qualification testing using Biological Indicators (BI)s should be performed prior to placing the sterilizer in service. Three consecutive test runs, for each cycle type tested, with negative results from the Biological Indicators provide verification the sterilizer has been properly installed.
For more detailed information about installing your autoclave, please refer to the M9/M11 installation operation manual.
For further support, contact Midmark Support Services at 1-800-MIDMARK.
Видео How to Install a Midmark M9®/M11® Steam Sterilizer канала Midmark Dental
Learn more at http://midmark.com.
Video Transcript:
This video is an overview of its installation; however, always refer to the appropriate technical documentation for the complete list of instructions, safety alerts, and sequence of procedures before conducting any service or maintenance operation.
Inside the autoclave you will find the M911 installation and operation manual, a laminated quick reference guide for cleaning and operation, one bottle of speed clean, four trays and a power cord.
This illustration can be found in the installation and operation manual. It provides critical information for installing the autoclave, including types of support surface, recommended location and minimum clearances around the unit. These recommendations must be followed to ensure optimum performance of your autoclave.
Be sure your unit has the following clearances around it for proper air circulation. Place the unit of a moisture resistant surface such as laminate or stainless steel. The support surface must be level to ensure proper water level in the chamber during operation. Position the unit close to the front edge of the support surface so that the drain tube is easily accessible. If installing the unit beneath a cabinet, shelf or overhang a minimum clearance of 5 inches must be maintained above the unit to allow the operator to change the paper roll if the optional printer is installed.
If there is less than 5 inches of clearance above unit the overhang must not project further than 15 inches from the rear of the M9 or 18 inches from the rear of the M11.
The M9/M11 autoclave operates best in environments where the room temperature is between 68 degrees F and 104 degrees F with less than 80% relative humidity.
M9 and M11 autoclaves are available in either 115 volt or 230 volt AC. It is critical that the voltage delivered to the units be maintained between 104 & 127 volts AC for 115-volt models and between 207 & 253 volts AC for the 230-volts models.
In all cases, it is necessary to use a 3-prong grounded circuit in either voltage configuration. The maximum power consumption is approximately 1500 watts. The autoclave requires a dedicated electrical circuit and should NOT be connected to an electrical circuit with other appliances. After ensuring proper electrical requirements, attach the electrical cord to the back of the autoclave and then into the wall space socket. Now you will want to fill the reservoir with clean distilled water. It is very important that only distilled water be used. Since the autoclave operates with high water temperatures any minerals dissolved in the water will leak out and form mineral deposits. This can prevent valves from opening or closing properly and can also lead to corrosion in the chamber and tubing. The use of distilled water will minimize or eliminate these problems.
After your sterilizer is installed qualification testing using Biological Indicators (BI)s should be performed prior to placing the sterilizer in service. Three consecutive test runs, for each cycle type tested, with negative results from the Biological Indicators provide verification the sterilizer has been properly installed.
For more detailed information about installing your autoclave, please refer to the M9/M11 installation operation manual.
For further support, contact Midmark Support Services at 1-800-MIDMARK.
Видео How to Install a Midmark M9®/M11® Steam Sterilizer канала Midmark Dental
Показать
Комментарии отсутствуют
Информация о видео
Другие видео канала
 How to Operate a Midmark M9®/M11® Steam Sterilizer
 Demonstration: Midmark M11 Ultraclave
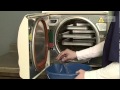 How to Clean and Care for Your Midmark M9®/M11® Steam Sterilizer (Daily/Weekly Maintenance)
 TechNation's Free, ASRT Certified Webinar Wednesday - 11/12/2014
 How to Perform Monthly Maintenance on a Midmark M9®/M11® Steam Sterilizer
 The Midmark Experience
 Elevance Dental Chair- Adjusting the Headrest and Tang
 5 Steps to Avoiding Cross-Contamination in Your IP Workflow
 Statim Sterilization
 IQ/OQ validation package
 How to Load a Midmark M9®/M11® Steam Sterilizer
 Introduction to Sterilization Pouches
 Midmark Dentist’s Stool
 Crosstex/SPS - Cleaning, Packaging & Sterilization
 Cryosuccess Cryotherapy Pen for Treatment of Skin Lesions
 #Carestream CS 9600 Features Full Length #CS9600
 How to Install Laminate Countertops
 Loading Pouches Properly for Sterilization
 Introduction to Clinical Laboratory Science: Ritter M7 SpeedClave Autoclave
 Failed Spore Test - What do you do?