Preparing Images for Digitizing in SewArt
This video is a comprehensive tutorial for preparing images for digitizing with the SewArt digitizing program from S & S Computing. This is video 2 of a series, which will follow 3 different images through the process of reducing the colors, touching them up with artwork and finally cropping and resizing them. This process will prepare these images for creating a stitch file.
In the first segment, the use of the posterize, wizard, color reduction and merge color tools are explained.
In the second segment, the use of the paint brush, pencil, fill bucket and eraser tools is shown.
In the third and final segment, the crop and resize tools are explained, along with a brief overview of the reflect and rotate tools.
This is a lengthy video. I encourage viewers to watch a segment and then stop the video, open the program and practice what you have learned.
Segment 1 (Color Reduction Tools) begins at 0:01:40:00
Segment 2 (Art Tools) begins at 1:05:54:00
Segment 3 (Cropping and Resizing) begins at 1:56:26:00
Instructions for using the zoom feature while using the wizard tool:
Click the zoom slider at the bottom of the program window. Once the design is larger than the wizard panes, you will see scroll bars. Click on the pane you want to scroll and roll the mouse wheel to view a different portion of the design.
This video is best viewed in full-screen mode.
Please feel free to join the SewArt Facebook group for a friendly place to ask questions and get advice about using SewArt. https://www.facebook.com/groups/460114370753528/
Видео Preparing Images for Digitizing in SewArt канала Mya Twesten
Показать
Комментарии отсутствуют
Информация о видео
Другие видео канала
 Simple Fill Digitizing in SewArt
 SewArt - 4 Tips for Digitizing with SewArt
 Top 5 mistakes new embroiderers make! Don't make these errors! A collaboration with Kandia!
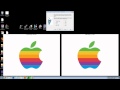 DIGITIZE And Create EMBROIDERY Files - Easily AND For FREE - Tutorial .PES .JPG Etc.
 MySewNet Platinum_ Digitizing a Simple Logo
 SewWhatPro - Combining Alphabets and Fonts using Planet Applique Designs
 Scan N Cut Basics - getting an image from the internet to the cutting machine using Canvas
 SewArt Beginner Basics
 Hatch Embroidery: How to digitize a logo for a customer! Step by Step🙌
 Getting Started With SewArt Embroidery Design Software- Image To Embroidery File (remake)
 How to digitize a logo in SewArt embroidery software. Convert an EPS logo to an embroidery file.
 Unzipping, transferring files to a flash drive, and then onto a Brother PE 770 embroidery machine
 Eliminating jump stitches from areas that have been erased using SewWhat Pro
 Digitizing Complex Appliques in FTC-U
 Sew Art - Tips for Digitizing Logos
 Digitizing Basics
 Sew What Pro - Creating a Custom "Name" Snap Tab Key Fob
 Sew What Pro Tutorial - Splitting Embroidery Designs EASY Step by Step
 Adding, deleting and editing stitches in SewWhat Pro
 How to get started with Brother PE DESIGN 11 Embroidery Software