How to configure Nanostation M2 as Accesspoint (Ap) | Technical Hakim
How to configure Nanostation M2 as Accesspoint (Ap) | Technical Hakim,
Ubiquiti NanoStation M2 Setup as wired Range Extender Easy Step by Step (Bridge Mode)
=========================================================================
1. Nano Station M2 (NSM2) Setup as Access point: https://youtu.be/BUaC3T4Hj_o
#NSM2 #NSM2Setup
Procedures for Configuring your NanoStation:
Here i will configure the NanoStation to act as a WiFi Access Point.
While the device can be configured over the network, it's often easier to perform configuration when the LAN cable is plugged directly into the Ethernet jack on your computer.
Configuration is performed using your web browser by typing in https://192.168.1.20.
You'll get a warning pop up stating that the device has presented an invalid SSL certificate due to the certificate being self-signed and not issued by a CA. This is normal, so just hit accept/continue.
You'll then need to log in with the default username and password of "ubnt".
Configure the Wireless tab:
The first step is to configure the wireless tab so the NanoStation acts as a WiFi Access Point.
Change the settings according to the below picture. Be sure to set the device up with WPA2 security and an appropriate WiFi password here.
You can also use this tab to adjust the power output should you wish to cover a smaller area.
The default channel bandwidth is 40MHz, but some older devices such as wireless printers and mobile phones cannot operate on 40MHz, so we've changed it to 20MHz in this setup.
Configuring nanostation via airos 5.5 as wireless access point
Turn off airMAX:
Navigate to the left-most tab (with the Ubiquiti logo) and uncheck the airMAX checkbox to disable Ubiquiti's proprietary airMAX protocol (a special MIMO TDMA multiplexing technique that allows communication between two or more Ubiquiti devices).
You won't be able to untick the box until the wireless tab has been completely configured.
Disable airmax protocol airos 5.5
Configure Network Settings:
Finally, it's time to configure the network settings to reflect that of your existing network and modem.
In our case the Telstra Cable modem is located at 192.168.0.1 with a subnet mask of 255.255.255.0, meaning all our devices are restricted to the 192.168.0.XXX subnet.
This means that we've had to change the default 192.168.1.20 to 192.168.0.20.
As we want the cable modem to continue controlling the network, we're setting the NanoStation to Bridge mode, and then assigning the Default Gateway and DNS IP addresses to the address of the modem (192.168.0.1).
The secondary DNS server is set to 8.8.8.8 (Google's DNS server), but this isn't important. Of course these are our network settings, your settings will undoubtedly be different, so make sure you configure them accordingly.
After the configuration is done, plug or connect the one end ethernet cable or lan cable to primary or main router's LAN port for internet accessibility.
=======================================================================
How to configure and Setup Nanostation M2 as Accesspoint (Ap), #TechnicalHakim #NanostationM2Setup How to install Ubiquiti Routers, How to setup ubnt nanostation m2 as AP, Station, Ap-repeater in bridge, router or soho-router mode, #NanostationM2Configuration Rocket m2 setup and configuration as Accesspoint (AP) and Station or as Ap- Repeater.
Technical Hakim,Tech Videos,Networking,Computer Networks,Information Technology,How to configure Nanostation M2 as Accesspoint (Ap) | Technical Hakim,how to setup nanostation m2 as repeater,nanostation m2 setup,nanostation loco m2,nanostation m2,nanostation m2 hotspot setup,how to configure nanostation m2 as accesspoint.
How to extend WiFi coverage using an Ubiquiti NanoStation M2.
In this video i have shown how to setup or configure ubnt/ubiquiti Nanostation M2 as Ap(accesspoint) to work as range extender or long distance coverage.
Hope you find the video informative. Do comment below about any queries related and Subscribe the channel for more updates.
Thank You, Make a good day ahead...!!!
-------------------------------------------------------------
Reach out to us:
Website: https://technicalhakim.com
Blog: https://technicalhakim.blogspot.com
Facebook: https://facebook.com/technicalhakim
Linkedin: https://www.linkedin.com/company/technicalhakim
Видео How to configure Nanostation M2 as Accesspoint (Ap) | Technical Hakim канала Technical Hakim
Показать
Комментарии отсутствуют
Информация о видео
Другие видео канала
 User Creation and Deletion on Huawei OLT | Technical Hakim
 Configuring Bridging And Vlan Binding In Huawei Olt For Voip/intranet | Technical Hakim
 Know Huawei OLT Board GPON Port and Optics details | Technical Hakim
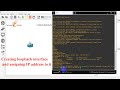 Creating Loopback interface and assigning ip address | GNS3 lab | Technical Hakim
 How To Configure Interface As Access Mode In Juniper Device | Technical Hakim
 TACACS+ configuration on Packet Tracer | Technical Hakim
 Huawei SmartAX MA5683T GPON OLT VLAN PORT Link-Aggregation Deletion Configuration | Technical Hakim
 Huawei GPON OLT Power Supply Demonstration | Technical Hakim
 Junos Os: Mastering Aggregated Ethernet Lacp With Technical Hakim
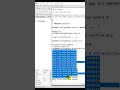 How To Enable Autofind In Huawei OLT Service Board/card Port | Technical Hakim
 Creating Users under login classes in juniper | Technical Hakim
 How to play offline game in Microsoft Edge browser | Technical Hakim #EdgeSurf #surf
 Test Your Internet Speed from these easy methods | Technical Hakim | Speedtest #internetSpeed
 Configuring BTV IGMP User and IGMP multicast-vlan for IPTV service in Huawei OLT | Technical Hakim
 How To Set Ip Address In Interfaces Of Junos Juniper Device | Technical Hakim
 IP configuration in cisco router interface in packet tracer | Technical Hakim | Router Configuration
 How to load configuration on Huawei OLT from TFTP | Technical Hakim
 RIPv1 (Routing Information Protocol) Configuration | GNS3 lab | Technical Hakim
 How To Set And Delete Interface Descriptions In Junos Juniper Devices | Technical Hakim
 Deleting DBA-profile Ont-srvprofile and ONT-lineprofile in Huawei GPON OLT | Technical Hakim
 How to Fix or Modify DBA Profile Traffic Bandwidth in Huawei OLT | Technical Hakim