etrailer | Dexter Left and Right Electric Trailer Brake Kit Installation
Click for more info and reviews of this Dexter Axle Trailer Brakes:
https://www.etrailer.com/Trailer-Brakes/Dexter-Axle/23-105-106.html
Check out some similar Trailer Brakes options:
https://www.etrailer.com/dept-pg-Trailer_Brakes-sf-Electric_Drum_Brakes.aspx
https://www.etrailer.com
Don’t forget to subscribe!
https://www.youtube.com/user/etrailertv
Full transcript: https://www.etrailer.com/tv-review-dexter-electric-trailer-brake-kit-23-105-106.aspx
Today we're going to be taking a look at the Dexter Electric Trailer Brake Kit, designed for use with 12 inch brake assemblies and it includes the left and right hand side. Now these brake assemblies are designed to give us excellent stopping power. All it's going to require from our truck is a brake controller. I like electric brakes over hydraulic brakes in utility applications because you don't have to worry about leaks and different stuff like that.These assemblies are going to replace the entire brake kit, so you're not going to have to worry about hardware, your springs being worn out, your magnet being worn out, or not properly connected. By getting a full assembly like this, you can replace absolutely everything, every piece of hardware, you don't have to worry about premature failure. Now in the kit, you'll get a left hand assembly, says it right here, "Left hand," and a right hand assembly.The left hand goes on the driver's side, right hand's going to go on the passenger side, just to give you a heads up.
Also, unlike a lot of other brake assemblies, you're going to have the new hardware to attach the assembly to your axle. I really like that feature. Then of course we'll just have the two wires to connect on the backside, one goes to power, one goes to ground, that energizes our magnet.Now as our hub is spinning around our assembly, once this magnet is energized, it's going to pull. You can see as it pulls on that hub, that's where our expansion comes from, it's going to force our shoes out making contact with the drum, giving us the braking force that we need. Now the magnet, you can see it's going to be a floating magnet, so while it is going to press up against the hub, we're not going to have to worry about it pressing too hard and doing any additional wear that's not normal.Now you can see the brake adjuster right here, this is designed so we can fine tune the braking application.
With any brake tool or screwdriver, you can go in the backside, there's a cutout there, you can see my tool coming in right here, that's going to allow us to adjust whether we need to adjust that for a little more tension. Maybe we got it too tight and we need to relieve a little tension. You can see how that tool's going to work in there.On the left side if we go up like this, that's going to cause our brakes to expand. If we go down, it's going to cause them to contract. Now just to fill you in on the more detailed specifications, the overall diameter of the assembly's going to qualify as a 12 inch brake assembly by two, meaning the pads are two inches wide or the shoes are two inches wide.
This is going to be designed to work with your 14 and a half, 15, and 16 inch rims.Now to begin our replacement process, we're going to need to gather a few simple tools. Basically, we want a dead blow hammer, a pair of channel locks, and needle-nosed pliers. These are really all we're going to need to get this replacement done. The first thing we need to do is get rid of our grease cap here on the end. Generally, we're going to tap outward, you can see that gap starting to increase then it'll pop off.Once that's out of the way, we've got a cotter pin located right here.
Get our cotter pin out of there. Now with our channel locks, we need to get ahold of this large nut here and get it removed. Now as we take this apart, we want to salvage this washer right here, this is our thrust bearing there and that's the only thing that doesn't come with our new drum assembly. We've got new lug nuts, we've got a new cap, new bearings, new seals, this is that one component we want to be sure to hang on to when we put it back together.Now we're just going to start working our hub assembly off. You can see that old bearing, we're going to get rid of that. The brakes are hanging up a little bit, we're going to be replacing those too, so I'm not too worried about, so I'm just using a pry bar just to get them worked off of here. And we'll slide it off. Now as you can see, we've got all the grease off that spindle, got rid of all the old stuff, and this is our time to inspect it.We need to ensure basically that three main areas are in good shape. You got this area here, this is where the inner bearing rides. Nice and smooth, no issue there. Same thing out here where our outer bearing goes. Then right in here on this wider area, you can see where it's real shiny there, that's where our seal is going to ride as it goes around. So we're just going to rub our finger around there
Видео etrailer | Dexter Left and Right Electric Trailer Brake Kit Installation канала etrailer.com
Показать
Комментарии отсутствуют
Информация о видео
Другие видео канала
 Replace: Electric Trailer Brakes - Part 2
 etrailer | Dexter Nev-R-Adjust Electric Trailer Brake Kit Installation
 How To Install and Connect a Trailer Brake Controller
 Does Your Trailer Need Brakes?
 How To Replace RV Trailer Brakes, Hubs, Rotors & Repack Bearing Grease
 Replacing the bearings, brakes on 7,000lb trailer axle
 HOW TO INSTALL DEXTER TRAILER BRAKES 6 X 12 Cargo Trailer Camper Conversion Part 34 vanlife
 Trailer Brake Hanging Up- Plus How I Do a Brake Job
![How to Repack Trailer Wheel Bearings [Start to Finish]](https://i.ytimg.com/vi/H3J4NSFTnY4/default.jpg) How to Repack Trailer Wheel Bearings [Start to Finish]
How to Repack Trailer Wheel Bearings [Start to Finish] etrailer | Dexter Electric Trailer Brake Kit Installation
 Electric Trailer Brake Maintenance 10" x 2 1/4" - DIY
 RV Wheel Maintenance, What You Need To Know.
 Trailer Wiring Junction Box Installation
 What's a Trailer Brake Controller???
 Replacing Trailer Bearings and Brakes - Part 2 (Step by Step)
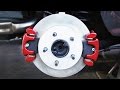 How to Install Dual Brake Calipers
 A Common Defective Brake Design Could Kill Your Family and Friends
 etrailer | Spectro Trailer Wiring Junction Box Installation
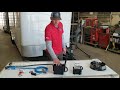 How a Trailer Brake-Away System Works by Factory Outlet Trailers 403-603-3311
 etrailer | Dexter Trailer Hub and Drum Assembly Installation