EASY Chevron Tutorial with TEAR DROP LOOP // Friendship Bracelets: Beginner DIY
♡ OPEN ME ♡
Materials used:
DMC embroidery floss, tape, scissors, desk/table
White - BLANC
Dark Blue - 930
Pink - 351
Light Blue - 809
A HORRIBLY written step by step (this is why I make video tutorials lol):
1. Pick 4 colours for your bracelet, and pick one of those colours to be your loop.
2. Cut 3 of your colours (excluding loop colour) at 200cm; cut your loop colour at 215cm
3. Line up all of the ends of your floss and fold floss in half
4. Secure floss at halfway point (100cm) on the edge of your desk with tape, with the extra long thread (loop colour) being on the side closest to you.
5. Create approx. 10 forward backward knots using your longest thread (loop colour)
6. Remove tape, and create horseshoe shape with forward backward knots
7. Reattach "horseshoe" to edge of your desk
8. With the group of floss on the right, create forward backward knots over your group in the order you want your colours to go, excluding each strand of floss after creating the forward backward knot until you run out of colours to use.
9. With the group of gloss on the left, create backward-forward knots over your group in a symmetrical order to the group on the right, excluding each
strand of floss after creating the backward-forward knot until you run out of colours to use.
10.Join the two middle strands of floss using a forward knot
11.Using the far left string, create forward knots over each colour on the left
12. Using the far right string, create backward knots over each colour on the right
13. Join the two middle strands using a forward knot
14. Repeat step 11,12 & 13 until chevron pattern is approx. 6-8 inches long
15. Starting on the left, use the second strand of floss to create a backward-forward knot over the far left strand, then gather into one group
16. Use the next strand of floss to create a backward-forward knot over the group you've created, add that strand to your group
17. Repeat step 16
18. Starting on the right, use the second to last strand of floss to create a forward-backward knot over the far right strand, then gather into one group
19. Use the next strand of floss to create a forward-backward knot over the group you've created, add that strand to your group
20. Repeat step 19
21. Braid group 1 and group 2 separately
22. Tie off braids
23. Cut excess floss
MORE TUTORIALS
https://tinyurl.com/nf8xys69
TIMELAPSE VIDEOS
https://tinyurl.com/5e252h6b
TWITCH CHANNEL
https://twitch.tv/ninjenndo64
FIND ME EVERYWHERE
https://linktr.ee/knotliketheothers
PHOTOGRAPHY:
https://linktr.ee/coffeebeanchaos
Music:
Youtube Audio Library
Видео EASY Chevron Tutorial with TEAR DROP LOOP // Friendship Bracelets: Beginner DIY канала KnotLikeTheOthers
Показать
Комментарии отсутствуют
Информация о видео
Другие видео канала
![CHEVRON BRACELET TUTORIAL [CC] || Beginner Friendly](https://i.ytimg.com/vi/KCBGya6L7oQ/default.jpg) CHEVRON BRACELET TUTORIAL [CC] || Beginner Friendly
CHEVRON BRACELET TUTORIAL [CC] || Beginner Friendly The Grinch - Mini Tapestry Timelapse
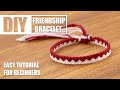 Triangle Simple Minimalistic Cute Macrame Friendship Bracelets | Easy Tutorial for Beginner
 DIY : 10 EASY FRIENDSHIP BRACELETS - Girl Crafts
 5 Handmade Friendship Bracelets Ideas| How To Make Thread Bracelet At Home |DIY Jewelry|Creation&you
 How To Make Bracelets At Home | DIY Thread Bracelet Ideas | Creation&you
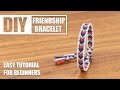 Outside Chevron Line Trendy Summer Macrame Friendship Bracelets | Easy Tutorial for Beginner
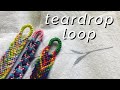 HOW TO: start your bracelets with a TEARDROP loop!
 DIY Friendship Bracelets for Beginners
 Simple Arrowhead Primarycolors Diamond Macrame Friendship Bracelets | Easy Tutorial for Beginner
 name/letter friendship bracelet tutorial! (advanced)
 3 EASY BEGINNERS FRIENDSHIP BRACELETS || Twisted, Striped, & Chevron ||
 DIY MACRAME BRACELET 🌈 Square Knot/Cobra Stitch Friendship Bracelet 💖
 DIY - How to make Chevron Friendship Bracelet - Easy Tutorial
 HEART FRIENDSHIP BRACELET TUTORIAL (beginner friendly and in depth) || friendship bracelets
 How To Make Macrame Bracelets | DIY | Handmade Jewellery Ideas | Thread Bracelet |Creation&you
![BASIC LOOPS FOR BRACELETS TUTORIAL [CC] || Beginner Friendly](https://i.ytimg.com/vi/5AFoA78pVr0/default.jpg) BASIC LOOPS FOR BRACELETS TUTORIAL [CC] || Beginner Friendly
BASIC LOOPS FOR BRACELETS TUTORIAL [CC] || Beginner Friendly Triple Layer Zigzag Macrame Friendship Bracelets | Easy Tutorial for Beginner
 DIY Chevron Friendship Bracelet
 Wish Bracelet Video Tutorial