- Популярные видео
- Авто
- Видео-блоги
- ДТП, аварии
- Для маленьких
- Еда, напитки
- Животные
- Закон и право
- Знаменитости
- Игры
- Искусство
- Комедии
- Красота, мода
- Кулинария, рецепты
- Люди
- Мото
- Музыка
- Мультфильмы
- Наука, технологии
- Новости
- Образование
- Политика
- Праздники
- Приколы
- Природа
- Происшествия
- Путешествия
- Развлечения
- Ржач
- Семья
- Сериалы
- Спорт
- Стиль жизни
- ТВ передачи
- Танцы
- Технологии
- Товары
- Ужасы
- Фильмы
- Шоу-бизнес
- Юмор
How To Manage Permissions In ChatGPT Codex 2026: Complete Step By Step Security And Access Guide!
Welcome back to ProgrammingKnowledge2! In today’s comprehensive, full-length software engineering tutorial, we are diving deep into one of the most critical aspects of enterprise and collaborative development: how to manage permissions inside your ChatGPT Codex Workspace.
In 2026, the Codex environment has evolved into a robust collaborative integrated development environment. Whether you are a B.Tech Computer Science student specializing in cybersecurity, leading a remote coding sprint, or managing API integrations from a corporate office in Gurugram, maintaining strict access control over your codebase is absolutely non-negotiable. If you invite collaborators into your workspace without configuring proper read, write, and execution permissions, you risk unauthorized code alterations, accidental deletion of critical infrastructure, or exposure of your private environment variables.
In this complete guide, we will walk you through the entire dashboard navigation process step by step, ensuring you know exactly how to secure your projects and manage team access efficiently.
Step 1: Accessing the Workspace Settings
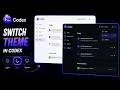
To get started, launch your preferred desktop web browser and log into your primary ChatGPT developer account. Toggle your interface from the standard conversational layout to the dedicated Codex Workspace IDE. Look at the top right corner of the workspace header and click on the Gear icon to open your Workspace Configuration dashboard. From the main menu, navigate to the tab specifically labeled "Access and Permissions."
Step 2: Understanding Role-Based Access Control
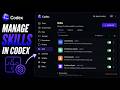
Inside the Permissions dashboard, Codex utilizes a strict Role-Based Access Control system. Before you invite anyone to your project, you need to understand the three primary tiers. The "Viewer" role allows a user to read your code and view the terminal output, but they cannot make any edits or execute commands. The "Contributor" role allows a user to write code and push changes, but they cannot delete the workspace or invite others. Finally, the "Admin" role grants absolute control over the environment, including managing billing and overriding security sandboxes.
Step 3: Inviting and Managing Collaborators
To add a new team member, click the blue "Invite User" button at the top of the dashboard. Enter the email address associated with their OpenAI developer account. Before hitting send, use the dropdown menu next to their email to assign them one of the specific roles we just covered. Once they accept the invitation, their name will appear in your Active Collaborators list. If you ever need to upgrade a Viewer to a Contributor, or revoke access entirely, simply click the three dots next to their name in this list and select "Modify Role" or "Remove Access."
Step 4: Managing External App and Integration Permissions
Permissions are not just for human users; they also apply to third-party integrations. If you have connected GitHub, Google Drive, or specialized deployment pipelines to your Codex Workspace, you must manage what those applications can access. Scroll down to the "Connected Apps" section within the Permissions tab. Here, you will see a list of every authorized integration. Click on an app to view its granular scopes. Always practice the principle of least privilege: if an app only needs to read your repository, ensure its "Write" and "Execute" permissions are strictly toggled off.
Step 5: Reviewing the Security Audit Log
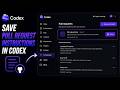
For ultimate cybersecurity hygiene, you need to monitor how permissions are being used. At the very bottom of the Access and Permissions page, click on the "View Audit Log" button. This generates a real-time ledger of every single action taken in your workspace. You can see exactly who modified a file, which integration pushed a commit, and when specific permissions were altered. Monitoring this log ensures your development environment remains completely secure and transparent.
Managing permissions properly is the foundation of secure software engineering and professional team collaboration. Implementing these steps ensures your intellectual property remains locked down while still allowing for seamless teamwork.
If you found this full-length development tutorial helpful, please hit the LIKE button and SUBSCRIBE to ProgrammingKnowledge2 for more in-depth software engineering guides, advanced account configurations, and cybersecurity workflow tutorials in 2026! What role do you usually assign to your peer reviewers? Let us know in the comments section below!
Hashtags
#ChatGPT #CodexWorkspace #ProgrammingKnowledge2 #TechTutorial #Coding2026 #SoftwareEngineering #DeveloperTools #Cybersecurity #AccessControl #AIProgramming #TechEducation #Programming
SEO Tags
Видео How To Manage Permissions In ChatGPT Codex 2026: Complete Step By Step Security And Access Guide! канала ProgrammingKnowledge2
In 2026, the Codex environment has evolved into a robust collaborative integrated development environment. Whether you are a B.Tech Computer Science student specializing in cybersecurity, leading a remote coding sprint, or managing API integrations from a corporate office in Gurugram, maintaining strict access control over your codebase is absolutely non-negotiable. If you invite collaborators into your workspace without configuring proper read, write, and execution permissions, you risk unauthorized code alterations, accidental deletion of critical infrastructure, or exposure of your private environment variables.
In this complete guide, we will walk you through the entire dashboard navigation process step by step, ensuring you know exactly how to secure your projects and manage team access efficiently.
Step 1: Accessing the Workspace Settings
To get started, launch your preferred desktop web browser and log into your primary ChatGPT developer account. Toggle your interface from the standard conversational layout to the dedicated Codex Workspace IDE. Look at the top right corner of the workspace header and click on the Gear icon to open your Workspace Configuration dashboard. From the main menu, navigate to the tab specifically labeled "Access and Permissions."
Step 2: Understanding Role-Based Access Control
Inside the Permissions dashboard, Codex utilizes a strict Role-Based Access Control system. Before you invite anyone to your project, you need to understand the three primary tiers. The "Viewer" role allows a user to read your code and view the terminal output, but they cannot make any edits or execute commands. The "Contributor" role allows a user to write code and push changes, but they cannot delete the workspace or invite others. Finally, the "Admin" role grants absolute control over the environment, including managing billing and overriding security sandboxes.
Step 3: Inviting and Managing Collaborators
To add a new team member, click the blue "Invite User" button at the top of the dashboard. Enter the email address associated with their OpenAI developer account. Before hitting send, use the dropdown menu next to their email to assign them one of the specific roles we just covered. Once they accept the invitation, their name will appear in your Active Collaborators list. If you ever need to upgrade a Viewer to a Contributor, or revoke access entirely, simply click the three dots next to their name in this list and select "Modify Role" or "Remove Access."
Step 4: Managing External App and Integration Permissions
Permissions are not just for human users; they also apply to third-party integrations. If you have connected GitHub, Google Drive, or specialized deployment pipelines to your Codex Workspace, you must manage what those applications can access. Scroll down to the "Connected Apps" section within the Permissions tab. Here, you will see a list of every authorized integration. Click on an app to view its granular scopes. Always practice the principle of least privilege: if an app only needs to read your repository, ensure its "Write" and "Execute" permissions are strictly toggled off.
Step 5: Reviewing the Security Audit Log
For ultimate cybersecurity hygiene, you need to monitor how permissions are being used. At the very bottom of the Access and Permissions page, click on the "View Audit Log" button. This generates a real-time ledger of every single action taken in your workspace. You can see exactly who modified a file, which integration pushed a commit, and when specific permissions were altered. Monitoring this log ensures your development environment remains completely secure and transparent.
Managing permissions properly is the foundation of secure software engineering and professional team collaboration. Implementing these steps ensures your intellectual property remains locked down while still allowing for seamless teamwork.
If you found this full-length development tutorial helpful, please hit the LIKE button and SUBSCRIBE to ProgrammingKnowledge2 for more in-depth software engineering guides, advanced account configurations, and cybersecurity workflow tutorials in 2026! What role do you usually assign to your peer reviewers? Let us know in the comments section below!
Hashtags
#ChatGPT #CodexWorkspace #ProgrammingKnowledge2 #TechTutorial #Coding2026 #SoftwareEngineering #DeveloperTools #Cybersecurity #AccessControl #AIProgramming #TechEducation #Programming
SEO Tags
Видео How To Manage Permissions In ChatGPT Codex 2026: Complete Step By Step Security And Access Guide! канала ProgrammingKnowledge2
Manage permissions ChatGPT Codex 2026 ChatGPT workspace access control how to share Codex workspace OpenAI role based access control ProgrammingKnowledge2 full tutorial AI software engineering security B.Tech CSE cybersecurity tools restrict file access ChatGPT IDE manage team collaborators Codex ChatGPT API integration scopes audit log ChatGPT developer account secure coding environment setup.
Комментарии отсутствуют
Информация о видео
16 июня 2026 г. 11:30:24
00:01:36
Другие видео канала