Lesson 2 - Koi fish 3D painting in Resin - Timelapse version
Koi fish 3D painting in Acrylic
Hello everyone, welcome to my 3D gold fish resin channel. In this video, I am going to use epoxy resin with two components: A – epoxy resin and B – hardener. I will mix these two components together with a ratio of 3:1 (3 epoxy resin : 1 hardener). You can also purchase resin on amazon from Artresin. Its quality is relatively good but the ration would be 1:1. Mine is 3:1.
Regarding colours, I recommend acrylic colour from Pebeo. The bowl for the resin is a Japanese ceramic bowl and I think you should use the pointed round brush because it is suitable for the 3D resin fish. Other than that, I will also use the dry slow compound from Linquitex to make the acrylic dry a bit slower.
With this kind of picture, I will apply the layer by layer style. Each layer will be drawn meticulously to avoid the breaking of the layers. Each layer will be from 1.5mm to 2mm thick and the time required for them to dry out would be around 8-10 hours. I will have to wait for the epoxy resin to dry out to apply the other layer. Therefore, it would take from 7 to 10 days to complete the picture. Each of these 3D resin would be split into two videos. The first one would be done on Uxcel 2mm clear perspex acrylic, which aim to help you to be familiar with the layer-by-layer drawing style. The second video would be done using resin material. I have just getting used to this kind of picture in the last month but I promise to share everything I know about this kind of art for all beginners. If you like my videos, please like and subscribe to my channel
Видео Lesson 2 - Koi fish 3D painting in Resin - Timelapse version канала 3D Goldfish Art
Показать
Комментарии отсутствуют
Информация о видео
Другие видео канала
 Amazing epoxy resin table of fish - Koi fish in epoxy resin.
 【UVレジン】小さな熱帯魚のアクアリウムを作りました!mini aquarium resin DIY
 Lesson 2 - Koi fish 3D painting on clear Perspex Acrylic - Timelapse version
 BUILDING 3 HYPER-REALISTIC DIORAMAS THAT ARE SO AMAZING
 Lesson 1 - Koi fish 3D painting in resin - Timelapse version
 3D Fish In Resin Design Ideas - 4 New Projects Using Stickers!
 3D Fish in Resin Stickers | NEW Fish Designs | NO Painting!
 Riusuke Fukahori Goldfish Salvation
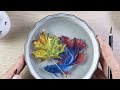 3D Goldfish Painting Tutorial l | Step By Step 3D Painting Of Betta fish
 FAIRY PENDANTS MADE FROM DRIED PLANTS AND EPOXY RESIN
 DIY. Aquarium with RESIN. Fish Tank 🐟 / ART RESIN
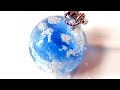 【UVレジン】100均材料と石けんで雲レジンを作りました! cloud resin made with soap DIY
 Lesson 3 : 3D goldfish painting in resin - TIME LAPSE version
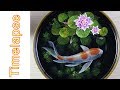 TIMELAPSE - 3d koifish painting in resin
 Message in a Bottle Epoxy Resin Paperweight Cube with Ocean Sea Foam Effect | DIY
 CHARMING WINTER-INSPIRED ACCESSORIES CREATED WITH EPOXY RESIN
 Art 3D Goldfish Painting Tutorial
 How to Make The Swamp || Crocodile Diorama || Resin Art
 Ocean from Resin 🌊 / ART RESIN
 3D Goldfish Painting On Resin Layers