A Full Restoration It Is - Project M40 Restoration Part 3
In this episode of Restore It, plans change for the M40 project as I decide to strip the car down fully, for a full restoration. Download the AutoDoc app at the link below:
https://www.autodoc.co.uk/?utm_source=youtube&utm_medium=referral&utm_campaign=Rest
https://interstitials.onelink.me/1036709825?pid=YouTube&c=Rest
Check out the AutoDoc YouTube channel:
https://www.youtube.com/c/AutodocUk?sub_confirmation=1
The original plan for this car was just a surface level clean up, fixing all of the obvious issues like the paint, visible rust and interior issues. But after taking some parts out and giving it a clean, it didn't feel right doing a half job. It also quickly became apparent that it was the right choice.
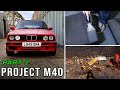
Even though this was one of the last models of E30 BMW made, it still had all of the classic rust spots in the engine bay, on the boot lid, on the bottom of the doors and around the footwells.
The plan now is to strip the car almost completely, sort out all of the rust, give it a full respray, and restore all of the parts that were removed.
Thanks for watching! Subscribe with the bell on to see this car restored back to factory condition.
Email restoreitchannel@gmail.com for general inquires to do with the video or series.
#restoration #BMWE30 #ProjectM40
Thanks to FCP Euro for supplying parts for this restoration and supporting the channel. Get a lifetime guarantee on all parts here - https://hubs.ly/H0kPPZW0
#Mtech1 #BMWE30 #Restoration
Tools & equipment used:
Quartz Lacquer - https://goo.gl/8PTVKM
Base Coat Paint - https://goo.gl/mWhufG
Rust Remover - https://goo.gl/13gopW
Rohr 250 Welder - https://bit.ly/33mkOGP
U-Pol Weld Through Primer #2 - https://bit.ly/2qL38ak
Fast Mover 1kW Infrared Paint Dryer, Stand, Timer - https://bit.ly/2WYR9jJ
Workbenches - https://arborgardensolutions.co.uk
Moldex Full Face Mask - https://goo.gl/NNYGrv
FGL 5 Spray gun - https://goo.gl/Acg5rd
A.N.I. R150-T Mini Spray gun - https://goo.gl/cHTJS2
Colad Washable Overalls - https://goo.gl/3Css9E
Colad Mixing Cups - https://goo.gl/8DYmE8
Colad TurboMix Sticks - https://goo.gl/cYZfks
Colad Synthetic Paint Strainers - https://goo.gl/H79ZgL
Steel wire bits - http://geni.us/keyaD
Blasting Cabinet - https://bit.ly/2GxvKJ7
Blasting pot - https://bit.ly/32TMnrU
Time Stamps
00:00 - Intro
00:30 - Removing the rear lights
00:37 - Removing the door cards
01:28 - Removing the right side boot trim
01:45 - Removing the rear battery tray trim
01:56 - Removing the left side boot trim
01:58 - Removing the inner left & right D pillar trim
20:13 - Removing the left & right rear speaker
20:28 - Removing the right cover storage mount
20:35 - Removing the rear wheel arch sound insulation
20:57 - Removing the main boot trim
30:04 - Removing the rear bench carpet
30:18 - Removing the left interior B pillar trim & seat belt
30:28 - Removing the main carpet
04:11 - Cleaning the chassis
05:19 - All of the parts so far
05:30 - Removing some of the boot trim
05:36 - Download the AutoDoc App at the link below
06:14 - Discussing broken trim
06:30 - Removing the rear headliner clips
06:54 - Removing the grab handles
07:12 - Removing the sun visors
07:31 - Removing the two rear inner windows seals
07:49 - Removing the sunroof
09:22 - Removing the sunroof handle & surround
09:35 - Removing the headliner
10:04 - Removing the rear licence plate
10:10 - Removing the rear licence plate trim
10:20 - Seeing how bad the rust was on the boot lid
10:56 - Removing the rear BMW badge
11:01 - Removing the rear seat mounting rail
11:07 - Failing to remove some boot trim
11:16 - Removing the carpet under the boot carpet
11:34 - How I organise all of the parts
11:58 - Removing the washer fluid reservoir
12:07 - Removing the bonnet
13:08 - Removing the headlight trim
13:14 - Removing the front grilles
13:31 - Removing the headlights
14:17 - Removing the front licence plate
14:20 - Removing the engine bay seal
14:30 - Removing the wing mirrors
15:04 - Removing the roof trim
15:42 - Removing the exterior D pillar covering trim
16:07 - Removing the door weatherstrip cover
16:25 - Removing the top door rubber seal
17:05 - Removing the door weatherstrip
17:24 - Removing the door dumper trim
17:42 - Removing the door vapour barrier
18:11 - Removing the window guide
18:38 - Removing the door covering trim
19:54 - Removing the rear door rear glass section
20:02 - Removing the window guide
20:15 - Removing the rear door glass
21:58 - Outro
Follow me on Social media to keep up to date with videos and behind the scenes.
My Patreon Page:
https://www.patreon.com/RestoreIt
My Twitter Page:
https://twitter.com/Restore__It
My Facebook Page:
https://www.facebook.com/RestoreItCha...
My Instagram Page:
@RestoreItChannel
PayPal Donations:
Restoreitchannel@gmail.com
Discord
I now also have a discord server if you want to chill with like-minded people and maybe learn something new.
https://discord.gg/vNmCBk9
Видео A Full Restoration It Is - Project M40 Restoration Part 3 канала Restore It
https://www.autodoc.co.uk/?utm_source=youtube&utm_medium=referral&utm_campaign=Rest
https://interstitials.onelink.me/1036709825?pid=YouTube&c=Rest
Check out the AutoDoc YouTube channel:
https://www.youtube.com/c/AutodocUk?sub_confirmation=1
The original plan for this car was just a surface level clean up, fixing all of the obvious issues like the paint, visible rust and interior issues. But after taking some parts out and giving it a clean, it didn't feel right doing a half job. It also quickly became apparent that it was the right choice.
Even though this was one of the last models of E30 BMW made, it still had all of the classic rust spots in the engine bay, on the boot lid, on the bottom of the doors and around the footwells.
The plan now is to strip the car almost completely, sort out all of the rust, give it a full respray, and restore all of the parts that were removed.
Thanks for watching! Subscribe with the bell on to see this car restored back to factory condition.
Email restoreitchannel@gmail.com for general inquires to do with the video or series.
#restoration #BMWE30 #ProjectM40
Thanks to FCP Euro for supplying parts for this restoration and supporting the channel. Get a lifetime guarantee on all parts here - https://hubs.ly/H0kPPZW0
#Mtech1 #BMWE30 #Restoration
Tools & equipment used:
Quartz Lacquer - https://goo.gl/8PTVKM
Base Coat Paint - https://goo.gl/mWhufG
Rust Remover - https://goo.gl/13gopW
Rohr 250 Welder - https://bit.ly/33mkOGP
U-Pol Weld Through Primer #2 - https://bit.ly/2qL38ak
Fast Mover 1kW Infrared Paint Dryer, Stand, Timer - https://bit.ly/2WYR9jJ
Workbenches - https://arborgardensolutions.co.uk
Moldex Full Face Mask - https://goo.gl/NNYGrv
FGL 5 Spray gun - https://goo.gl/Acg5rd
A.N.I. R150-T Mini Spray gun - https://goo.gl/cHTJS2
Colad Washable Overalls - https://goo.gl/3Css9E
Colad Mixing Cups - https://goo.gl/8DYmE8
Colad TurboMix Sticks - https://goo.gl/cYZfks
Colad Synthetic Paint Strainers - https://goo.gl/H79ZgL
Steel wire bits - http://geni.us/keyaD
Blasting Cabinet - https://bit.ly/2GxvKJ7
Blasting pot - https://bit.ly/32TMnrU
Time Stamps
00:00 - Intro
00:30 - Removing the rear lights
00:37 - Removing the door cards
01:28 - Removing the right side boot trim
01:45 - Removing the rear battery tray trim
01:56 - Removing the left side boot trim
01:58 - Removing the inner left & right D pillar trim
20:13 - Removing the left & right rear speaker
20:28 - Removing the right cover storage mount
20:35 - Removing the rear wheel arch sound insulation
20:57 - Removing the main boot trim
30:04 - Removing the rear bench carpet
30:18 - Removing the left interior B pillar trim & seat belt
30:28 - Removing the main carpet
04:11 - Cleaning the chassis
05:19 - All of the parts so far
05:30 - Removing some of the boot trim
05:36 - Download the AutoDoc App at the link below
06:14 - Discussing broken trim
06:30 - Removing the rear headliner clips
06:54 - Removing the grab handles
07:12 - Removing the sun visors
07:31 - Removing the two rear inner windows seals
07:49 - Removing the sunroof
09:22 - Removing the sunroof handle & surround
09:35 - Removing the headliner
10:04 - Removing the rear licence plate
10:10 - Removing the rear licence plate trim
10:20 - Seeing how bad the rust was on the boot lid
10:56 - Removing the rear BMW badge
11:01 - Removing the rear seat mounting rail
11:07 - Failing to remove some boot trim
11:16 - Removing the carpet under the boot carpet
11:34 - How I organise all of the parts
11:58 - Removing the washer fluid reservoir
12:07 - Removing the bonnet
13:08 - Removing the headlight trim
13:14 - Removing the front grilles
13:31 - Removing the headlights
14:17 - Removing the front licence plate
14:20 - Removing the engine bay seal
14:30 - Removing the wing mirrors
15:04 - Removing the roof trim
15:42 - Removing the exterior D pillar covering trim
16:07 - Removing the door weatherstrip cover
16:25 - Removing the top door rubber seal
17:05 - Removing the door weatherstrip
17:24 - Removing the door dumper trim
17:42 - Removing the door vapour barrier
18:11 - Removing the window guide
18:38 - Removing the door covering trim
19:54 - Removing the rear door rear glass section
20:02 - Removing the window guide
20:15 - Removing the rear door glass
21:58 - Outro
Follow me on Social media to keep up to date with videos and behind the scenes.
My Patreon Page:
https://www.patreon.com/RestoreIt
My Twitter Page:
https://twitter.com/Restore__It
My Facebook Page:
https://www.facebook.com/RestoreItCha...
My Instagram Page:
@RestoreItChannel
PayPal Donations:
Restoreitchannel@gmail.com
Discord
I now also have a discord server if you want to chill with like-minded people and maybe learn something new.
https://discord.gg/vNmCBk9
Видео A Full Restoration It Is - Project M40 Restoration Part 3 канала Restore It
Показать
Комментарии отсутствуют
Информация о видео
Другие видео канала
 BMW First Deep Clean In 28 Years - Project M40 Part 2
 Restoring an Ancient Barn Roof | Part 5
 STRIPPING My SEIZED AUDI RS4 B7 TTS Supercharger!!
 Is a Digital Dash Worth It?
 The Ultimate HYPER-HATCH PROJECT
 BMW E30 Gas Tank Restoration
![BMW E30 Dashboard [Restoration]](https://i.ytimg.com/vi/s3EotMAZ-I0/default.jpg) BMW E30 Dashboard [Restoration]
BMW E30 Dashboard [Restoration] Old D15 diesel engine fully restoration | Restore and repair old D15 diesel engine
 BMW E30 325i Touring Engine First Start - What Happened To The Touring?
 Restoring a BMW E30 M3 EVO2 in 9 minutes!
 Traxxas 8s X-Maxx Rebuild (My most abused RC Car)
 Why Subaru Engines FAIL
 DEEP Cleaning a Luxuriously FILTHY BMW! | Hairy Car Detailing Transformation and BMW Cleaning
 £1000 But Stuck In Gear And Running Rough - Project M40 Part 1
 BMW E30 M20B25 Engine Rebuild Restoration - The Machine Shop | Part 8
 Antique and Broken Wooden Jack Restoration
![Restoration of a Classic Engine Reviving the Chrysler 218 Straight 6 Flathead Engine - ASMR [PART 1]](https://i.ytimg.com/vi/Dw4nJqYFID4/default.jpg) Restoration of a Classic Engine Reviving the Chrysler 218 Straight 6 Flathead Engine - ASMR [PART 1]
Restoration of a Classic Engine Reviving the Chrysler 218 Straight 6 Flathead Engine - ASMR [PART 1] What Horrors Are In This 1952 MG TD Engine?
![BMW E30 M-Technic Sports Steering Wheel [Restoration]](https://i.ytimg.com/vi/rsymRQJHbIs/default.jpg) BMW E30 M-Technic Sports Steering Wheel [Restoration]
BMW E30 M-Technic Sports Steering Wheel [Restoration]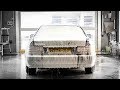 How to RESTORE a 30-Year Old 100,000 Mile Mercedes 500 SL