How to Create Topiaries - Step-by-step instructions and materials list in the description
Have you ever wanted a dog that won’t keep the neighbors up at night, shed all over your house, or lick every guest that walks into your home? Maybe you should consider investing in a topiary dog- a shrub that has been manipulated by Re-bar to take the shape of man’s best friend. You don’t have to feed him, he won’t sink his teeth into the mailman, and you never have to deal with ticks, fleas, or mange.
Materials & Tools needed
- 2 arbor vitas
- 2 pieces three eighths inch Re-bar
- A few old nylon socks
- A piece of copper wire
- A pipe fitters tool for bending copper tubing
- A mallet
- A shovel
- Pruning sheers
Step 1
Getting a Well Rooted Dog Dig a hole in which to plant your first arbor vista. There is a tendency to want to dig a smooth sided hole when working with a long handled shovel. This is not desirable because it contributes to the girdling and circling of roots. The roots need to grow and extend from the root ball. It’s a good idea to chop up the sides of the hole with a spade so it’s rough and chipped to give the them a chance to grow outward.
Plant your arbor vista at about a 65 degree angle being sure to turn it in a way that you have a good twig for a tail in the back. Pound a piece of Re-bar deep into the earth at the front of the plant so it is solid.
Step2
Tying Up Your Dog Everyone has a few lonely socks in their drawer that don’t match anything. A good way find use out of them without looking like a fashion dummy is to cut the old socks into strips that can be used to tie the arbor vista to the Re-bar every six inches or so. Be careful not to tie the plant too tightly. It should be snug but not constricting. Bend the Re-bar toward in a L shape to where the second arbor vista will be planted to form the back legs and torso of your new dog.
Step 3
Setting the Front Legs Plant the second shrub for the front legs, pound the Re-bar, tie the plant, and bend it slightly forward to form the neck and down to create the muzzle. You may want to use the pipe bender for leverage in the bending of the muzzle.
Step 4
Taming Your New Dog Now the shrub will naturally grow in the direction that the Re-bar leads it. All that needs to be done is some judicious pruning. Prune very slowly and with great thought because once it’s gone, it’s gone. Define your dog with frequent pruning over the course of a year.
Step 5
Giving It a Tail to Wag Use a piece of copper wire to wrap around the tail to lead it in any direction you’d like. You can give it a pointy tail or a bushy one. Have fun and be creative in raising your dog. It could be a tenacious pointer or a husky chow. It’s up to you.
After about a year your dog should be thick, filled out, and mature. You can change your dog’s shape any time you desire. This project could also just as well be how to make a topiary deer, bear, or man. It’s just a matter of manipulating the shrub’s growth with the Re-bar and harnessing it with ties and pruning. Imagine that. A dog that doesn’t eat anything, never begs, and doesn’t slobber – all in the great outdoors.
More Gardening and Landscaping:
https://www.youtube.com/playlist?list=PLjTMbsoHW2ejdcWzNkAARBzUQDvT3W1ME
More of The Great Outdoors with Joe Sherinski:
https://www.youtube.com/playlist?list=PLjTMbsoHW2ejiksPCxa2DTFANK-gz52xN
Видео How to Create Topiaries - Step-by-step instructions and materials list in the description канала Your New House
Показать
Комментарии отсутствуют
Информация о видео
Другие видео канала
 How To: Prune A Spiral Topiary + Topiary Tour
 Great British Garden Revival - Episode 2: Topiary and Roof Gardens
 How To Do Basic Topiary : Tutorial
 How to make a DIY Wire Sculpture
 Pierwsze formowanie spirali z tui /Jak przyciąć thuję w spiralę w prosty sposób | 1 wersja
 DIY How to insert plant in topiary frame
 Topiary Design | Mullan Nursery Company | Baltimore MD
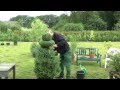 Buchsbaum Buxus Boxwood neu gestalten, re style
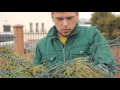 How to make topiary? Каркас для топиари, каркас слона
![Landscape design Topiary [Bacho]](https://i.ytimg.com/vi/pmJUD4jjwmU/default.jpg) Landscape design Topiary [Bacho]
Landscape design Topiary [Bacho]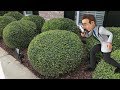 Trimming Round Ball Bushes
 The best evergreen shrubs for clipping into shapes and simple topiary (plus 3 to avoid!)
 How to Make a Spiral Topiary Shrub | The Great British Garden Revival
 Michelle Castles Wire Sculpture short preview
 Creating Stuffed Topiaries
 Topiary Frame Elephant L
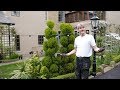 How to cloud prune - inspired by Jake Hobson and Niwaki techniques
 Amazing Art Topiary (HD1080p)
 Pruning a 2 gallon Boxwood into a Topiary Form