Better Redshift Renders using ACES with After Effects
Hi Everyone! In this tutorial I go over my ACES workflow from Cinema 4D & Redshift into After Effects then out into the world. I find this to be a simpler workflow than the one I see shared often on Youtube and Forums. I have both workflows written out below for reference. I also have a list of great links to other tutorials that do a great job of explaining some of the more technical aspects of ACES. Thanks for watching!
00:00 Intro / Downloads
01:10 Setting up ACES in Redshift
06:09 Tonemapping example in Lightroom
11:13 Lighting differently with ACES
14:33 Redshift Render Settings for ACES EXRs
17:40 ACES in After Effects
20:15 Look Back at the Old way of using ACES in After Effects
22:30 ACES in After Effects Continued
28:55 Mythbusting ACES with C4D and Redshift
45:26 Standard sRGB Lighting Compared to ACES Lighting
47:39 About Part 2 / Outro
Part 2: https://youtu.be/ddzYA-_B5Fo
/// TB;DW – Too Busy; Didn’t Watch ///
SIMPLIFIED WORKFLOW: ACES in After Effect with Color Management On
1. Under “Project Settings” “Color” tab “Depth: 32 bits”; Working Space: sRGB (or Rec.709); “Linearize Working Space” checked ON
2. Drag your .EXR footage into a new 32bit comp; “View” “Use Display Color Management” should be ON
3. Add a new adjustment layer above your .EXR; Add the “OpenColorIO” effect. For “Configuration” browse to your “config.ocio” under the latest Aces folder in the OpenColorIO configs you downloaded.
4. In the OpenColorIO Effects Panel under “Input Space” select “ACES - ACEScg”; In the “Output Space” select “Output - sRGB” or “Output -Rec.709” or whatever your output space is going to be.
5. Add a new adjustment layer on top; Add the “Color Profile Converter” effect. Set both the input and output space to your output color space chosen in the previous step (i.e. sRGB, Rec.709); Check ON “Linearize Output” checkbox. (This negates the double gamma curve applied by After Effects and OCIO plugin)
6. Any color correction should be applied to an adjustment layer or layers above the .EXR/footage layer but below the OpenColorIO layer; color corrections are the meat of the sandwich. .EXR layer and OpenColorIO are the bread.
/// OLD WORKFLOW: ACES in After Effects with all Color Management Off ///
1. Under “Project Settings” “Color” tab “Depth: 32 bits”; “Working Space: ACEScg”; “Linearize Working Space” checked ON
2. Import your rendered .EXR and/or footage, Right click and select “Interpret Footage - Main”; Under “Color Management” tab check ON “Preserve RGB”
3. Drag your .EXR or footage into a new 32bit comp. Under “View” menu UNcheck “Use Display Color Management”
4. Add a new adjustment layer above your .EXR; Add the “OpenColorIO” effect. For “Configuration” browse to your “config.ocio” under the latest Aces folder in the OpenColorIO configs you downloaded.
5. In the OpenColorIO Effects Panel under “Input Space” select “ACES - ACEScg”; In the “Output Space” select “Output - sRGB” or “Output -Rec.709” or whatever your output space is going to be.
6. Any color correction should be applied to an adjustment layer or layers above the .EXR/footage layer but below the OpenColorIO layer; color corrections are the meat of the sandwich. .EXR layer and OpenColorIO are the bread.
7. When ready to export; “Add to Render Queue”; Under “Render Queue” tab, click “Output Module - Lossless”, under “Color Management” tab check ON “Preserve RGB”
/// DOWNLOADS ///
OpenColorIO Download
https://github.com/colour-science/OpenColorIO-Configs/tree/feature/aces-1.2-config
OpenColorIO for After Effects
http://fnordware.blogspot.com/2012/05/opencolorio-for-after-effects.html
Liam Collod’s PYCO Image Colorspace Converter
https://www.artstation.com/artwork/188YwG
ACEScg Color Checker Image Download:
https://github.com/colour-science/colour-nuke/tree/master/colour_nuke/resources/images/ColorChecker2014
/// RESOURCES ///
Chris Brejon’s ACES Blog
https://chrisbrejon.com/cg-cinematography/chapter-1-5-academy-color-encoding-system-aces/
Aces Central Online Community
https://community.acescentral.com/
Why we shouldn’t use sRGB Output Display Transform as an Input Device Transform
https://community.acescentral.com/t/understanding-the-srgb-texture-idt-taking-an-image-from-the-screen-into-the-scene/2974
/// RECOMMENDED TUTORIALS ///
Lego Movie Talk
https://www.youtube.com/watch?v=vKtF2S7WEv0
InLightVFX’s Add VFX into Cinematic RAW+LOG Footage (the right way) | ACES Part 1
https://youtu.be/aJF2sAjRsy0
Youtube Video explaining gamma encoding:
https://www.youtube.com/watch?v=_Zeat3aeJCU
Jacob Danell’s ACES Linear Workflow Tutorial
https://youtu.be/1ixzKR21jdw
Andrey Lebrov’s Introduction to ACES
https://youtu.be/_MXNKCxgfSE
Arvid Schneider’s Rendering in ACES
https://youtu.be/RKW9Y1hMx1o
Greyscale Gorilla’s Why Cinema 4D Artists Should Care About ACES
https://youtu.be/4cCQ3pTRfmU
Видео Better Redshift Renders using ACES with After Effects канала i_go_by_zak
Показать
Комментарии отсутствуют
Информация о видео
Другие видео канала
 Redshift ACES Part 2: CG into Live Action After Effects Workflow
 Redshift Studio Lighting 01 - Product Shot Tutorial with Vincent Schwenk
 Introduction to ACES | Fusion, Resolve, AE
 Simplified Subsurface Scattering in Redshift! SSS...S?
 Proper Linear Workflow | Fusion, AE, PS, Octane, C4D
 How to Setup ACES in Cinema 4D & Octane
 Procedural Foam Material in Redshift (Redshift Tutorial)
 91. Видеоурок по Cinema 4D: Новый Redshift 3.0.48 (интерфейс, ACES)
 INSYDIUM TerraformFX - Coming Soon!
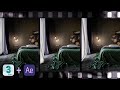 Bring your renders to life with Cinemagraphs! (Visualization + Animation)
 UNREAL ENGINE 5 - Cinematic Renders (Lumen in action)
 Add VFX into Cinematic RAW+LOG Footage (the right way) | ACES Part 1
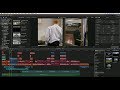 A COMPLETE END TO END WORKFLOW IN FINAL CUT PRO X
 Why Cinema 4D Artists Should Care About ACES | Greyscalegorilla Plus Preview Tutorial
 What is Redshift?
 ACES Workflow for Redshift 3.0.46
 Cinema 4D Fog Volumes Tutorial (Redshift)
 Redshift & C4D & AE / Render EXR to AOV's (Custom Layers, Multipass) and expand in AE / L#0003
 V-Ray | How to use ACES in PHOTOSHOP
 Complete ACES Setup & Workflow in V-Ray 5 for 3ds Max | + Managing ACES renders in post using Fusion