DIY How to Apply Ceramic Coating (boat)- SAVE MONEY.
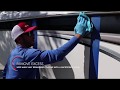
Here I quickly show how to DIY apply ceramic coating on a boat (Save you about $2,000-$3,000 vs a pro application). I cover some of the considerations for prep; temperature; products; plus what ceramic will and will not do for you. If you want to skip the intro- fast forward (scrub) to 1:45. That’s where I apply. (For MORE DETAIL - like what you may NEED - scroll down farther where I talk about what your specific boat may need .. i.e. New vs. Used boat, how much product you will need, removing water spots, etc.)
I have been using Marine Nano Shop products for a few years. (SEE DIY KITS Below).
Make SURE you practice on smaller, less noticeable areas before going all out on your project! This is not the same as waxing. If you don't wipe it off before it dries completely - you will have a permanent haze and have to start over on that area with a buffer. DO not apply over oxidized surfaces, or water spots. That makes it even harder to remove. Also- best to use 2 coats and let cure between coats (at least 24 hours).
Links:
Marine Nano Shop DIY Kits-
BASIC DIY Starter Kit https://marinenanoshop.com/products/liquid-crystal-armour-diy-starter-kit?ref=3852830769301?ref=3852830769301 (This will only do 1 coat on a 20' boat hull below the gunnel - but not the bottom. Sides only. It's really only a way to try it out cheap, not a full blown ceramic application the way it should be done. Currently $149. But I recommend 2 coats *see below kits...
NEW BOAT DIY KIT https://marinenanoshop.com/products/liquid-crystal-armour-diy-ceramic-coating-new-boat-kit?ref=3852830769301 (This is what you need if your boat is new, not oxidized or water spotted, not faded, etc.) It comes with all you need to do 2+ coats. Currently $510.
USED BOAT DIY KIT https://marinenanoshop.com/products/liquid-crystal-armour-diy-ceramic-coating-restoration-kit-for-gel-coat?ref=3852830769301 (If your boat has oxidation, spots, needs buffed, faded, this is what you need). It comes with what you need to revitalize the gel coat & apply 2+ coats. Currently $580. NOTE: IF your boat has water spots that cannot be removed with vinegar or buffing - then you will need the "MineralX".
MineralX (WATER SPOT REMOVER) - https://marinenanoshop.com/products/mineralx-stain-water-spot-remover?ref=3852830769301 This is the alternative to buffing. But it is only recommended to use on non-oxidized, non-scratched gel coat. So if you have oxidized or scratched gel-coat - you will need to buff it first anyway.
Amazon DIY Kit: https://amzn.to/35lROlC
SPECIAL CONSIDERATIONS:
1. NEW BOATS - Not been moored, no spots, no scratches yet, then you can just use the wipe down in the new boat kit to remove residual wax. Then apply. IF you have any water spots at all, swirl marks, light scratches - then you will need to buff it; then wipe down with the Pre-wipe provided. The new boat kits comes with product for either situation.
2. USED BOATS - Has been moored, has some spots, may have some oxidation & scratches - then the used boat kit comes with several compounds to get your gel-coat back to like new condition. Then it has same as new boat kit components.
3. NOT READY to SPEND $500? Then the DIY Starter Kit has enough product to let you test or try ceramic and see if it's worth it to you. The starter kit assumes you have already buffed your gel coat into reconditioned quality. The little bottle goes a long way - but I'd estimate only the sides below the gunnel - & the stern/bow -- but not enough to do topside or bottom.
4. HORRIBLE WATER SPOTS. If you have spots that vinegar, Hot Sauce or any other spot remover can remove - then you need MineralX spot remover (link above) - OR Polishing Compound that comes with the KITS. If you have oxidation, scratches AND spots - you need to just polish it out. The MineralX will be good to have on hand after ceramic coating because it eliminates the need to buff later.
I'll add some more videos as I remove spots, buff, etc. Please subscribe to follow & be notified of future videos.
Видео DIY How to Apply Ceramic Coating (boat)- SAVE MONEY. канала The Real World
Показать
Комментарии отсутствуют
Информация о видео
Другие видео канала
 Glidecoat Marine Ceramic Coating Application Steps With Before & After Photos
 Why You Shouldn't Get A Ceramic Coating
 How To Detail, Wash & Wax a New Boat
 How To Ceramic Coat
 CERAMIC COATING myths | The truth about CERAMIC COATINGS
 How To Apply Barrier Coat to Your Boat's Bottom
 How to Repair Clear Coat Fix 100% all types
 Powder Coating: The WD40 Method (TIS263)
 Ceramic Coating Gelcoat Fiberglass Boat: How to
 This Is Better Than A Clay Bar And Only Costs $2
 Do it yourself - body car repair dent & scratch
 12 Car Cleaning Tricks Local Dealers Don't Want You to Know About
 Extreme Barnacle Blasting and Removal
 Considering a Ceramic Coating? Watch this First!
 How to Apply a Ceramic Coating to your Car!!! - VETERAN 9H
 Protect Your Car From The Elements for 7+ Years Using Adam's Graphene Ceramic Coating™
 COMPLETE guide to ceramic coating your wheels!
 Learn how to apply ceramic coating to your boat or yacht.
 Removing RUST From A Boat The EASY Way!
 Babes Boats Ceramic Coating: Instructional Video - PRO version