How to Tile a Small Bathroom Floor | Bath room tiles Installation | DIY Bath Remodel
I partnered with RIDGID to show how to tile a bathroom floor. This is part of my small bathroom remodel project and floor tiling is one of the biggest bang for your buck DIY projects you can do in a bathroom. It totally changes the look and feel and in a small bath like mine, installing large format tiles really makes the room feel bigger. #bathroom #remodel #tiling
Measure Floor
Use a tape measure to determine how much tile, mortar, grout and backingboard will be needed. Purchasing the right amount of tile at the beginning of the job reduces the risk of mismatches in texture or color between production lots.
#Washroomtiles #Floortiles #
Bathroom tiles #Leveluphome
Prepare Underlayment
Attaching an underlayment of cement board to sub-flooring provides a level and sturdy surface to which bathroom tile can be easily attached. Using a circular saw, cut panels to fit measured bathroom and use a jigsaw to cut holes as needed to accommodate the toilet and other bathroom fixtures.
Use a drill with driver bit to attach backerboard screws to underlayment to sub-floor. Space screws approximately 6 inches apart and make sure they rest flat once secured.
If using a contrasting trim, lay edge tile first. Then lay tile in a configuration that will use the most whole tiles and best fits the space. Use tile spacers to make sure tiles are square and evenly spaced. Position tiles to minimize visibility of tiles that must be cut to size. Once the best layout has been determined, measure tiles that must be cut to complete coverage.
Use a tile saw to cut tiles necessary to complete floor.
Place cut tiles to complete tile layout and confirm tiles are spaced evenly, are spare and that the layout is pleasing to the eye. Once satisfied with the layout, remove tile to apply thinset mortar.
Apply a thin layer of thinset mortar to floor in small sections using a notched trowel. Replace tiles a few at a time, once again using spacers to help hold position.
Once tiles are all in place, allow mortar to dry for 24 hours before continuing.
How to Tile a Small Bathroom Floor | Bath room tiles Installation | DIY Bath Remodel
How to tile a bathroom floor, how to tile a small bathroom floor, bathroom remodel, bathroom remodel diy, diy bathroom remodel, small bathroom remodel, how to tile a floor, tile floor installation, tile floor installation bathroom, porcelain tile floor installation, how to tile a floor on plywood, how to tile a bathroom, how to, diy, do it yourself, diy project, fixthisbuildthat, fix this build that, tile bathroom, tile leveling spacers, tile leveling, tile leveling system
Once grout has been completely applied, use a damp sponge to wipe away excess grout, leaving tiles clean and grout smooth and level. Make sure to be thorough. Grout left behind on tile results in "grout haze", which can be difficult to remove once grout has set. Grout will be ready to walk on within 24 hours, although may take several weeks to fully cure.
Once grout is dry, finish your weekend tile project by applying a grout sealer to reduce staining and protect grout.
Видео How to Tile a Small Bathroom Floor | Bath room tiles Installation | DIY Bath Remodel канала Level up Home
Показать
Комментарии отсутствуют
Информация о видео
Другие видео канала
![How to Install Tile on the Bathroom Wall [Step-by-Step]](https://i.ytimg.com/vi/39qHa4fkAoM/default.jpg) How to Install Tile on the Bathroom Wall [Step-by-Step]
How to Install Tile on the Bathroom Wall [Step-by-Step] Toilet techniques _ 2×2 Floor tiles Installation in Bathroom|Fitting floor tiles|sumi construction
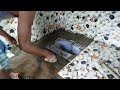 Amazing technology-How to install bathroom floor tiles- using by cement mixer grout
 bathroom floor tiles fitting in telugu by Chinna tiles work
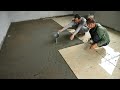 Techniques Install Ceramic Tiles Bedroom - 80x80cm Big Ceramic Tiles
 How To Tiles a Small Toilet Floor - Technique Cut and Put Ceramic Tiles Right Way
 How to Tile a Small Bathroom Floor | Bath room tiles Installation | DIY Bath Remodel | Latest
 How To Install Granit Kitchen Table - Kitchen Table Complete
 How To Tiles Bathroom | Cut Tiles Around Pipes | Handle The Brick Edges
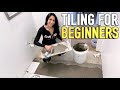 How to Tile a Floor for Beginners
![Shower Pan TILE Installation [How to set a shower drain and tile a shower floor with mosaic tile]](https://i.ytimg.com/vi/aZn1owm0Sto/default.jpg) Shower Pan TILE Installation [How to set a shower drain and tile a shower floor with mosaic tile]
Shower Pan TILE Installation [How to set a shower drain and tile a shower floor with mosaic tile]
 DIY Small Bathroom Renovation with EXTREME before & after! | Lake House Makeover | The DIY Mommy
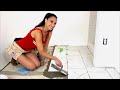 How to Tile a Floor | STEP BY STEP
 How to Tile a Shower Wall...Vertical 12x24 Porcelain -- by Home Repair Tutor
 बाथरूम में टाइल्स कैसे लगाए / Wall Tiles Fitting | Bathroom me tiles kese lagaye
 How To Tile A Shower | From A to Z
 Construction Techniques For Installing Beautiful Bathroom Tiles And Accurate Bathroom Floor
 Building Techniques-how to install flooring ceramic tile in small and design bathroom
 Techniques Contruction Bathroom Floor With Ceramic Tiles