- Популярные видео
- Авто
- Видео-блоги
- ДТП, аварии
- Для маленьких
- Еда, напитки
- Животные
- Закон и право
- Знаменитости
- Игры
- Искусство
- Комедии
- Красота, мода
- Кулинария, рецепты
- Люди
- Мото
- Музыка
- Мультфильмы
- Наука, технологии
- Новости
- Образование
- Политика
- Праздники
- Приколы
- Природа
- Происшествия
- Путешествия
- Развлечения
- Ржач
- Семья
- Сериалы
- Спорт
- Стиль жизни
- ТВ передачи
- Танцы
- Технологии
- Товары
- Ужасы
- Фильмы
- Шоу-бизнес
- Юмор
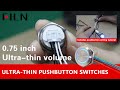
12MM Waterproof Ultra-Thin Tactile Switch
Hey everyone! If you’re working on a project that needs a compact, reliable switch—whether it’s a small electronic gadget, a control panel, or even a DIY device—today’s video is for you. Let’s take a deep dive into the 12MM Waterproof Ultra-Thin Tactile Switch—it’s tiny, tough, and packed with features that make it a must-have for any builder!
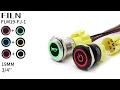
First, let’s talk about its size: at just 12mm, it’s ultra-thin, which means it fits in tight spaces where bulkier switches can’t go. No more rearranging your project to make room for a switch—this one slides right in! But don’t let its small size fool you; it’s built to handle moisture like a pro. It has an IP67 waterproof rating—that means it can be submerged in water and still work perfectly. The tail even has a glued design to lock out every drop of water, so you can use it in damp areas or projects that might get splashed without a worry.
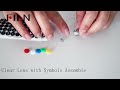
Another big plus? The ring-shaped LED light around the button. It’s bright enough to be seen clearly, even in well-lit rooms, and there are multiple light colors to choose from—pick the one that matches your project’s aesthetic or use different colors to signal different statuses (like “active” or “idle”). It adds a professional touch while making the switch easier to find and use.
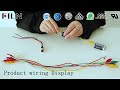
Now, let’s get to installation—don’t worry, it’s super straightforward, but there’s one key thing to note first: this switch has an anti-misinsertion design to protect it. That means you need to check the correct direction before plugging in the connector. If you force it in the wrong way, you could damage the connector and the switch itself—so take an extra second to line it up right, okay?
Here’s the step-by-step install process:
Check the components: First, make sure the light wires and the connector are all intact—no frayed wires or broken parts.
Match wires to the connector: Take the light wires (they’ll match the color of the LED) and plug each one into the corresponding color slot on the connector. It’s a one-to-one match, so you can’t mix them up here!
Connect the connector to the switch: Line up the connector with the switch (remember that anti-misinsertion direction!) and plug them together—you’ll feel a secure fit when it’s right.
Power it up: Connect your device’s power supply to the switch, and boom—the LED ring will light up, and your switch is ready to use!
One more thing: this switch uses a self-reset mode. That means when you press the button, it triggers your device (like turning a light on or sending a signal), and when you let go, it pops back to its original position. No need to press again to “reset”—it does the work for you, which is perfect for tasks where you just need a quick, temporary press.
Whether you’re building a mini robot, a custom remote, or a compact control panel, this 12MM Waterproof Ultra-Thin Tactile Switch checks all the boxes: small size, waterproof, bright LED, easy install (with safety built-in), and reliable self-reset functionality.
If you want to grab one for your next project, the link is in the description below. And if you found this video helpful, hit that LIKE button, SUBSCRIBE for more DIY and electronics tips, and drop a comment—what project are you gonna use this switch for? Thanks for watching, and I’ll see you next time!
Видео 12MM Waterproof Ultra-Thin Tactile Switch канала FILN Electronics
First, let’s talk about its size: at just 12mm, it’s ultra-thin, which means it fits in tight spaces where bulkier switches can’t go. No more rearranging your project to make room for a switch—this one slides right in! But don’t let its small size fool you; it’s built to handle moisture like a pro. It has an IP67 waterproof rating—that means it can be submerged in water and still work perfectly. The tail even has a glued design to lock out every drop of water, so you can use it in damp areas or projects that might get splashed without a worry.
Another big plus? The ring-shaped LED light around the button. It’s bright enough to be seen clearly, even in well-lit rooms, and there are multiple light colors to choose from—pick the one that matches your project’s aesthetic or use different colors to signal different statuses (like “active” or “idle”). It adds a professional touch while making the switch easier to find and use.
Now, let’s get to installation—don’t worry, it’s super straightforward, but there’s one key thing to note first: this switch has an anti-misinsertion design to protect it. That means you need to check the correct direction before plugging in the connector. If you force it in the wrong way, you could damage the connector and the switch itself—so take an extra second to line it up right, okay?
Here’s the step-by-step install process:
Check the components: First, make sure the light wires and the connector are all intact—no frayed wires or broken parts.
Match wires to the connector: Take the light wires (they’ll match the color of the LED) and plug each one into the corresponding color slot on the connector. It’s a one-to-one match, so you can’t mix them up here!
Connect the connector to the switch: Line up the connector with the switch (remember that anti-misinsertion direction!) and plug them together—you’ll feel a secure fit when it’s right.
Power it up: Connect your device’s power supply to the switch, and boom—the LED ring will light up, and your switch is ready to use!
One more thing: this switch uses a self-reset mode. That means when you press the button, it triggers your device (like turning a light on or sending a signal), and when you let go, it pops back to its original position. No need to press again to “reset”—it does the work for you, which is perfect for tasks where you just need a quick, temporary press.
Whether you’re building a mini robot, a custom remote, or a compact control panel, this 12MM Waterproof Ultra-Thin Tactile Switch checks all the boxes: small size, waterproof, bright LED, easy install (with safety built-in), and reliable self-reset functionality.
If you want to grab one for your next project, the link is in the description below. And if you found this video helpful, hit that LIKE button, SUBSCRIBE for more DIY and electronics tips, and drop a comment—what project are you gonna use this switch for? Thanks for watching, and I’ll see you next time!
Видео 12MM Waterproof Ultra-Thin Tactile Switch канала FILN Electronics
Комментарии отсутствуют
Информация о видео
20 октября 2025 г. 14:16:29
00:00:23
Другие видео канала