Trouble Shooting - Thermal relief valve leaking water
This video details the steps that are involved in the replacement of a thermal relief valve. This is a small yet crucial component of your pump that keeps it from overheating. If you notice that water is leaking or shooting out of it, you will need to replace it before using the pressure washer again. The location of the valve differs based on the pump, but it will have roughly the same appearance regardless of where it is located.
To replace the thermal valve yourself, you will need the following:
- A replacement thermal relief valve.
- A 10mm wrench.
- A heat gun or a torch with any applicable safety gear.
- Medium strength thread lock/sealant.
Once you have all of these items in place, you can begin replacing the valve.
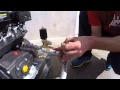
1. To start, turn on your heat gun or torch and direct it at the area between the thermal relief valve and your pump until it’s warm. This should take roughly 90 seconds with a heat gun.
2. Once the area around the valve has been heated, use the wrench to remove the old thermal relief valve.
3. Apply a generous amount of thread lock/sealant to the new thermal relief valve and install it on the unit using the wrench. Let the unit sit for about 30 minutes to ensure that the thread lock is dry. After this, your unit is ready for operation!
If you found this video helpful, feel free to give us a like and subscribe to our channel. We’ll be consistently adding a number of product, troubleshooting, and how-to videos in the future.
Website: https://www.bepowerequipment.com/
Instagram: https://www.instagram.com/bepowerequipment/
Facebook: https://www.facebook.com/Be-Power-Equipment-378208095962129/
Видео Trouble Shooting - Thermal relief valve leaking water канала BE Power Equipment
To replace the thermal valve yourself, you will need the following:
- A replacement thermal relief valve.
- A 10mm wrench.
- A heat gun or a torch with any applicable safety gear.
- Medium strength thread lock/sealant.
Once you have all of these items in place, you can begin replacing the valve.
1. To start, turn on your heat gun or torch and direct it at the area between the thermal relief valve and your pump until it’s warm. This should take roughly 90 seconds with a heat gun.
2. Once the area around the valve has been heated, use the wrench to remove the old thermal relief valve.
3. Apply a generous amount of thread lock/sealant to the new thermal relief valve and install it on the unit using the wrench. Let the unit sit for about 30 minutes to ensure that the thread lock is dry. After this, your unit is ready for operation!
If you found this video helpful, feel free to give us a like and subscribe to our channel. We’ll be consistently adding a number of product, troubleshooting, and how-to videos in the future.
Website: https://www.bepowerequipment.com/
Instagram: https://www.instagram.com/bepowerequipment/
Facebook: https://www.facebook.com/Be-Power-Equipment-378208095962129/
Видео Trouble Shooting - Thermal relief valve leaking water канала BE Power Equipment
Показать
Комментарии отсутствуют
Информация о видео
Другие видео канала
 unloader valve
 pressure washer broken or leaking valve fix
 Honda gx 390 4000 psi 15 litre belt driven low speed 1450 rpm Petrol pressure washer
 How to fix your pressure washer recoil starter and tip over troubleshooting
 Defective Pressure Washer Pump Diagnosis
 Pressure washer water leak thermocouple replacement
 Relief Valve Basics
 Leaking Pressure Washer Repair | Clean Pro Exteriors
 DEWALT 4200 PSI 4.0 GPM Direct Drive Pressure Washer Review | DXPW4240
 RMV Pump Repair & Maintenance
 Steps to Change and or Install an Thermal Relief Valve
 RSV Head Rebuild
 EASY FIX! HONDA PRESSURE WASHER that will not start after storage (plugged carburetor main jet)
 Pressure Washer Start Up Procedure with a Honda GX Series Engine
 POWER WASHER PUMP LEAK REPAIR - Generac Leaking Bad!
 Pressure Washer Start up Procedure
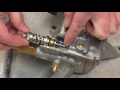 How a pressure washer unloader valve works (with cut-away view)
 How To Fix A Pressure Washer That Has Low Pressure - Video
 Pressure Washer Unloader Valve
 How to: Resolve a Low Pressure Problem on a Jet/Pressure Washer