WE BROKE A NEW RECORD! | RICHARDSON Cap 3D Puff Embroidery | FREE Embroidery Design (EMB Hub Ep119)
We’re setting records on Embroidery Hub this week! Willy’s embroidering 3d puff on a Richardson cap using 3 layers of 2.5mm of foam! We’re going to show you how we completed this challenge, what materials you want to use, and what look for in the digitizing of these kinds of designs. PLUS, make sure to watch to the end to download the FREE 3d puff design so you can try this challenge at home.
If you want to learn the basics of 3d puff embroidery, click this link -
https://www.youtube.com/watch?v=SxEuC_23rhw&t=3s
For tips on hooping your Richardson caps and adjusting your machine for 3d puff, click here-
https://www.youtube.com/watch?v=V1M2_aLaNWc&t=2s
Check out the digitizing software we used-
https://ricoma.com/US/software/chroma
Learn more about our MT-1501 here -
https://ricoma.com/US/machine/mt-1501
Watch demonstrations in person and get hands-on training at DecoSummit -
https://www.decosummit.com/
Download this design here -
https://hoopmade.com/designs/Embroidery%20Hub
If you enjoyed the last episode where we showed you how to embroider Richardson caps on a multi-head Ricoma at 1000 spm, then you don’t want to miss this episode. Typically, we see 3mm-4mm foam used for 3D puff. Some have even doubled up 3mm foam to achieve 6mm 3D puff. But what we’re attempting is EVEN THICKER than that at 7.5 mm!
Let’s breakdown the profit potential for this cap:
The cost of the cap is $3-$4 at wholesale price.
One piece of foam costs about $.25 so the price for three is about $1
So, the material cost per item is about $5.
The average price of a regular 3d puff embroidered cap is about $25-$30. For this style of 3d puff, you’ll be able to price your cap at about $35-$40.
This means the overall profit potential is $30-$35.
To get started, you’re going to want to use your 80/12 needles and thread that matches the color of your foam. You’re not going to need stabilizer for this project because the Richardson caps are already very structured and don’t need added support or stabilization.
Since this is a very thick foam, make sure to run your machine at a slower speed and make all necessary adjustments to your machine for successful 3d puff embroidery. These tips can be found in our Richardson cap video linked above.
Let’s discuss digitizing on our Chroma software. For three layers of foam, Willy followed these steps:
Used a satin stitch for the lettering.
Lowered the density to 1.
Removed the underlay.
Made the letters as thick as possible by adjusting the push and pull compensation. The thicker the letters, the more the 3d puff stands out.
Make sure the letters were embroidered from the bottom up.
Once you have your cap loaded on your machine, trace your design and then place your 3 layers of foam. We used two pins on either side to secure the 3 layers in place on top of the cap and then pressed start.
After the embroidery is completed, you can clean up the cap with a sharp tool to push any lingering foam inside the thread. Use a heat gun to adhere the thread and foam together.
At Ricoma we’re always pushing the limits to show you what your Ricoma machine is capable of. Make sure to download this design, follow our tips and create this super impressive cap!
------------------------------------------------------------------------------------------------
Facebook Embroidery & Custom Apparel Mastery Group: https://www.facebook.com/groups/embroiderymastery/
Join the Ricoma newsletter for educational blogs, videos, and live webinars: https://ricoma.com/US/insights
To learn more schedule a virtual demo today:
https://ricoma.com/US/virtual-demo
Get our latest Ricoma embroidery youtube videos sent straight to your Facebook Messenger!: https://manychat.com/l2/RiCOMA.us
To learn more about our embroidery machines, visit our website:
https://ricoma.com/
Видео WE BROKE A NEW RECORD! | RICHARDSON Cap 3D Puff Embroidery | FREE Embroidery Design (EMB Hub Ep119) канала Ricoma Embroidery Machines
Показать
Комментарии отсутствуют
Информация о видео
27 июня 2020 г. 1:36:15
00:11:07
Другие видео канала
 Embroidering Small Letters On Caps | Best Threads & Needles | FREE Embroidery Design (EMB Hub Ep120)
 SUBLIMATION on 3D Puff EMBROIDERY | Printing and Embroidery on RICHARDSON 112 Cap | (EMB Hub Ep129)
 RICHARDSON CAPS 3D Puff Embroidery Challenge at 1000 SPM - Mission Impossible?
 3D Puff Embroidery Digitizing
 DIGITIZING 3D PUFF FOR HEART AND HUSTLE PRINTING
 How To Embroider Beanies Like A PRO! 🧵 | Las Vegas Golden Knights Beanies ⛸️ | Brother SE625
 How To Do 3D Embroidery With Foam & Avance 1501C
 Front and Side CAP EMBROIDERY - 3 DESIGNS in one RUN | FREE Embroidery Design (EMB Hub Ep116)
 EMT16X Embroidery Machine Demo
 My First Time Using An EMBROIDERY MACHINE!
 Wilcom Tutorial 2. How to digitize 3D puff embroidery.
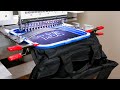 3D Puff Embroidery on a Laptop Bag
 Chenille Embroidery Hack - Varsity Jacket Embroidery | (Embroidery Hub Ep108)
 Embroidery Hub Ep. 10: 3D Embroidery | How To Do Puff Embroidery On Hats Tutorial
 How to Adhere Patches to Caps | Embroidery Vs. Heat Press | Pros & Cons (EMB Hub Ep128)
 3D Foam Puff Embroidery Q&A Facebook Live
 EMBROIDERY on MESH | How to Embroider Mesh Caps | (EMB Hub Ep131)
 How to Make 3D Embroidered Hats with a Hat Press in 60 Seconds