Negative Pressure Therapy: Part 4 of 4- Understand Wound Care
More information at http://www.vohrawoundcare.com/education
Vohra Wound Physicians: Healing Wounds, Saving Lives
Summary:
In Part 4 of the Negative Pressure Therapy Demonstration, Japa Volchok, DO discusses various tips and techniques. This is a step-by-step instruction of preparing a wound for negative pressure therapy. This demonstration is performed by a trained wound care physician for educational purposes only and should not be tried at home.
Text:
This video demonstration includes several tips and pointers that will allow you to correctly apply negative pressure therapy and achieve a successful dressing application. One common problem that may occur when applying a negative pressure dressing is it may be difficult to achieve a seal around a specific wound. Commonly, pressure ulcers develop in locations of the body where the skin's surface area is varied in its texture and depth.
This is a sacral wound where you can see that within the cleft of the buttock here, there is a relative deficit. When applying the adhesive, it were laid flat, you would see that there's a large defect here. To get the adhesive to stick and seal can sometimes be difficult.
One assist in achieving a good seal over the wound is to use an ostomy or stoma paste. Stoma paste is supplied by prescription or from your medical device vendor. It commonly comes in a tube. Sometimes it is in a strip or roll. What you can do with stoma paste, is apply it in the area where there is a defect in the skin, prior to applying your adhesive.
Once you've applied your stoma paste, you can then apply the adhesive directly over that as you will see in this demonstration. Your adhesive can stick directly to the stoma paste that has filled the deficit.
It is not uncommon when applying your suction tubing that the tubing may run across a portion of the body where you would not want the patient to be laying on tubing. This suction device can be located elsewhere, off a site of support. To do that, we would construct a bridge.
What you would want to do first is to lay down a layer of adhesive dressing, from the wound extending to where you would like the negative pressure tubing to be located. In this case, off to the side. Once this has been lain down and the working layer has been removed, the next step is to cut a strip of your foam dressing, approximately the length of the distance between you wound and where you would like your pressure tubing to be located.
Once you have cut a piece of foam that extends from your wound to where you would like you negative pressure tubing to be located, you would then position that. Then, cover with another layer of adhesive. Once you have entirely sealed this second layer of your foam dressing, you're now ready to peel this off.
You have now constructed a bridge that extends from over your primary dressing, where you've cut a hole in the sealant that covers the sponge that's filling the wound. This is now on top of adhesive. It is not in contact with normal skin. It extends out to where you would like to position your tubing that will connect to the negative pressure generator.
Similarly, as we have done over the wound dressing, we cut a portion of the adhesive away. As I had said before, if you remove a portion of the sponge with this it's not a problem. So, feel free to carve as you need with your scissors. Discard that.
You will now then take your tubing that connects to the negative pressure device, remove the adhesive, and this will go over the area where you have cut away the adhesive. Completely adhere that over and remove the backing.
Now you are ready to connect this tubing to the negative pressure generating device. You will see that once the negative pressure is active and is being generated by the device, this bridge will suction down. Any fluid or exudate will pull through the sponge that's in the wound bed, come up through the hole that we had cut and come out through the bridge and through the tubing. The underside of this particular portion of foam dressing is in contact with adhesive and is not in contact with healthy skin.
There are several specific indications and contraindications to negative pressure therapy. One should carefully review the manufacturer's educational materials and the indications for use of a specific dressing and negative pressure therapy system.
The wound model in this demonstration as well as the negative pressure generator and the supplies, have all been donated by K.C.I. for educational purposes.
Видео Negative Pressure Therapy: Part 4 of 4- Understand Wound Care канала Vohra Wound Care
Показать
Комментарии отсутствуют
Информация о видео
Другие видео канала
 Negative Pressure Therapy: Part 1 of 4- Understand Wound Care
 Negative Pressure Therapy: Part 2 of 4- Understand Wound Care
 PICC Dressing Change (peripherally inserted central catheter) for Nurses
 V.A.C. Therapy Mechanisms of Action
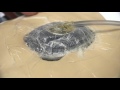 Negative Pressure Wound Therapy
 3M™ ActiV.A.C.™ Therapy System Clinician Instructional Video
 7 Steps to Effective Wound Care Management
 Bridging Two Wounds - Medela Invia® Foam Dressing Application
 TRAINING | KCI® V.A.C. Simplicity™
 Matt Stell - Everywhere But On (Lyrics)
 Nursing Skill Check: Wound Care Dressing Change
 Small, Medium and Large 3M™ V.A.C. Veraflo™ Dressing Application
 Tips and Tricks to Mastering NCLEX®-Style Questions in 2020 | Picmonic Nursing Webinar
 3M™ V.A.C.® Simplace™ Dressing Application on Sacral Pressure Ulcer
 Understanding Wound Dressings Categories and Indications
 NPWT Training - How to apply dressing for negative pressure wound therapy
 SNAP™ Bridge Dressing – Applying the SNAP™ Bridge Dressing on a Diabetic Foot Ulcer
 V.A.C.ULTA™ 4 Therapy System, 1 unit, 4 therapies
 Negative Pressure Therapy: Part 3 of 4- Understand Wound Care
 RENASYS◊ TOUCH Negative Pressure Wound Therapy - Foam Dressing Kit Application Guide