CNC Tool Length Offsets Explained
This video is talking about the 3 most common Tool Length Offsetting methods used on CNC milling machines, and the pros and cons of each method.
Method 1 - For this first method, you will assemble the tool and load it into the spindle of the machine. Your part would also be loaded into the vise/fixture. Next, you'll bring the tool tip down to the top of the part (or where ever you plan on placing Z0). To accurately set the tool tip to the work, a piece of paper can be used. Once the position is established, make note of the distance from HOME the machine is currently at. This will be the value that gets loaded into the height offset for this tool. A value of 0 will be input into the Z value for the work offset (G54).
This method is quick as only one touch off is needed for the tool, none for the work. The limitation of this method is it is only good for the current part. A new part (one that differs in thickness) will require a new tool touch off. Tool length is a large negative number, work offset is 0.
Method 2 - This method is similar to Method 1, with the addition of an intermediate block. This block can be of any thickness and can be placed at any position in the machine, as long as the same block and position are used for all tool and work settings. Touch the tool tip to the top of the intermediate block. The distance from HOME to the current position will be placed in the tools height offset. Next, measure the height difference between the intermediate block and the work piece. There are several methods to accomplish this, but again paper can be used. The difference is height between the intermediate block and the top of the work piece will be entered into the Z value of the work offset. Polarity of this number is very important.
This method requires a touch off for each tool and one touch off for the work piece. If a new work piece is loaded, simply re-measure from the intermediate block to the work piece, no need to retouch the tools. Tool length is a large negative number, work offset is difference between intermediate block and work.
Method 3 - This method is my preferred option as it results in an offset that is the physical length of the tool (a positive number). With no tool in the spindle, bring the spindle face to the work piece. Paper, again, can be used. With the spindle at the Z0 location on the part, this distance from HOME will be loaded in the Z value of the work offset. While at this position, you can zero out the Relative position field for Z. Then move the spindle up, load the tool, retouch the same position. The value in Z is the actual length of this tool. That value will go into the tools height offset. Repeat for all tools.
This method requires a touch off for each tool and one for the work piece. If a new work piece is loaded, simply re-measure spindle face to top of part. The tool length is a positive value that is the tools physical length.
Positive tool lengths can be transferred from machine to machine. Negative values cannot. You can quickly check a positive tool length with a tape measure/caliper. Negative values cannot.
If you do not like using paper for touch offs, and you do not have a probe, I would recommend something similar to the setter below. You can set the '0' to be at exactly 2.00, and there is some compression to the plunger on top which helps to cut down on touch off mistakes.
See other blog posts
https://blog.caminstructor.com
Check out our website
https://caminstructor.com
#Mastercam #LearnCNC
Видео CNC Tool Length Offsets Explained канала CamInstructor
Показать
Комментарии отсутствуют
Информация о видео
Другие видео канала
 How to: Set Tool Length and Work Offsets – Haas Automation Tip of the Day
 Tool Length Automatic Touch Off Probe Error Analysis LinuxCNC
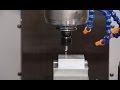 Setting Work and Tool Offsets on the Haas CNC Mill - Clark Magnet High School SSP.
 How to use Tool Length Offsets in Fusion 360 and MACH3
 Tool Offsets Explained – Haas Automation Tip of the Day
 ADVANCED FIXTURING | Set Z Fixture Offsets to Numerous Heights… Set All Tools to Single Height
 DIG-Z series, (DIG-Z.M, DIG.Z.C), hand-operated CNC tool length sensors
![MACH3 ATC - Automatic Tool Length Offset Measurement and Compensation [마하3 ATC - 자동 공구 길이 측정 및 보정]](https://i.ytimg.com/vi/rj-z196hw_Q/default.jpg) MACH3 ATC - Automatic Tool Length Offset Measurement and Compensation [마하3 ATC - 자동 공구 길이 측정 및 보정]
MACH3 ATC - Automatic Tool Length Offset Measurement and Compensation [마하3 ATC - 자동 공구 길이 측정 및 보정] G43 Tool Length Compensation in + Direction Learn CNC in hindi and English
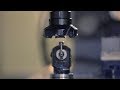 TITAN FUNDAMENTALS: Probing Height Offsets With an Automatic Tool Setter
 KITAMURA MYCENTER 1 CNC VMC
 Haas 5-Axis - CNC Mill - Tool Length Offset
 Cutter Compensation: when and how to use it
 TITAN FUNDAMENTALS: Setting Tool Height Offsets Manually
 9 Lines of Code Every CNC Machinist Needs To Know! - Haas Automation Tip of the Day
 CNC Mill Tool and Work Offsets Explained Part 2
 Toolsetters for Tormach and other CNC Mills
 Setting tool lenght offsets cnc mill
 Work Offset and Tool Offset | CNC-Learning | Rajeev Sreedharan