Mercedes-Benz Sprinter - How to replace the radial shaft sealing ring and coupling flange | W906
Heavy oil leakage with drip formation on drive flange of axle on Sprinter as of 3.5 tons.
The radial shaft sealing ring and coupling flange must be replaced.
Before starting the repair, make sure that no gear is engaged.
Release the parking brake and remove the wheels.
The propeller shaft has already been detached and secured at an appropriate point.
In contrast to the Sprinter up to 3.5 tons two fully floating axles have to be removed here.
Remove the bolts and pull out the fully floating axle.
Repeat the procedure on the driver side.
Drain off the axle gear oil.
Check the axle gear for defects.
Use your finger to check whether there are metal shavings or other small parts in the oil.
If so, the axle gear may be damaged.
Another indication of a defect is rough running or axial play.
If damage is found, the entire axle must be replaced.
Reseal the oil drain.
Use the correct torque of 60 Nm and turn the bolt 90 degrees further.
After repair, the axle must have a friction resistance ...
... 0.1 Nm to 0.3 Nm above the value measured here.
Determine the friction torque now.
Turn the unit at a speed of roughly one revolution per second.
After the fifth revolution, read off the value while turning.
In this example, the friction value is 1 Nm.
Note down the measured value for checking after the repair.
Remove the radial sealing ring.
Remove the retainer for the 12-point nut and open the nut.
Important: Do not use an impact wrench on the 12-point nut.
Do not use one for the rest of the installation procedure. Otherwise the axle gear could be damaged.
A retainer wrench in combination with a torque wrench can be used to unscrew the nut.
Remove the coupling flange on the drive pinion with a puller.
The radial sealing ring is exposed and can be taken out.
To do so, knock the ring on one side with a drift ...
... so that the tension of the sealing ring is released in the seat of the housing.
Pry out the radial shaft sealing ring together with the garter spring using a suitable tool.
Do not damage the bearing behind it.
Do not clean the sealing ring, return it for investigation as removed.
Also send in the coupling flange as removed.
Clean the seat of the sealing ring in the housing and the end face of the tapered roller bearing ...
... before installing the new radial sealing ring.
A drift is needed to knock in the ring uniformly and flush with the housing.
This prevents the ring from tilting.
Use your finger to check whether the sealing ring is seated completely flat.
This is extremely important so that the ring seals properly later.
Install a new coupling flange and ...
tighten the 12-point nut with an initial torque of 30 Nm.
The flange must have no axial play afterwards.
Check this with a dial indicator attached to a magnetic mounting fixture.
Find a suitable position for the fixture and place the measuring pin on the flange.
Check the play by shaking in the axial direction with your hand.
In this case, there is no axial play.
If the bearing is not free of play, increase the initial torque to a maximum of 60 Nm in steps of 10 Nm.
If play is still present, the rear axle must be replaced.
To make sure that the tapered rollers also run properly in the bearing and line up for adjustment ...
turn the drive flange at a speed of roughly one revolution per second ...
... 15 times clockwise and 15 times counterclockwise.
Mark the mounting nut in order to first turn it 15 degrees further, half of a 12-point graduation.
Turn freely again, 15 times clockwise and 15 times counterclockwise.
Mark the 12-point nut again.
Then turn the nut another 15 degrees.
Align the tapered rollers by freely turning the shaft 15 times in both directions.
Check whether the bearing runs with the correct friction resistance.
You need the friction value which was recorded during the first measurement.
Before the repair, it was 1 Nm.
A value of 1.2 Nm is measured here, which is within the tolerance.
The current friction value must be between 0.1 Nm and 0.3 Nm above the initial value noted.
If this is not the case, the rear axle must be replaced.
Never turn the 12-point nut back to reach the correct friction value.
Secure the 12-point nut.
The retaining tab must contact the left-hand nut edge against the opening direction.
Install the fully floating axle.
Coat the flange with sealant before installation.
Tighten the collar nuts on the flange to 25 Nm and ...
.. further tighten nuts through 40 degrees.
Note: Refill with new transmission oil.
Observe the filling capacities of the corresponding axle model designation.
Install the propeller shaft and wheels.
===========================================================
instagram:
https://www.instagram.com/mbownersclub/
twitter:
https://twitter.com/MB_Owners
Видео Mercedes-Benz Sprinter - How to replace the radial shaft sealing ring and coupling flange | W906 канала MBOwnersClub
Показать
Комментарии отсутствуют
Информация о видео
Другие видео канала
 2004 Sprinter Rear Axle Bearing Removal and Replace.
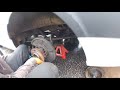 Replacing rear axle bearing Mercedes Sprinter VW Crafter / Замена задней полуоси подшипника VW Craf
 Mercedes Vito 2008 zmieniamy podpory wału napędowego „Jan V8”
 Mercedes-Benz Sprinter - Seal the axle drive | W906
 Black Oxide Coating Parts For Your Own Projects
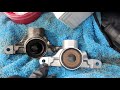 Mercedes Diesel GL, ML, R, E 320/350 OM642 Oil sucking eliminated/broken Y-intake fix
 Heavy Duty Wheel Bearing Installation and Adjustment - Bower Heavy Duty Bearings by NTN
 My first W903 sprinter, revisited, old start cold start. Will it run?
 How to Replace Engine Mounts on a B7 Audi A4
 SPRINTER OIL CHANGE, AIR FILTER & CABIN FILTER - DIY Self Build SPRINTER VAN SERVICE! #vanlife
 RUMORE ROTOLAMENTO AUTO ? SOSTITUZIONE CUSCINETTO RUOTA FORD FOCUS ! COME CAPIRE SE FA RUMORE !
 Como y de donde LEVANTAR un COCHE de forma CORRECTA y SEGURA | Gatos Hidraulicos y Borriquetas 🛡💡
 2008 Mercedes Sprinter, Rear Axle Bearing
 Замена кольца ABS +сальник МерседесСпринтер516 CDI🔧Replacing the ABS ring + oil sealMercedesSprinter
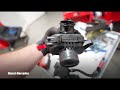 Mercedes OM642 Resonator fail
 Sprinter rear axle tear-down, 2004 Dodge, T1n
 Зачётный дизель с одной серьезной проблемой: Mercedes 2.2 CDI (OM646)
 2010 Mercedes ML350, 3L Diesel Engine Oil Leaks
 Audi Subframe Bushing Replacement DIY - A4 S4 B6 B7