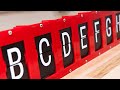
How to apply split-flap letter stickers
Tutorial of how to apply letter stickers to split-flap display flaps consistently and perfectly aligned (the trick is to use static electricity!)
The rough steps are:
- create a jig to hold flaps in place (0:32)
- add bottom margin 0.1875" from the bottom (1:08)
- add alignment markers to help center letters horizontally, 1.0625" and 0.53125" from the sides (2:41)
- Cover a glass container with plastic cling wrap (3:45)
- Place sticker upside down (sticky side up) on cling wrap (4:26)
- Flip over container, align sticker with flaps, and press down (4:45)
- Cut sticker along flap edge (5:22)
This is part of the documentation of how you can build your own split-flap display - check out the open-source project here: https://github.com/scottbez1/splitflap
If you're looking for pre-cut flaps to use in your split-flap display, I've had some professionally made, available in my Tindie store: https://www.tindie.com/products/scottbez1/blank-split-flap-display-flaps/
Those are way nicer than the hand-cut flaps seen in this video.
Instructions for cutting the flaps yourself (and everything else involved in building a split-flap display) are available in the project wiki: https://github.com/scottbez1/splitflap/wiki/Build-flap-cutting-jig
Видео How to apply split-flap letter stickers канала scottbez1
Показать
Комментарии отсутствуют
Информация о видео
Другие видео канала
 DIY Split-Flap Display Build
![(New) How to Solve the Rubik's Cube Blindfolded Tutorial [Pochmann Method]](https://i.ytimg.com/vi/ZZ41gWvltT8/default.jpg) (New) How to Solve the Rubik's Cube Blindfolded Tutorial [Pochmann Method]
(New) How to Solve the Rubik's Cube Blindfolded Tutorial [Pochmann Method] DIY Split-flap display: three module demo
 Biggest DIY open-source split-flap display? 108 characters, 4320 flaps!
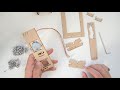 How to assemble split-flap mechanical parts
 Random four-letter words on a split-flap display (6 minutes)
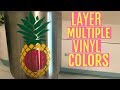 LAYERING MULTICOLORED VINYL DECALS WITH CRICUT EXPLORE | REGISTRATION MARKS
![[5 Pro Crafting Tips] To Improve Your Cardmaking!](https://i.ytimg.com/vi/J2rrLDKdWLM/default.jpg) [5 Pro Crafting Tips] To Improve Your Cardmaking!
[5 Pro Crafting Tips] To Improve Your Cardmaking!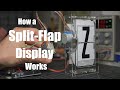 How a Split-Flap Display Works
 Better Sealer Option than Mod Podge for Glass
 Split Flap Display Demo
 Pre 2020 Alphabet Sticker Collection
 DIY split-flap display: 2 character test
 Dollar Tree DIY Spring Home Decor Farmhouse Style Easy $5
 Sea Glass Mosaics What to use for Glue
 7Row x 32Column Split Flap animations
 DIY LOST Swan Station Split Flap Display Timer
![Split-Flap Attack [Maker Update]](https://i.ytimg.com/vi/WVafSAaSPNo/default.jpg) Split-Flap Attack [Maker Update]
Split-Flap Attack [Maker Update] How to assemble the split-flap controller PCB