PRODUCT PHOTOGRAPHY | PLANNING, STYLING AND SHOOTING ON LOCATION
When it comes to planning a styled shoot, I first list the items which need to be photographed. As soon as a client decides to sign up with me, I send them a questionnaire which helps me understand the look and feel they want me to create and this helps me identify the kinds of props I will use for for styling. Some clients prefer that you take the creative lead, while others like to share the direction. In this case, the client preferred that I inject my personal taste in styling to showcase her products in a creative way.
To make sure that I bring the client’s products to life correctly, I educate myself on how to position things like cutlery and glasses by doing some research. Even if I might know how to do something like this, it’s a good idea to confirm my knowledge. Sometimes this is necessary when you’re photographing functional products that need to be presented in a specific way.
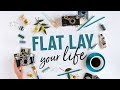
Now it’s time to shoot! I shoot from a few different angle to provide the client with diversity. The client is going to be using this content on her website as well as Instagram, so I do find it handy to know which images work best on social media. A little side note: Flatlays do really well when it comes to product images on Instagram. Flatlays give a birds eye view to products and give me a great opportunity to add some design elements to paint a full picture
I chose to style this on the floor because I liked the look and texture of the floorboards. They suited the light and beachy mood I wanted to create for the first product set. Now, just a side note: one of my favourite things that I’ve learned about being a photographer is learning how to think outside of the box when it comes to creating a set. What is a set? A set is like a scene, and when you’re styling products, you’re effectively setting a scene so that you can imbibe a lifestyle around the product which you are photographing.
SET UP 2:
When it comes to styling products like this, I like to create layers, and play with different textures. I do this by using props.
In this case, I added additional props into my set, because after taking a few shots, I felt like something was missing. Here’s a llittle product styling tip: when I need to add a pop of colour or texture, I find fruits to be very effective. They’re also cost efficient so they don’t blow the client’s budget out at all!
SET UP 3:
Here’s another beautiful thing about shooting on location: locations tend to have design and decor of their own which can be incorporated into a shot. Like here, the floor rug and the driftwood compliments the natural look of this set. This is another cost-saving element which actually ADDS to the shoot.
Onto the fourth and final set. I’ve styled this particular set of charger plates in an area which will not attract too much distraction to the reflective surface of the plate
SET UP 4:
This last set is unique to the rest in that the product is reflective. It’s a mirror! So I’ve chosen a place where the ceiling is plain and doesn’t have too many contrasting designs or colour to avoid detracting from the other items which we also want to highlight, like the napkin, napkin ring, and cutlery.
SET UP 5: SHOOTING AMANDA FOR WINX
Moving onto the shoot for my other client who provides a natural beauty product for eyelash growth. In this shoot, we want to breath life into the product by shooting it with a model. Photographing a product in use makes the product and the lifestyle around the product more relatable to people. So to really paint the picture around the lifestyle of this product, we set the scene. For example, when I think of beauty regimens, I automatically think: bathroom setting, either morning or night, and the person using the product is either just starting the day, so they’re freshening up, maybe freshly showered, or ending the day. So here, I’ve styled the model in a way that mimics the start to the day - in a towel and a robe, and we’re photographing in the bathroom.
🤗 Manifest your dream life through Photo & Video Content 🤗
My Book 👑 Content Queen: Beginner's Guide to Making Good AF Content (Even if You Suck At Using the Camera): 👉 https://go.kristinefernandez.com.au/cqyt
============
🎥 WHAT I FILM WITH 🎥
📸 Vlogging Camera: https://amzn.to/2Wonz98
💡 Lighting: https://amzn.to/2WEpvu8 and
https://amzn.to/2QQyZP8
🎤 Wireless Microphone: https://amzn.to/2WEpvu8
🎤 Plug-In Microphone: https://amzn.to/2WEpvu8
☑️ Tripod: https://amzn.to/2xK55n2
============
💁🏽♀️ MY HAIR SECRETS 💁🏽♀️
👌🏽 Best softness & shine: https://amzn.to/2xPDl07
👌🏽 Ultimate volume & styling: https://bit.ly/Hair-volume (USE CODE KRISTINE10 to get 10% off site-wide)
============
📈 GROW ONLINE 📈
✅ YouTube Growth: https://www.tubebuddy.com/Kristine
✅ Copyright-free Music: https://artlist.io/KRISTINE-820568 (Sign up with my code and get 2 Months free)
✅ Canva Pro: https://canva.7eqqol.net/AvM3o
✖️ Instagram: instagram.com/missfernandez__
Видео PRODUCT PHOTOGRAPHY | PLANNING, STYLING AND SHOOTING ON LOCATION канала Kristine Fernandez
To make sure that I bring the client’s products to life correctly, I educate myself on how to position things like cutlery and glasses by doing some research. Even if I might know how to do something like this, it’s a good idea to confirm my knowledge. Sometimes this is necessary when you’re photographing functional products that need to be presented in a specific way.
Now it’s time to shoot! I shoot from a few different angle to provide the client with diversity. The client is going to be using this content on her website as well as Instagram, so I do find it handy to know which images work best on social media. A little side note: Flatlays do really well when it comes to product images on Instagram. Flatlays give a birds eye view to products and give me a great opportunity to add some design elements to paint a full picture
I chose to style this on the floor because I liked the look and texture of the floorboards. They suited the light and beachy mood I wanted to create for the first product set. Now, just a side note: one of my favourite things that I’ve learned about being a photographer is learning how to think outside of the box when it comes to creating a set. What is a set? A set is like a scene, and when you’re styling products, you’re effectively setting a scene so that you can imbibe a lifestyle around the product which you are photographing.
SET UP 2:
When it comes to styling products like this, I like to create layers, and play with different textures. I do this by using props.
In this case, I added additional props into my set, because after taking a few shots, I felt like something was missing. Here’s a llittle product styling tip: when I need to add a pop of colour or texture, I find fruits to be very effective. They’re also cost efficient so they don’t blow the client’s budget out at all!
SET UP 3:
Here’s another beautiful thing about shooting on location: locations tend to have design and decor of their own which can be incorporated into a shot. Like here, the floor rug and the driftwood compliments the natural look of this set. This is another cost-saving element which actually ADDS to the shoot.
Onto the fourth and final set. I’ve styled this particular set of charger plates in an area which will not attract too much distraction to the reflective surface of the plate
SET UP 4:
This last set is unique to the rest in that the product is reflective. It’s a mirror! So I’ve chosen a place where the ceiling is plain and doesn’t have too many contrasting designs or colour to avoid detracting from the other items which we also want to highlight, like the napkin, napkin ring, and cutlery.
SET UP 5: SHOOTING AMANDA FOR WINX
Moving onto the shoot for my other client who provides a natural beauty product for eyelash growth. In this shoot, we want to breath life into the product by shooting it with a model. Photographing a product in use makes the product and the lifestyle around the product more relatable to people. So to really paint the picture around the lifestyle of this product, we set the scene. For example, when I think of beauty regimens, I automatically think: bathroom setting, either morning or night, and the person using the product is either just starting the day, so they’re freshening up, maybe freshly showered, or ending the day. So here, I’ve styled the model in a way that mimics the start to the day - in a towel and a robe, and we’re photographing in the bathroom.
🤗 Manifest your dream life through Photo & Video Content 🤗
My Book 👑 Content Queen: Beginner's Guide to Making Good AF Content (Even if You Suck At Using the Camera): 👉 https://go.kristinefernandez.com.au/cqyt
============
🎥 WHAT I FILM WITH 🎥
📸 Vlogging Camera: https://amzn.to/2Wonz98
💡 Lighting: https://amzn.to/2WEpvu8 and
https://amzn.to/2QQyZP8
🎤 Wireless Microphone: https://amzn.to/2WEpvu8
🎤 Plug-In Microphone: https://amzn.to/2WEpvu8
☑️ Tripod: https://amzn.to/2xK55n2
============
💁🏽♀️ MY HAIR SECRETS 💁🏽♀️
👌🏽 Best softness & shine: https://amzn.to/2xPDl07
👌🏽 Ultimate volume & styling: https://bit.ly/Hair-volume (USE CODE KRISTINE10 to get 10% off site-wide)
============
📈 GROW ONLINE 📈
✅ YouTube Growth: https://www.tubebuddy.com/Kristine
✅ Copyright-free Music: https://artlist.io/KRISTINE-820568 (Sign up with my code and get 2 Months free)
✅ Canva Pro: https://canva.7eqqol.net/AvM3o
✖️ Instagram: instagram.com/missfernandez__
Видео PRODUCT PHOTOGRAPHY | PLANNING, STYLING AND SHOOTING ON LOCATION канала Kristine Fernandez
Показать
Комментарии отсутствуют
Информация о видео
Другие видео канала
 Choose and Arrange Props for Instagram | Beautiful Flat-lay Photography 📷
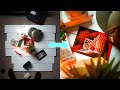 Product Photography- 5 Years Experience in 8 minutes | All The Basics You NEED
 FLAT LAY PHOTOGRAPHY
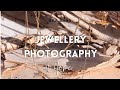 JEWELLERY PHOTOSHOOT - STYLING AND BTS - ANA LUISA JEWELLERY
 HOW TO TAKE FLATLAY PHOTOS FOR INSTAGRAM
 NEXT LEVEL PRODUCT PHOTOGRAPHY
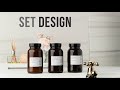 Design a set for lifestyle product photography and videos using household items
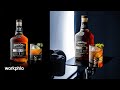 Full 1 Light Whisky Photography Tutorial & Photoshop Composite
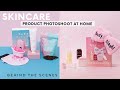 SKINCARE Product Photography Ideas: Styling Tips, Backgrounds, & Editing
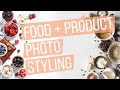 Essential Photo Compositions TO KNOW: food + product styling
 How To Shoot Product Shots: 3 Cheap And Easy Setups | Cinematography Techniques
 5 Flat Lay Tips for Food Photography
 PRODUCT PHOTOGRAPHY
 How to Photograph a Lifestyle and Branding Portrait Session
 Flatlay Photography For Instagram: Flatlay Backgrounds & And Props
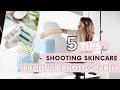 Product Photography Tips | HOW TO Shoot Skincare Products
![Learn Photography [Full Course] by Australian Geographic Photographer Chris Bray](https://i.ytimg.com/vi/LxO-6rlihSg/default.jpg) Learn Photography [Full Course] by Australian Geographic Photographer Chris Bray
Learn Photography [Full Course] by Australian Geographic Photographer Chris Bray![Take Killer Product Photos [Photography Tips]](https://i.ytimg.com/vi/qHEUsk0ppmQ/default.jpg) Take Killer Product Photos [Photography Tips]
Take Killer Product Photos [Photography Tips] Luxury Watch Photography - All Secrets Revealed!
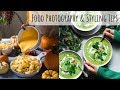 HOW TO IMPROVE YOUR FOOD PHOTOGRAPHY | food photography tips