DIY Paper palm leaves - How to make paper palm leaves step by step
DIY Paper palm leaves - How to make paper palm leaves step by step
If easier to read and take notes, check this article for DIY Paper Palm Leaves: https://missmv.com/diy-paper-palm-leaves-step-by-step-2/
Are you interested to design DIY paper palm leaves? Well, you have landed on the right page. Here we are going to talk about the simple and easy steps to create this artwork at home with easily available supplies.
DIY Paper Palm Leaves step by step:
Dry palm leaves are gaining huge popularity around the world these days due to their classy and elegant appeal. They provide a tropical touch with an earthy finish to enhance the home décor. But it may be a little difficult to find them in every season to decorate your home. Therefore, we advise using paper to design palm leaves for instant décor. You can put them in the vase in the living room or hang them on your bedroom wall with ease. So, let us talk about the simple steps to make DIY paper palm leaves:
In order to design these palm leaves, you need to collect brown-colored paper along with a scissor, hot glue, wooden skewers, and thin crepe paper. Once you have collected all these items, you need to follow these simple steps below:
Step 1:
Place the brown-coloured paper on the table and cut it into 13-inch width with 15-inch length. Then fold it once from the middle. Now you need to draw a cut line on one corner with half oven shape and cut the folded paper along that line.
Step 2:
In step 2, you need to tightly fold the paper in the form of palm leaves and mark the center of the fan leaf. You have to fold the paper like a fan with a flat bottom in the end. Tightly fold the leaves and create a mark in the middle of the fan leaf.
Step 3:
Now you need to create holes in the middle of the fan using a needle and then take out the needle. In the recently created holes, you have to insert a wooden skewer carefully. Make sure you take a big needle for creating holes so that the wooden skewer can fit with ease.
Step 4:
Now you have to fold the fan leaf ends and the wooden skewer will stay in the middle of the two halves. You can apply hot glue in the middle of the wooden skewer and on the edges as well to stick them together.
Step 5:
Now you have to give your fan a spiky look. For this, you have to cut the edges of the palm leaves. After separating all the leaves, you need to bend them carefully to get a natural look.
Step 6:
It is time to take the crepe paper and cut a tiny stripe of almost 1.5cm in width. Now wrap it around a wooden skewer with the same color paper.
Step 7:
Finally, you need to create a stem base with the help of the same crepe paper. It must be glued to the bottom of the leaf.
Now you have created the palm leaves and they are ready to be a part of your home décor.
#papercraft #easypapercrafts #kidscrafts #kidspapercraft #handmadeflowers #handmadepalmleaf #palmleaf #palmleaves #howtomakeapaperpalmtreestepbystep
#palmleaftutorial #diypaperpalmleaf #papercraft #palmleaves #DIYpaperpalmleaves #papercraft
Видео DIY Paper palm leaves - How to make paper palm leaves step by step канала Creative Giant Hands
Показать
Комментарии отсутствуют
Информация о видео
Другие видео канала
 DIY PAPER "DRIED" PALMS & THRIFTED VASE FLIP (boho home decor)
 COMO HACER HOJAS DE PAPEL KRAFT #Encasaconpatty
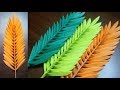 DIY PALM LEAVES EASY PAPER LEAVES MAKING FOR DECORATON
 Quilling Tricycle with Basket/Paper bicycle craft - DIY Newspaper bicycle decorative craft
 DIY GIANT LEAVES | HOW TO MAKE COCONUT LEAVES | PAPER PALM LEAVES FOR HOME DECORATION
 Gumpaste Palm Leaves Sugar Fan Cake Topper Tutorial
 #DIY - Folha de palmeira (palm leaf)
 DIY Fan Palm Leaves | Paper Leaves | Paper Leaves Making | Paper Leaf | Paper Crafts For School
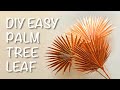 PALM TREE LEAF: DIY Easy from Crepe Paper
 COMO HACER HOJAS CON YUTE STILO BOHO/ JUTE LEAVES BOHO STYLE #encasaconpatty
 BOHO Palm Leaf Wall Hanging
 ENG) DIY PAPER PALM LEAVES & CONCRETE CANDLE HOLDER EP. 9 | DIY BY GENO in Los Angeles
 DIY How to make paper "dried" flowers, paper palm frond, paper lunaria, paper pampas
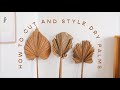 DIY // Dry Palm Home Decor
 DIY paper palm leaves for home decor
 Paper Leaf | Paper Leaves Making | Paper Crafts for School | Decorative Leaves Making
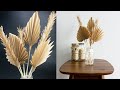 DIY Paper Palm Leaves - Easy Paper Kraft Palm Leaf - Boho Home Decor - Room Decor
 Easy DIY String Pampas Grass from Dollar Tree Materials!
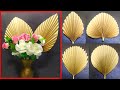 4 easy DIY paper palm leaves for decoration | cara membuat daun palem kering dari kertas
 HOW TO MAKE A JUTE FEATHER | DIY Pampas Grass | Home Decor