How to Remove Peel and Stick Floor Tile
In this video, demonstrate how to remove peel and stick floor tile. This is a frequently-asked question we get from prospective customers and those researching the subject.
The adhesive on self adhesive flooring (at least the brand we sell) is very strong. It's easily repositioned if you don't get it right the first time, but within minutes, the adhesive grabs the surface and the bond gets stronger over the course of days.
The tile I removed in this video was installed in April, 2011 (and you can see the video n our YouTube Channel of this installation). All the tiles from the original installation are still firmly in place.
One of the great benefits of peel and stick tile is the fact that if a tile becomes damaged due to the moving of furniture, or any reason, the tile can be removed and replaced. This is why we always recommend our customers to order enough to have some left over. At our low wholesale price, an extra box of tile is a very cheap "insurance policy" so you can keep your floor looking great over a great length of time...even a lifetime.
In this video, I removed a single tile from my garage floor with ease using a heat gun designed to remove paint. I purchased this for about $20 from a hardware store. The only other tool needed was a 3" putty knife/scraper. Almost zero pressure was needed once the heat was applied.
After the tile was about half way removed the remainder peeled of easily and the tile ultimately came up in one piece with no additional effort needed. I replaced the tile with a new one.
You can find other helpful floor tile preparation videos, installation videos, and tips on our channel.
You are obviously invited to subscribe to our channel. Click the Bell near the Subscribe button to be notified when we post new videos.
To learn more about our floor covering selection and 1000's of other hardware and Home Improvement products, visit https://www.mazerwholesale.com
Established since 1986
Видео How to Remove Peel and Stick Floor Tile канала mazerwholesale
Показать
Комментарии отсутствуют
Информация о видео
Другие видео канала
 How to remove vinyl sticky tiles
 Super Easy Peel and Stick Tile Removal | Budget Mobile Home Remodel #9
 REMOVING PEEL AND STICK FLOORING
 How To Install Peel-and-Stick Vinyl Flooring Over Existing Flooring
 How to Remove Carpet & Vinyl Adhesive the Easy Way
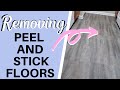 REMOVING Peel And Stick Vinyl Floors | 1 YEAR LATER | How To Remove Without Damage
 How to Remove Vinyl Tiles & Adhesive From Wood Flooring : Flooring Help
 Best Way to Remove Sticky Floor Tiles
 Un-Making Over Apartment (how to remove Peel & Stick Tile, Backsplash, Flooring, Contact Paper etc.)
 Removal of Armstrong linoleum w/ clean removal of all adhesive
 How to remove glue on hardwood floors using orange peel cleaner
 Peel & Stick Tile and Adhesive Removal: All Possible Methods Remover
 How to Install Peel-And-Stick Vinyl Flooring Over Existing Flooring in a RENTAL BATHROOM | BEST HACK
 How To Tile Over Tile
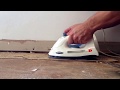 How to remove old vinyl tile. Using 2 irons, best method!!!
 How to easily remove sticky vinyl tiles
 How To Install Peel-and-Stick Vinyl Plank Flooring and Floor Preparation
 Removing linoleum flooring.
 DIY: HOW TO REMOVE VINYL FLOORING : BOSCH MULTI TOOL
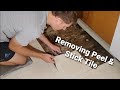 How to Remove Peel and Stick Linoleum Tiles with an Iron