Stair Baluster Installation with Wooden Spindles
For this stair baluster installation, I worked on the landing section at the top of the staircase first. This is easier as the wooden spindles are installed first, then the handrail is placed on top. It’s a process of stacking parts. The angled baluster sections are more complicated because the handrail is already installed.
See the playlist of all the videos in this staircase makeover project - https://www.youtube.com/playlist?list=PLdSuVz1n16d8_MK7VTqDkMu24NQGiIJhZ
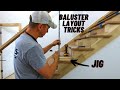
When I moved on to the angled sections, the most challenging part was determining the length of the balusters when they were plumb. I ended up making an extendable baluster jig that I could put in place, make sure it was plumb, and then lock it to length. I then transferred this jig to a spindle to draw my cut lines. The jig needs to be centered on the spindle, so by adding measurements on each end, it became easy to center the spindle.
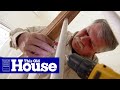
Once I had the stair balusters cut, I could put them in place with a wooden fillet strip in between each one. This let me see how the start and end of the run looked so I could get equal spacing between the spindles and the newel posts. Once I cut my starter fillet strip, I was ready to install the run for stair spindles. I glued them in place with carpenter’s glue and if the spindle wasn't a snug fit, I also drove a finishing nail through the spindle into the handrail.
We hope you enjoy this video. If you've got questions, leave a comment on the video. We're happy to respond to your comments and questions.
Our woodworking plans - https://woodenitbenice.ca/collections/woodworking-plans
Our 1-on-1 woodworking advice sessions - https://woodenitbenice.ca/collections/woodworking-advice-sessions
See the tools we use in our workshop and the tools we recommend: https://www.amazon.com/shop/homeimprovementwoodworking
🇨🇦 Canadian link - https://www.amazon.ca/shop/homeimprovementwoodworking
For more woodworking knowledge or to contact us directly, visit our website https://WoodenItBeNice.ca Hosted by Scott Bennett, owner of Wooden It Be Nice in Brooklin, Ontario, Canada
#balusters
Видео Stair Baluster Installation with Wooden Spindles канала Home Improvement Woodworking
See the playlist of all the videos in this staircase makeover project - https://www.youtube.com/playlist?list=PLdSuVz1n16d8_MK7VTqDkMu24NQGiIJhZ
When I moved on to the angled sections, the most challenging part was determining the length of the balusters when they were plumb. I ended up making an extendable baluster jig that I could put in place, make sure it was plumb, and then lock it to length. I then transferred this jig to a spindle to draw my cut lines. The jig needs to be centered on the spindle, so by adding measurements on each end, it became easy to center the spindle.
Once I had the stair balusters cut, I could put them in place with a wooden fillet strip in between each one. This let me see how the start and end of the run looked so I could get equal spacing between the spindles and the newel posts. Once I cut my starter fillet strip, I was ready to install the run for stair spindles. I glued them in place with carpenter’s glue and if the spindle wasn't a snug fit, I also drove a finishing nail through the spindle into the handrail.
We hope you enjoy this video. If you've got questions, leave a comment on the video. We're happy to respond to your comments and questions.
Our woodworking plans - https://woodenitbenice.ca/collections/woodworking-plans
Our 1-on-1 woodworking advice sessions - https://woodenitbenice.ca/collections/woodworking-advice-sessions
See the tools we use in our workshop and the tools we recommend: https://www.amazon.com/shop/homeimprovementwoodworking
🇨🇦 Canadian link - https://www.amazon.ca/shop/homeimprovementwoodworking
For more woodworking knowledge or to contact us directly, visit our website https://WoodenItBeNice.ca Hosted by Scott Bennett, owner of Wooden It Be Nice in Brooklin, Ontario, Canada
#balusters
Видео Stair Baluster Installation with Wooden Spindles канала Home Improvement Woodworking
Показать
Комментарии отсутствуют
Информация о видео
26 июля 2018 г. 10:51:27
00:05:34
Другие видео канала
 How to Layout Iron Baluster Spacing on Staircase - Wood Tread & Handrail Spindle Layout
 How to Replace a Stair Railing | This Old House
 These were Stronger than I Expected! - Finally Making Progress!!
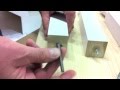 Cooper Stairworks Tips & Techniques - Installing Balusters Using Threaded Inserts
 Stairplan Straight Staircase Balustrade installation
 Fitting Staircase Spindles ~ Extension Build #17
 How to install Timber Balusters, Part 8 - Balusters
 Installing Stair Handrails and Balusters
 Easy stair baluster replacement how to
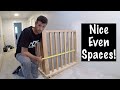 How to get EVENLY SPACED Spindles!
 Installing Railings
 Installing Newel post and stair railing | Finishing my Basement | Episode 28
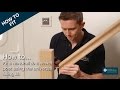 How to Fix a Handrail to a Newel Post | Cheshire Mouldings
 Setting BOX NEWEL Posts | Layout & Installation TRICKS!!!
 DIY: Transforming your staircase in 3 easy STEPS!
 How to fit a newel post using ZIPBOLT post fastener. Replace stair newel with slip fit fixing kit.
 Installing Stair Rails - Menards
 Installing a Staircase Guard Railing & Hardwood Floor Patching - DIY Homeowner Problem Solving
 How To Install Prefinished RetroFit Stair Treads from Stair-Treads.com