Woven pouches on a cardboard loom
Corona Crafting Episode 3
A tutorial on how to use a cardboard loom to weave device pouches, complete with handle and optional button flap.
If you need a refresher on how to measure and cut your loom:
If your objects are pretty flat, like a phone or tablet, measure the width and length with a ruler. Cut the cardboard rectangle 1 inch wider than the measured width. For a pouch that ends just above the top of your device, cut the cardboard 1 inch longer than your device. You will mark and cut one of the narrow ends, which becomes the top of your loom. Mark and cut every quarter inch, with one mark/cut in one of the top corners 1/8 inch from the side.
For bulky or round items, for instance sunglasses or a water bottle, measure around the object (the circumference) at the widest point. Divide that measurement by 2, and cut your board 1 inch larger than that number. For example, if you want a glasses case and the widest point around your glasses measures 5 inches around, 5 divided by 2 equals 2.5. So add one inch, 2.5 plus 1 equals 3.5. You will cut your board 3 and a half inches wide. The length for bulky items should be the length of your item plus 1 and a half inches.
To make a pouch with a button-flap, add another 2-3 inches in length to your board beyond the original length, and for a drawstring pouch, add an extra 3-4 inches beyond the original length.
For all types of pouches, use the same marking/cutting instructions.
Thanks for crafting with me!
Видео Woven pouches on a cardboard loom канала Jocelyn Carlin
Показать
Комментарии отсутствуют
Информация о видео
Другие видео канала
 Woven Pouch
 Soumak weaving - Weaving lessons for beginners
 Weaving pouch 2: making flap and removing from loom
 Cardboard Loom Weaving
 How To Weave
 Weaving for Free // Episode 60 // Taking Back Friday // a fibre arts vlog
 Weaving Herringbone on a Cardboard Loom
 How to Weave a Little Purse
 Branch Weaving
 Weaving a Pouch | Weaving a Bag | Fibers and Design | Weaving Projects for Beginners
 Weft Interlocking : Weaving Techniques
 Weave a Pouch, Threadbanger Contest Entry
 Weaving Circles // Warping and weaving on a circular frame loom // Tiny Tutorial
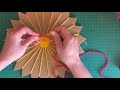 Cardboard Loom Circle Weaving
 Weaving for Beginners Part 4: Add Stripes and Geometric Shapes with Annabel Wrigley | Creativebug
 Pt1: Weave a Bag on a Cardboard Loom w/ Kim Gilman
 How to Loom Knit an Easy Bag (DIY Tutorial)
 yarn weaving pouch
 Weaving shapes
 Woven Wall Hanging Tutorial (Minimalist Weaving)