Old Trolley Jack Restoration
A fun little restoration the whole family can enjoy. So sit back relax and let me take you on another Really Random restoration adventure :)
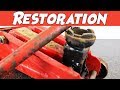
Yet again lurking in my friends shed was this tired and past its best Eversure trolley jack that was crying out to be restored so i obliged, I got it dug out and first thing i did was test it to see what kind of condition it was in and if it had any major defects and im glad to report it was fully functional, that is why in the video you dont see me taking the hydraulic cylinder apart as there was simply no need to.
After initial inspection i took it to the work bench and started the disassembly process.It came apart pretty easily except for the odd nut and bolt that needed a bit of persuasion with heat and a hammer.
After disassembly everything was stuck into a warm degreasing bath ( yes i need a parts washer ) and left to soak for an hour before giving them a good aggressive scrubbing to remove all the dirt and grease. After drying thoroughly all painted parts were media blasted to remove all old paint and any rust that had formed.
Any parts that weren't suitable for blasting were soaked in DEOX C to remove all rust.
The lifting arm on its horizontal face was particularly bad with rust pitting i had 2 choices at this point i could either go down the grinding route to resurface the arm or the body filler route and i chose the filler route as i felt it added another interesting process to the video. once dried and sanded smooth the arm was ready for primer along with all the other bare metal parts.
I decided at this point before i went any further to show a quick demo of the Ram in action so as not to be accused of building a non functional jack so this was the only reason i included this scene in the video.
After priming with etch primer and high build i wet flatted all the parts to give a super smooth surface for the paint to bond with to enhance the gloss levels and flatness of the final paint job. I mixed up the 2k yellow i colour matched to a piece of the old paint work then sprayed 3 coats then left to bake. After the bake cycle i came back into the booth and painted all the black parts in the same fashion.
All parts that were not painted like the pivots,nuts bolts,washers etc were all zinc plated and left to cure along with the paint.
Once all parts were totally dry it was time for assembly , not much to say here except lots grease was used and care taken no to chip any of the new paint apart from that its just a repeat of the disassembly in reverse.
This was another fun restoration, way longer than i anticipated but i hope you'll agree very interesting none the less.
A new addition to my videos from now on will be a water mark and my channel name popping up in random places throughout the video as im getting rather tired of people re-uploading my content as their own i hope you guys understand.
If you like what you see and have any ideas for the channel or would even like to donate something to restore to the channel please get in touch. :)
And as usual if you liked the video please like share and subscribe and help the channel grow.
#Restoration #jack #subscribe
Really Random Channel
Old Trolley Jack Restoration
Видео Old Trolley Jack Restoration канала RRC Restoration
Показать
Комментарии отсутствуют
Информация о видео
Другие видео канала
 30 Year Old Trolley Jack Restoration
 Old Gear Oil Pump Restoration - BAELZ 6G
 25 Year Old Brembo Brake Caliper Restoration / Rebuild
 Restoration Old skilsaw | Restoring Worm Drive Heavy Duty Corded Circular Saw
 VW Custom Manifold / Restoration
 Motorcycle Fuel Tank Restoration ( Honda TL125 70's)
 AEG | German Bench Grinder | Restoration & Modification | 4K
 1978 Honda ATC 90 Full Restoration - Part 3
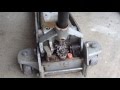 How to repair a floor jack that leaks fluid
 Type R Rocker Cover Restoration ( OEM Wrinkle )
 Restoration Hydraulic jack Lifting car rusty - Tutorial repair jack lift the oil restore old
 Subaru WRX Brake Caliper Perfect Restoration
 Weird 1950's era Fuel Can Restoration.
 HYDRAULIC FLOOR JACK REBUILD
![Gas-Powered Antique Maytag Washing Machine [Restoration]](https://i.ytimg.com/vi/0UPZkmcai-M/default.jpg) Gas-Powered Antique Maytag Washing Machine [Restoration]
Gas-Powered Antique Maytag Washing Machine [Restoration] MAZDA MX-5 Brake Caliper Restoration ( Miata , Eunos )
 Antique Blowtorch Restoration
 Volkswagen Alternator Rebuild / Restoration
 Rusty Old Axe Restoration
 Severely Neglected Wheel Restoration