Samsung Galaxy J7 (2016) Screen Repair, Teardown and Reassemble - Fixez.com
https://www.fixez.com presents the official Samsung Galaxy J7 (2016) Screen Repair, Teardown and Reassemble Guide. This step-by-step repair video will show you how to replace a broken or damaged 2016 Galaxy J7 display assembly, and also how to completely teardown and reassemble your Samsung phone. Visit Fixez.com for all of the DIY Samsung Galaxy J7 (2016) replacement screens, parts and tools you need to quickly, and affordably, fix your device! https://www.fixez.com/store/samsung/samsung-galaxy-j7-2016
If you need your Galaxy J7 (2016) repaired ASAP instead- we have you covered there too. Contact one of our skilled technicians at 866-233-6460 or support@fixez.com and they will fix your Samsung phone for you. They are available Monday to Friday, 9am to 5pm PST.
Subscribe to our YouTube Channel for additional DIY smartphone and tablet teardown and repair videos! https://www.youtube.com/channel/UCDJrZCUtdJQaJq0akRCt3Ng
Like us on Facebook: https://www.facebook.com/fixez.com
Follow us on Twitter: https://twitter.com/fixezdotcom
Samsung Galaxy J7 (2016) Screen Repair, Teardown and Reassemble Guide Video Transcription:
Warning:
You are performing this repair at your own risk
We claim no responsibility for any damages that might occur
The DIY Samsung Galaxy J7 (2016) repair tools used in this video can be found here: https://www.fixez.com/categories/repair-tools
Step 1
Power down your 2016 Samsung Galaxy J7 phone.
Step 2 (Samsung Galaxy J7 (2016) Rear Battery Cover)
Easily remove the Galaxy J7 rear cover. No tools necessary!
Step 3 (Samsung Galaxy J7 (2016) Battery)
Take out the 3300 milliampere-hour (mAh) Samsung Galaxy J7 (2016) battery.
Step 4 (Samsung Galaxy J7 (2016) Exterior Midframe)
Remove the following 18 Phillips screws.
Use the triangle opening tool to work around the Samsung phone and free the exterior midframe.
Step 5 (Samsung Galaxy J7 (2016) Loudspeaker)
Eradicate the Galaxy J7 loudspeaker box from the midframe.
Step 6 (Samsung Galaxy J7 (2016) Motherboard)
Detach the display cable and then the cable for the headphone jack assembly.
With the cables out of the way, lift out the Galaxy J7 motherboard.
Step 7 (Samsung Galaxy J7 (2016) Rear-Facing Camera and Front-Facing Camera)
Spudge up the 5-megapixel Samsung Galaxy J7 front-facing camera.
Remove the 13-megapixel Galaxy J7 (2016) rear-facing camera from the motherboard.
Step 8 (Samsung Galaxy J7 (2016) Vibrator and Earpiece Speaker)
With the tweezers in hand, remove the earpiece speaker.
Pluck out the spring-contact-connected Galaxy J7 vibrator.
Step 9 (Samsung Galaxy J7 (2016) Display Assembly)
Begin to free the Galaxy J7 Super AMOLED display assembly by using the heat gun to warm up the adhesive.
With the precision knife, carefully create separation and insert a playing card to start slicing through the adhesive.
Use playing cards to attack the adhesive securing the display assembly to the interior midframe. Take your time and apply additional heat as needed.
Once you have sliced through the adhesive, be mindful of the display cable and the cables for the bottom buttons when decoupling the 2016 Galaxy J7 screen from the midframe.
Step 10 (Samsung Galaxy J7 (2016) Home Button, Headphone Jack, Cables for the Bottom Buttons, and Home Button Switch)
Extract the Galaxy J7 (2016) home button.
Remove the headphone jack assembly. It includes the home button switch, cables for the bottom buttons, and the headphone jack.
* To reassemble your device, follow the steps in reverse order.
Видео Samsung Galaxy J7 (2016) Screen Repair, Teardown and Reassemble - Fixez.com канала Fixez.com
Показать
Комментарии отсутствуют
Информация о видео
Другие видео канала
 Samsung Galaxy J7 ( 2016) LCD-Touch Screen Replacement || Samsung j7 2016 Display Replacement
 Samsung J7 2016 (J710FN) замена дисплея, разборка,ремонт!!!
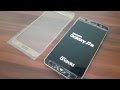 🔧Galaxy J7 Glass Only Replacement (FULL GUIDE) - J7 2016
 🔧Galaxy J7 2017 Glass Only Replacement - Complete guide 60FPS
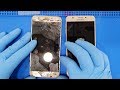 PARAMPARÇA!!! Samsung Galaxy J7 Prime Ekran ve Kasa Değişimi #samsunggalaxyj7prime
 iPhone 11 Pro Max Restoration...
 Samsung Galaxy J7 (J700) Take Apart Repair Guide - RepairsUniverse
 Samsung Galaxy J7 (2016) Disassembly || Tear down || All internal Parts of Galaxy j7 2016
 Cambiar pantalla Samsung J7 2016
 New Free Energy Technology Self Running for Generator At home 2019
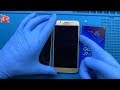 Samsung Galaxy J7 2016 Ekran Değişimi 🇹🇷 | SM-J710
 Samsung J7 2016 J710 disassembly LCD replacement
 Samsung Galaxy J7 2016 Broken Crack Touch Glass Replacement||How to Change Lcdscreen+touch
 How To Replacement On Off Ribbon Samsung J7 2016
 Samsung J700F Disassembly
 Samsung Galaxy J7 2017 lcd screen replacement
 Samsung J710 (J7 2016) Glass Change
 Samsung J7 plus touch glass replacement
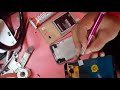 How to replacement J7 display+touch combo - Praveen Sinha
 Galaxy J7 (2016) lcd replacement