Mercedes-Benz GL - How to remove the dashboard / instrument panel | X164
This is how to remove and install the dashboard on Mercedes GL Model (W164)
Removing the dashboard on the GL.
We start at the center console. First remove the faceplate of the ashtray.
This gives you access to the center control panel from below.
First pull it out carefully downwards and then press it upwards slightly.
Now remove the control panel and disconnect the electrical connectors.
There are two screws on the ashtray which have to be removed.
Then you can carefully pull the ashtray out.
There is also a connector on it which has to be disconnected.
After that, start working on the beverage holder in the center console.
Use an assembly wedge to remove the plastic trim.
Two screws have to be removed.
Then you can take out the beverage holder.
There is an electrical connector which has to be disconnected.
There is a clip in the installation opening which also has to be removed.
The next screws to be removed are located in the stowage compartment.
You also have to remove the two screws at the front underneath the ashtray installation slot.
The seats must be set to their rearmost position to remove the center console.
The center console is also connected to the on-board electrical system.
Disconnect all of the connectors.
Now you can finally remove the center console.
Carefully pull out the console towards the rear.
This is what the interior compartment of the GL looks like without the center console.
We now continue with the removal of the dashboard.
First pull out the rubber seal at the front on the A-pillar.
Then remove the A-pillar trim.
We now move on to the instrument cluster. First extend the steering column all the way out.
WIS document AR54.30-P-6015GZ contains the order number for the extraction hook, ...
... which can be used to pull out the instrument cluster.
Again, do not forget to disconnect the connectors.
The next screw to be removed is at the engine hood opening lever.
Now move on to the cover underneath the instrument panel.
Three screws have to be removed and all of the connectors must be disconnected.
You can then remove the cover.
Underneath, there is another screw which has to be removed.
You need a delicate touch to remove the air vents.
Each air vent has three clips which have to be levered out simultaneously ...
... using three screwdrivers. Be careful not to break the clips!
The vent can simply be pulled out once you have pressed in the clips.
You can see where the screwdrivers have to engage on this removed vent.
We now move on to the apron on the steering column. Use an assembly wedge to pry it out.
Then remove the cover at the side of the dashboard.
Here there are some more screws which have to be removed.
The screw on the side of the center console has to be removed.
Then remove the screws on the installation frame of the center console.
There is also a screw to be removed in the cutout for the air vent.
There are two screws for the lower cover in the installation opening of the instrument cluster.
Remove these screws and then carefully pull out the cover.
Disconnect all of the connectors and also unhook the Bowden cable.
Now move over to the passenger side. Is a CD changer installed?
If so, fold it up and remove the side cover.
Remove the three screws at the bottom as indicated here.
Remove the lower panel.
Now start on the glove compartment. Remove all of the screws here.
Disconnect all of the connectors.
Remember that the AUX jack is located on the left-hand side.
There are two more screws to be removed on the frame of the installation opening ...
... of the lower center console on the front passenger side.
Finally, remove the two screws on the side of the center console.
The COMAND is removed in the next step.
Remove the two screws on the silver clips directly below the unit.
Simply pull the clips down and then you can remove the COMAND.
Disconnect all of the connectors here.
The mounting frame for the COMAND and the lower control panel is removed next.
Carefully pull out the plastic frame.
Next, disconnect the battery.
Note: When connecting the battery, the screw has to be tightened to 6 Nm.
The three remaining air vents also have to be removed in the same way as before.
There is another electrical connection here. Disconnect this connection as well.
There is a speaker in the center on the dashboard.
Carefully pry it out using an assembly wedge.
Disconnect the electrical connectors.
There is also a screw to be removed on the side under the cover for the vent slot.
Remove the same screw on the other side.
To remove the CD changer, remove the screws, disconnect the connectors and remove the unit.
There is a yellow connector on the right-hand side under the installation opening for the air vent.
Disconnect this connector, preferably using a screwdriver.
Видео Mercedes-Benz GL - How to remove the dashboard / instrument panel | X164 канала MBOwnersClub
Показать
Комментарии отсутствуют
Информация о видео
Другие видео канала
 Mercedes AC Vents Repair and Install DIY | ML350 And Others | W164
 Mercedes-Benz A-Class - Removal & installation of the dashboard / the instrument panel | W177
 AVIN Mercedes ML, GL, or R Class 9" Android 10 Infotainment Install! (W164, X164, W251)
 🤞 🇩🇪 Used Mercedes Benz GL Reliability | X164 / ML W164 Common Faults Issues and Problems
 Mercedes-Benz GL450 (x164) dashboard trim repair
 W205 / S205 Luftdüsen ausbauen , szellőző kiszerelés, air vent remove
 w164 2009 ml350 remove cluster instrument
 How to Remove Mercedes Front Door Panel ML350 W164
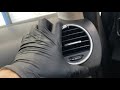 How to remove air vent ac on Mercedes ML500 Ml350 GL450 GL550 W164 X164
 126_벤츠E클래스 엠비언트 송풍구 부메스터 스피커 카오디오 튜닝 다이 설치할수 있습니다. Benz E Class W213 Ambient Vent,Boomers Diagram
 How to Remove/Upgrade Mercedes GL ML R Class Car Stereo with Android - Do it yourself Laslo Pataki
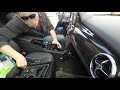 GLK350 Centre Console Removal
 MERCEDES BENZ G WAGON W463 WINDOW REGULATOR REPLACEMENT.
 Instalacja Ambientlight w Mercedesie A176 AMG
 Mercedes GL/ML Center Console Removal/Install. X166 M166.
 Mercedes-Benz SLK - How to remove the center console and COMAND | R171
 EASY DIY CAR HEADLIGHTS REMOVAL AND INSTALLATION FOR MERCEDES ML320, 350 AND GL 450,2006-2008
 AvinUSA 9inch android display upgrade for Mercedes ML350 installation DIY
 My Terrible DIY Video: How to Remove Instrument Cluster from Mercedes ML or GL